Checkpoints
Create the Dialogflow agent
/ 20
Import the Dialogflow agent
/ 20
Set up fulfillment using Cloud Function
/ 40
Test the agent using Dialogflow simulator
/ 20
Building Virtual Agent Fulfillment
GSP792

Overview
In this lab, you will continue working on your Pigeon Travel virtual agent created in the Design Conversational Flows for your Agent and add context as well as set up fulfillment to look up and store reservations entries in Firestore.
What you'll learn
In this lab you will perform the following tasks:
- Create a Firestore Collection
- Setup fulfillment as Cloud Functions code for the agent to be able to lookup and change the name on the reservation.
Setup and requirements
Before you click the Start Lab button
Read these instructions. Labs are timed and you cannot pause them. The timer, which starts when you click Start Lab, shows how long Google Cloud resources will be made available to you.
This hands-on lab lets you do the lab activities yourself in a real cloud environment, not in a simulation or demo environment. It does so by giving you new, temporary credentials that you use to sign in and access Google Cloud for the duration of the lab.
To complete this lab, you need:
- Access to a standard internet browser (Chrome browser recommended).
- Time to complete the lab---remember, once you start, you cannot pause a lab.
How to start your lab and sign in to the Google Cloud console
-
Click the Start Lab button. If you need to pay for the lab, a pop-up opens for you to select your payment method. On the left is the Lab Details panel with the following:
- The Open Google Cloud console button
- Time remaining
- The temporary credentials that you must use for this lab
- Other information, if needed, to step through this lab
-
Click Open Google Cloud console (or right-click and select Open Link in Incognito Window if you are running the Chrome browser).
The lab spins up resources, and then opens another tab that shows the Sign in page.
Tip: Arrange the tabs in separate windows, side-by-side.
Note: If you see the Choose an account dialog, click Use Another Account. -
If necessary, copy the Username below and paste it into the Sign in dialog.
{{{user_0.username | "Username"}}} You can also find the Username in the Lab Details panel.
-
Click Next.
-
Copy the Password below and paste it into the Welcome dialog.
{{{user_0.password | "Password"}}} You can also find the Password in the Lab Details panel.
-
Click Next.
Important: You must use the credentials the lab provides you. Do not use your Google Cloud account credentials. Note: Using your own Google Cloud account for this lab may incur extra charges. -
Click through the subsequent pages:
- Accept the terms and conditions.
- Do not add recovery options or two-factor authentication (because this is a temporary account).
- Do not sign up for free trials.
After a few moments, the Google Cloud console opens in this tab.

Task 1. Enable the API
-
In the Cloud Console go to Navigation menu (
) > APIs & Services > Enable APIs and Services.
-
Click + Enable APIs and Services.
-
Search for Dialogflow.
-
Click the Dialogflow API tile. If the API is not enabled, click Enable.
Task 2. Create your Dialogflow agent
You'll call your agent "pigeon-travel".
-
Go to the Dialogflow Console.
-
Click Sign in with the Google button, and make sure to select the lab credentials you logged into this lab with. Then click Allow.
-
Uncheck the email preferences and check the Terms of Service. Click on Accept.
-
In the left menu, click Create agent.
-
Now add the agent information as you see in the screenshot below:
-
Agent Name:
pigeon-travel -
Default Time Zone:
America/Denver - Google Project: use your lab Project ID
- Click Create.
Click Check my progress to verify the objective.
Task 3. Import your Dialogflow agent
In the previous lab, you exported the Dialogflow agent you built. You will now import it back in and continue building it.
This will create a new virtual agent project. Now you'll want to import the work you've already done.
- If you do not have exported files to use, use this file:
- Download the file to your local workstation.
-
Click on the settings gear icon
next to your agent name.
-
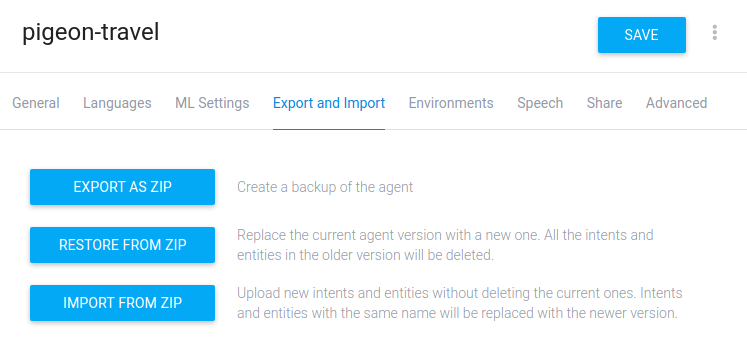
Select the Export and import tab.
-
Click Import from zip.
-
Click Select file and navigate to the zip file which contains the configuration of your virtual agent. You can alternatively drag and drop the file if you prefer.
-
Type in the word "IMPORT" in all caps to enable the import button and click Import.
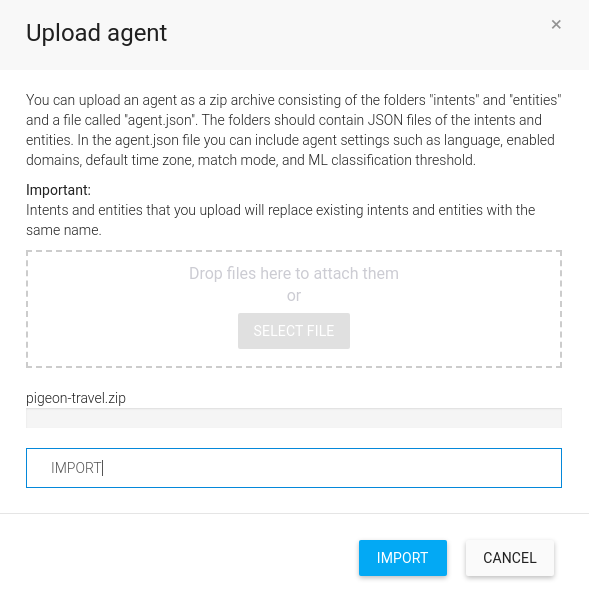
- Click Done to close out the upload window once the import is complete.
Your existing configuration has been imported into your new agent project.
Click Check my progress to verify the objective.
Task 4. Set up fulfillment using Cloud Functions to look up reservations in Firestore
So far the agent does a good job communicating with a customer to get their information including a reservation number. However, the information collected is not checked or recorded anywhere to enable further possible action. In this section, you will set up fulfillment by adding Node.js code and deploy it as a Cloud Function for your agent to look up the current reservation and add the change.
Configure Firestore
-
In the Console go to Navigation menu > Databases > Firestore.
-
Click Create Database.
-
For Select your Firestore mode, Choose Native mode (recommended) and click Continue.
-
For the location select Multi-region and then choose nam5 (United States) for the multi-region.
-
Click Create database. Once it completes you will have the ability to create a new collection.
-
Click Start collection.
-
Fill in the details to replicate the details below, then click Save.
-
Collection ID:
reservations -
Document ID:
100 -
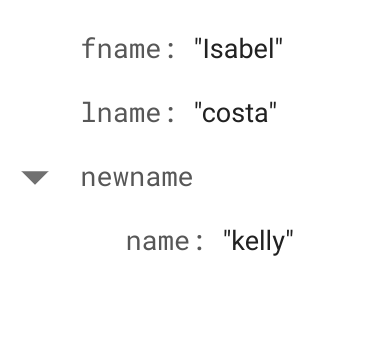
Field name:
fname -
Field type:
string -
Field value:
Isabel
- Then click the Add a Field (+) button to add another:
-
Field name:
lname -
Field type:
string -
Field value:
Costa
- Then click the Add a Field (+) button to add another:
-
Field name:
newname -
Field type:
string -
Field value:
You have now added your first document to a Firestore collection.
Firestore Document IDs Best Practice
-
Avoid the document IDs . and ...
-
Avoid using / forward slashes in document IDs.
-
Do not use monotonically increasing document IDs such as:
- Customer1, Customer2, Customer3, ...
- Product 1, Product 2, Product 3, ...
Such sequential IDs can lead to hotspots that impact latency.
Dialogflow Fulfillment
-
Navigate to the Diaglflow console and click on Fulfillment in the left menu. It may take a few minutes for the resources to be provisioned.
-
Next to the Inline Editor option, slide the slider to the right so it appears Enabled. This enables the Cloud Functions editor within your Dialogflow agent.
-
Once enabled, you will notice a default template in index.js.
-
Click on the Deploy button on the bottom right. This may take a few minutes.
-
Once deployment is successful, go into your Google Cloud console, and using the menu on the left, navigate to Cloud Functions to confirm if the function has been deployed.
Click Check my progress to verify the objective.
-
Back in the Fulfillment section of your Dialogflow console, click on the index.js tab.
-
Again notice that there is already some starter code, including functions to handle the default welcome and fallback intents. You will first add the following lines below to be able to work with Firestore.
Add the following code above the line that says process.env.DEBUG = 'dialogflow:debug';:
Add this code block below the line that says process.env.DEBUG = 'dialogflow:debug';:
- Now add the following code for handling or reservations after the handler functions for Welcome and Fallback intents.
Add the following code block below the line that says
exports.dialogflowFirebaseFulfillment = functions.https.onRequest((request, response) => {:
- Modify the
intentMapto include an entry to handle thename.reservation-getnamemapping to the function you just added:
so that it looks something like this:
- In
package.jsontab make sure thatfirebase-adminis set to"^5.13.1":
-
Click the Deploy button to save and deploy the code.
-
Click on the Intents in the left menu, and go into the
name.reservation-getnameinside thename.reservationintent and navigate all the way down to Fulfillment, under click the toggle switch for Enable the webhook call for this intent to enable it. Save the intent. -
Try it out in the simulator by typing out the question: change name on booking.
You will get the default response like: Sure I can help you to change your name on the reservation. Can I have your first name?.
-
Try by entering any username you want.
-
Then Try entering 100 when you get the default response asking for the reservation number.
-
After that enter the new name for which you want to make a reservation, for example: Kelly.
-
After the successful completion, you will receive the default response like: Thank you dylan. I have changed the name on reservation number 100 to be kelly.
-
You can confirm this further by going into the Cloud Console and using the left menu, navigate to Firestore > Data.
You will see the entry for your name change. Notice a new key/value pair was added, this way you can see what the original name was plus know what the new name is.
-
Examine the logs for code errors in your Dialogflow console. On the bottom left of the Fulfillment section, click View execution logs in the Google Cloud console to view the logs.
-
Examine the logs to see if there are any errors. Click Navigation menu > Operations > Logging.
-
In the Logs Explorer, select Cloud Function > dialogflowFirebaseFulfillment. You can verify all related logs here.
Alternatively, you can go to Navigation menu > Cloud Functions. Click LOGS inside your created function to view the logs.
Click Check my progress to verify the objective.
Task 5. (Optional) Export your code
Export your work so you can use it in the next lab. Click on the Source tab under Cloud Functions, scroll down, and you'll see a button to Download zip.
Export your agent
Export your agent as a zip file so that you can import it later when you start the next lab. This way you can reuse the intents and entities you've configured so far.
-
Click on the settings gear ⚙ icon next to your agent name in the left menu.
-
On the settings page that opens up, go to the Export and Import tab.
-
Click on Export as zip. This will download your agent into a local zip file.
Congratulations!
You have added context to your virtual agent as well as set up fulfillment to look up and store reservations entries in Firestore.
Google Cloud training and certification
...helps you make the most of Google Cloud technologies. Our classes include technical skills and best practices to help you get up to speed quickly and continue your learning journey. We offer fundamental to advanced level training, with on-demand, live, and virtual options to suit your busy schedule. Certifications help you validate and prove your skill and expertise in Google Cloud technologies.
Manual Last Updated February, 05 2024
Manual Last Tested February, 05 2024
Copyright 2024 Google LLC All rights reserved. Google and the Google logo are trademarks of Google LLC. All other company and product names may be trademarks of the respective companies with which they are associated.