Checkpoints
Load the data inside Cloud Storage Bucket
/ 25
Add Cloud Data Fusion API Service Agent role to service account
/ 25
Build and execute batch pipeline
/ 25
Build and execute dynamic pipeline
/ 25
Building Dynamic Pipelines in Cloud Data Fusion Using Macros
- GSP809
- Overview
- Setup and requirements
- Task 1. Load the data
- Task 2. Add the necessary permissions for your Cloud Data Fusion instance
- Task 3. Build a batch pipeline
- Task 4. Continue building the pipeline in Pipeline Studio
- Task 5. Test and deploy the pipeline
- Task 6. Perform dynamic loading and write data
- Congratulations!
GSP809

Overview
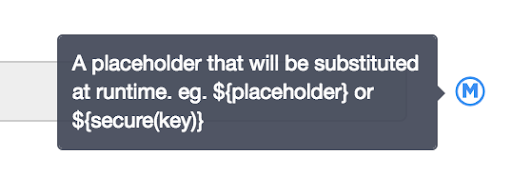
In Data Fusion, you can use Macros to introduce dynamic variables for plugin configurations so that you can specify the variable substitutions at runtime.
Macros are defined as variables wrapped inside of a ${ }. Plugins that have macro-enabled fields will contain a blue M icon.
A typical use case for macros is to allow for variable substitution when the pipeline is run, so instead of using hard-coded paths, you could use dynamic paths. This way you’re able to specify which particular file you want to process when the pipeline is invoked. In addition to macros, you'll use wildcards as well.
Objectives
In this lab, you learn how to:
- Create a simple batch pipeline.
- Modify the batch pipeline to use Macros for certain plugin configurations.
- Deploy the dynamic pipeline and run it using runtime arguments.
Setup and requirements
For each lab, you get a new Google Cloud project and set of resources for a fixed time at no cost.
-
Sign in to Google Cloud Skills Boost using an incognito window.
-
Note the lab's access time (for example, 02:00:00), and make sure you can finish within that time.
There is no pause feature. You can restart if needed, but you have to start at the beginning. -
When ready, click Start lab.
Note: Once you click Start lab, it will take about 15 - 20 minutes for the lab to provision necessary resources and create a Data Fusion instance. During that time, you can read through the steps below to get familiar with the goals of the lab. When you see lab credentials (Username and Password) in the left panel, the instance is created and you can continue logging into the console. -
Note your lab credentials (Username and Password). You will use them to sign in to the Google Cloud console.
-
Click Open Google console.
-
Click Use another account and copy/paste credentials for this lab into the prompts.
If you use other credentials, you'll receive errors or incur charges. -
Accept the terms and skip the recovery resource page.
Log in to Google Cloud Console
- Using the browser tab or window you are using for this lab session, copy the Username from the Connection Details panel and click the Open Google Console button.
- Paste in the Username, and then the Password as prompted.
- Click Next.
- Accept the terms and conditions.
Since this is a temporary account, which will last only as long as this lab:
- Do not add recovery options
- Do not sign up for free trials
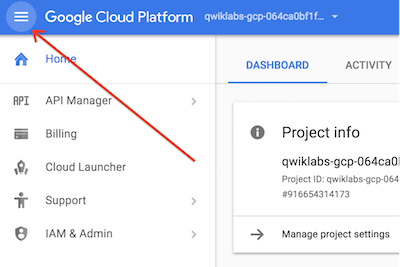
- Once the console opens, view the list of services by clicking the Navigation menu (
) at the top-left.
Activate Cloud Shell
Cloud Shell is a virtual machine that contains development tools. It offers a persistent 5-GB home directory and runs on Google Cloud. Cloud Shell provides command-line access to your Google Cloud resources. gcloud is the command-line tool for Google Cloud. It comes pre-installed on Cloud Shell and supports tab completion.
-
Click the Activate Cloud Shell button (
) at the top right of the console.
-
Click Continue.
It takes a few moments to provision and connect to the environment. When you are connected, you are also authenticated, and the project is set to your PROJECT_ID.
Sample commands
- List the active account name:
(Output)
(Example output)
- List the project ID:
(Output)
(Example output)
Check project permissions
Before you begin working on Google Cloud, you must ensure that your project has the correct permissions within Identity and Access Management (IAM).
-
In the Google Cloud console, on the Navigation menu (
-
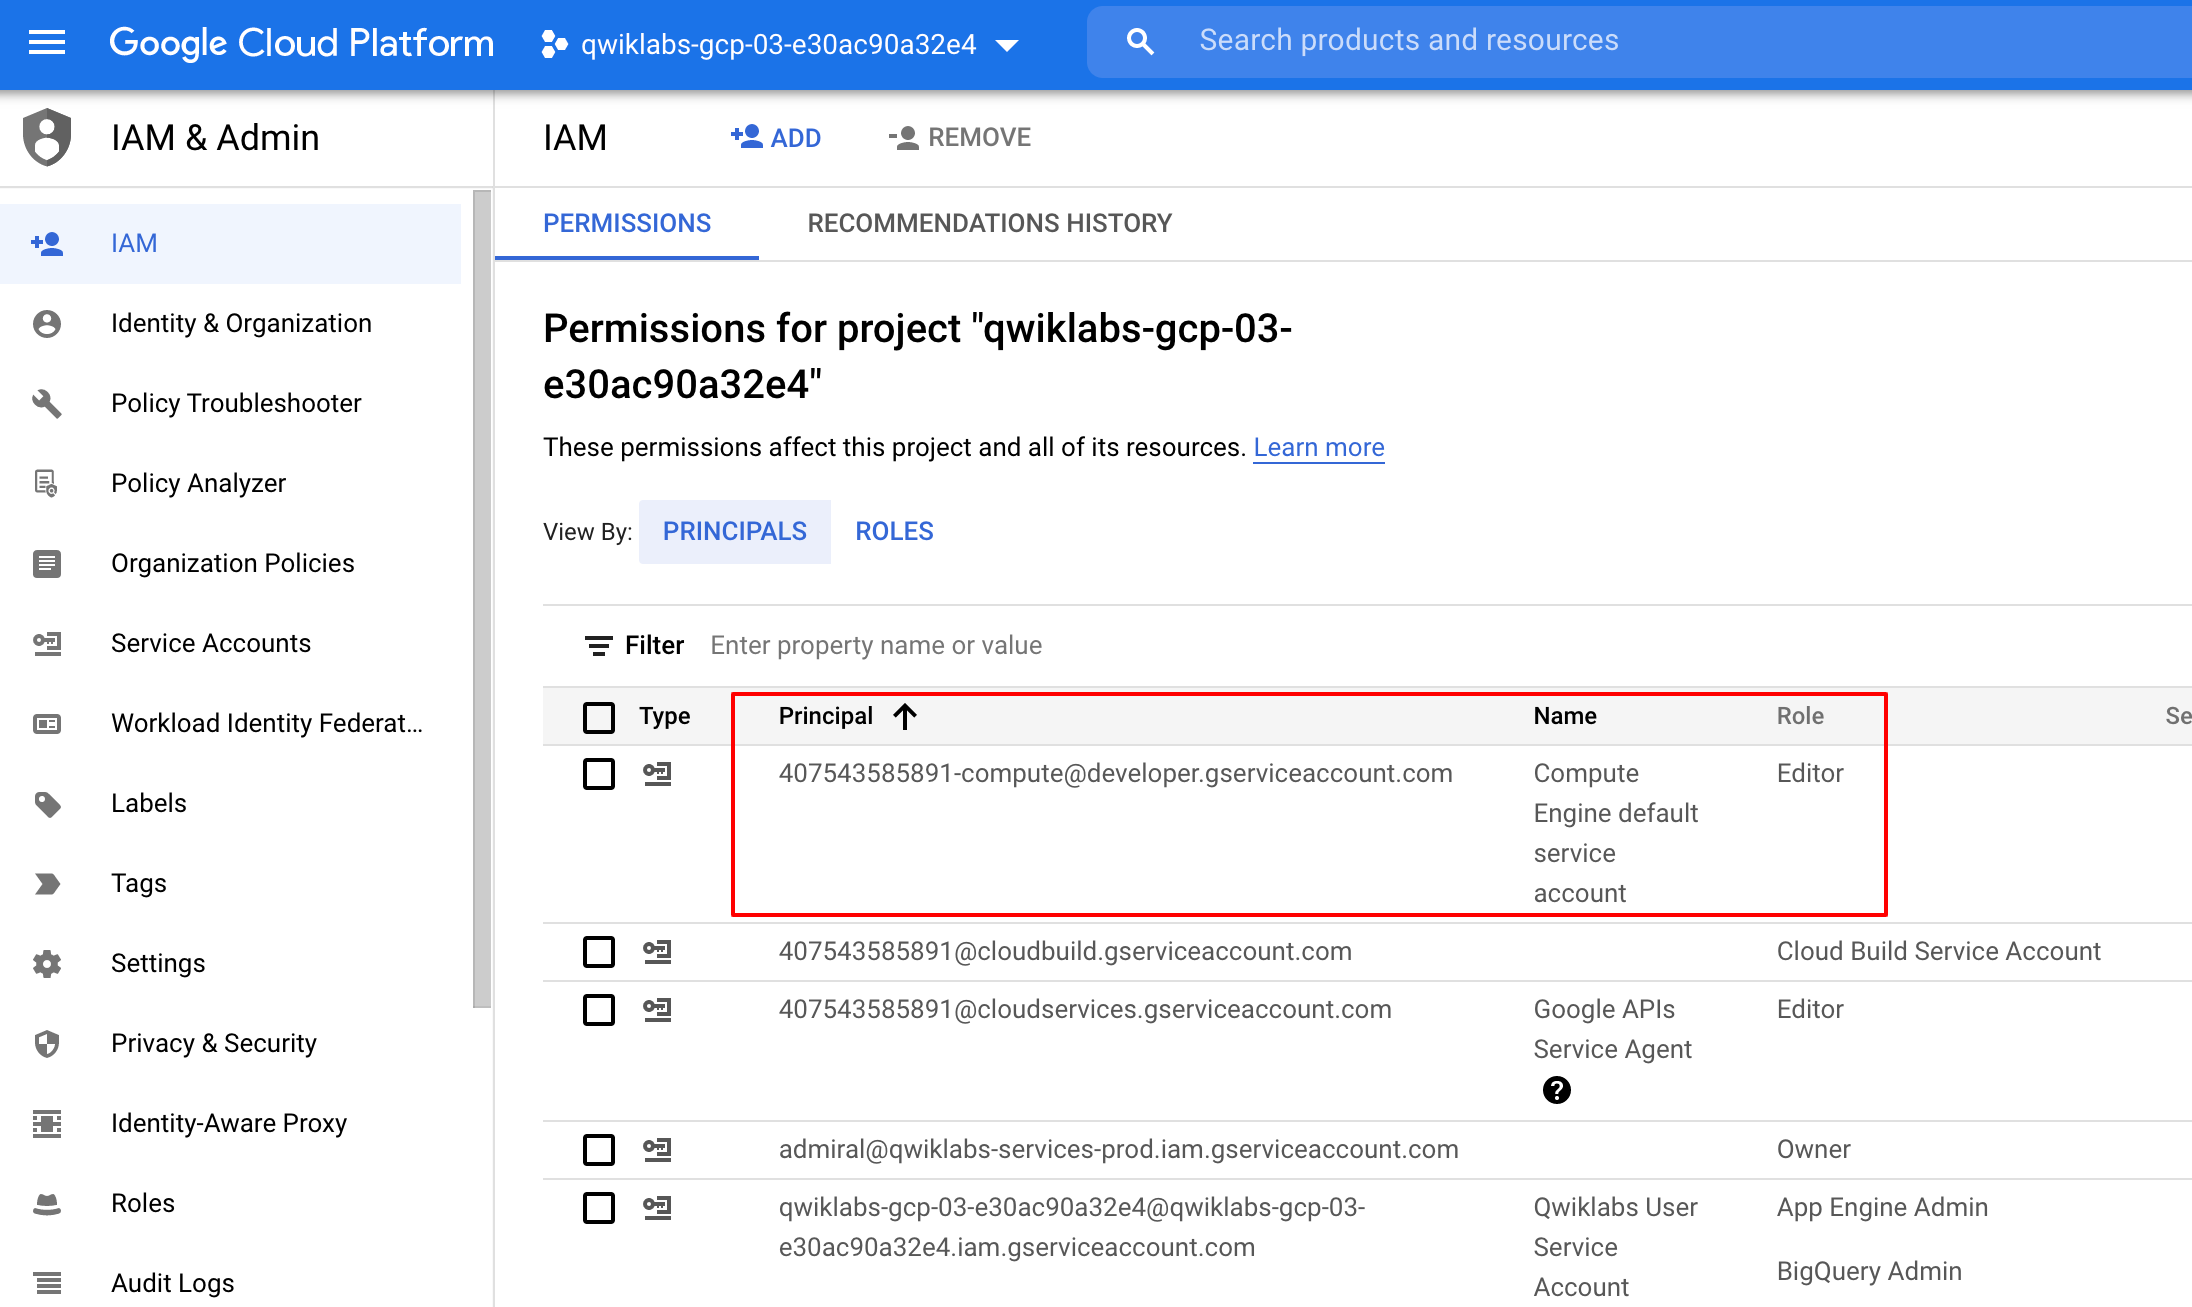
Confirm that the default compute Service Account
{project-number}-compute@developer.gserviceaccount.comis present and has theeditorrole assigned. The account prefix is the project number, which you can find on Navigation menu > Cloud overview.
If the account is not present in IAM or does not have the editor role, follow the steps below to assign the required role.
-
In the Google Cloud console, on the Navigation menu, click Cloud overview.
-
From the Project info card, copy the Project number.
-
On the Navigation menu, click IAM & Admin > IAM.
-
At the top of the IAM page, click Add.
-
For New principals, type:
Replace {project-number} with your project number.
-
For Select a role, select Basic (or Project) > Editor.
-
Click Save.
Task 1. Load the data
You will create a Cloud Storage bucket in your project so that you can load some sample data for Wrangling. Cloud Data Fusion will later read data out of this storage bucket
- In Cloud Shell, execute the following commands to create a new bucket:
This creates a bucket with the same name as your Project ID.
- Run the commands below to copy the CSV files into your bucket:
Click Check my progress to verify the objective.
Task 2. Add the necessary permissions for your Cloud Data Fusion instance
- In the Google Cloud console, from the Navigation menu select Data Fusion > Instances.
Next, you will grant permissions to the service account associated with the instance, using the following steps.
-
From the Google Cloud console, navigate to the IAM & Admin > IAM.
-
Confirm that the Compute Engine Default Service Account
{project-number}-compute@developer.gserviceaccount.comis present, copy the Service Account to your clipboard. -
On the IAM Permissions page, click +Grant Access.
-
In the New principals field paste the service account.
-
Click into the Select a role field and start typing "Cloud Data Fusion API Service Agent", then select it.
-
Click Save.
Click Check my progress to verify the objective.
Grant service account user permission
-
In the console, on the Navigation menu, click IAM & admin > IAM.
-
Select the Include Google-provided role grants checkbox.
-
Scroll down the list to find the Google-managed Cloud Data Fusion service account that looks like
service-{project-number}@gcp-sa-datafusion.iam.gserviceaccount.comand then copy the service account name to your clipboard.

-
Next, navigate to the IAM & admin > Service Accounts.
-
Click on the default compute engine account that looks like
{project-number}-compute@developer.gserviceaccount.com, and select the Permissions tab on the top navigation. -
Click on the Grant Access button.
-
In the New Principals field, paste the service account you copied earlier.
-
In the Role dropdown menu, select Service Account User.
-
Click Save.
Task 3. Build a batch pipeline
-
In the Cloud Console, from the Navigation Menu, click on Data Fusion, then click the View Instance link next to your Data Fusion instance. Select your lab credentials to sign in. If prompted to take a tour of the service, click on No, Thanks.
You should now be in the Cloud Data Fusion UI.
-
On the Cloud Data Fusion Control Center, use the Navigation menu to expose the left menu, then choose Wrangler.
-
When Wrangler loads, on the left side is a panel with the pre-configured connections to your data, including the Cloud Storage connection.
-
Under GCS, select Cloud Storage Default.
-
Click on the bucket corresponding to your Project ID.
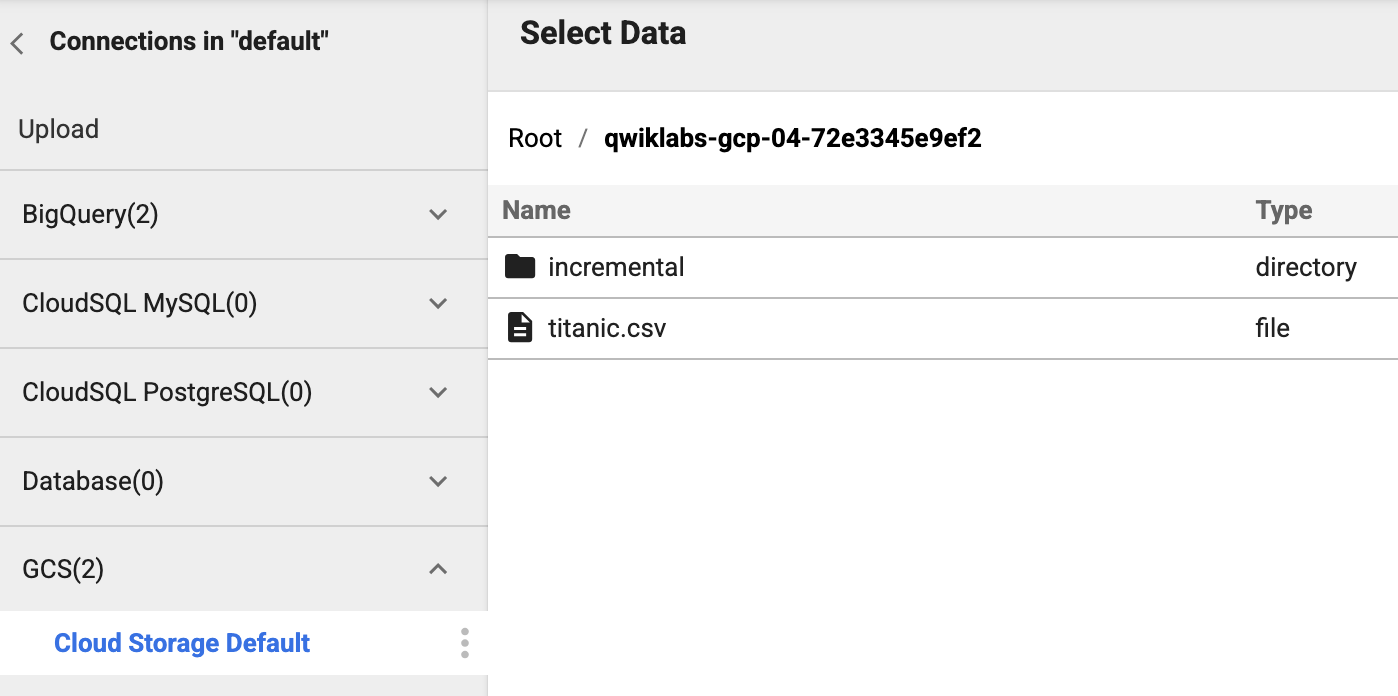
-
Click on titanic.csv. For Parsing Options, in Format choose text, then click CONFIRM.
The data is loaded into the Wrangler screen in row/column form.
Once the file has been loaded into Wrangler, you can start applying the data transformations iteratively.
-
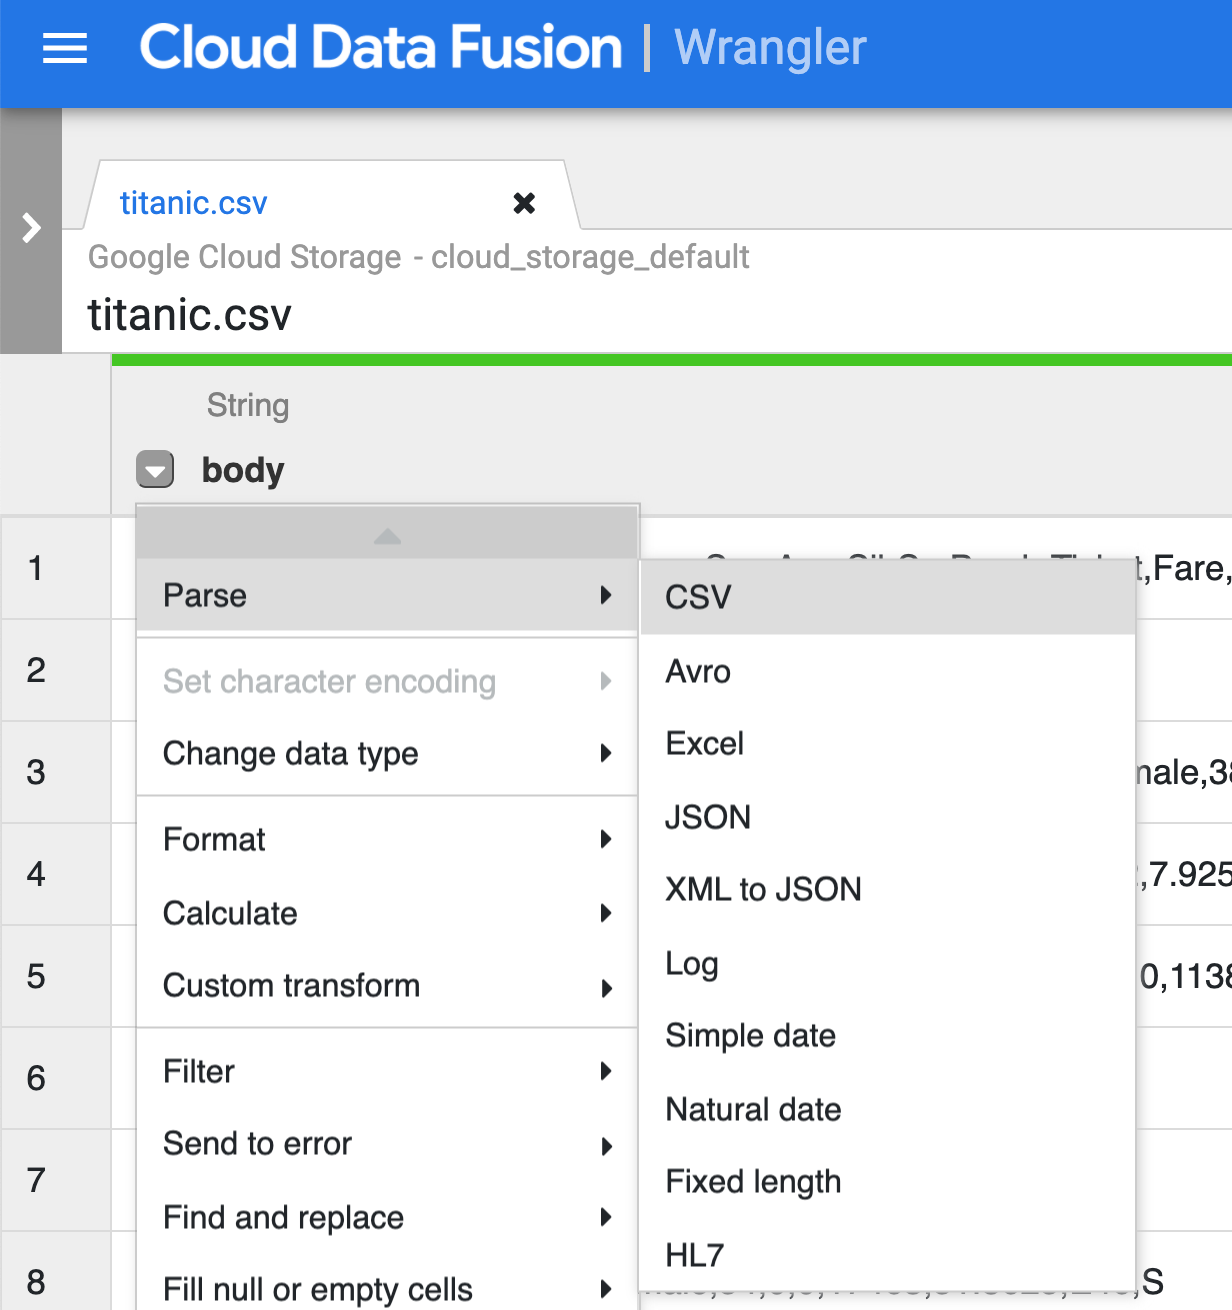
Click the dropdown icon from the first column (body) heading, select the Parse menu item, then choose CSV from the submenu.
-
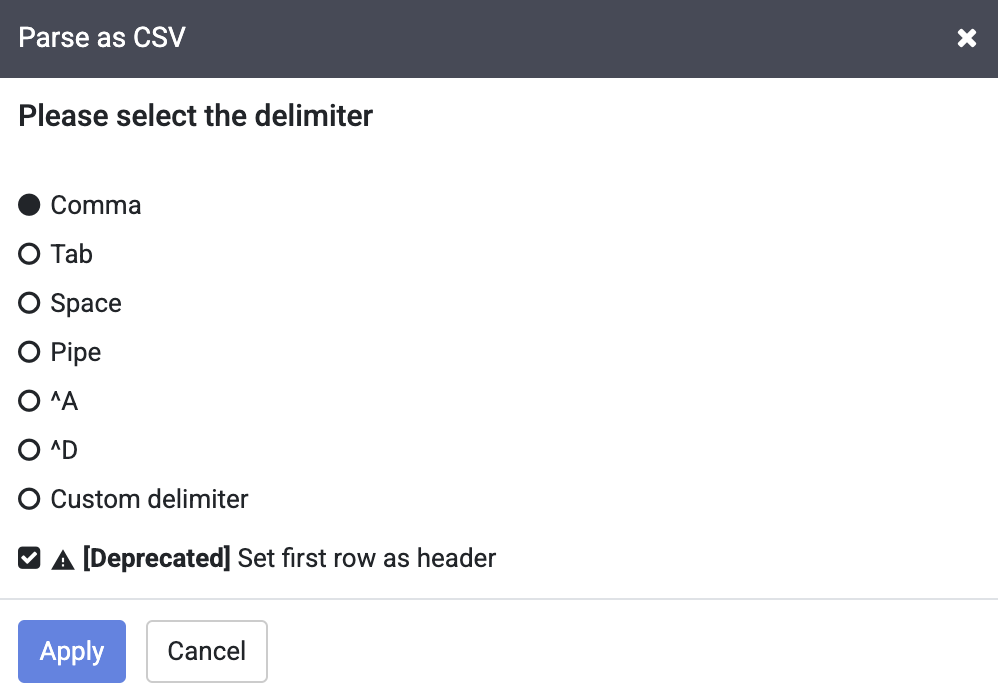
In the raw data, you can see that the first row consists of column headings, so select the option to Set first row as header in the dialog box for Parse as CSV, and click Apply.
You can ignore the deprecated warning.
-
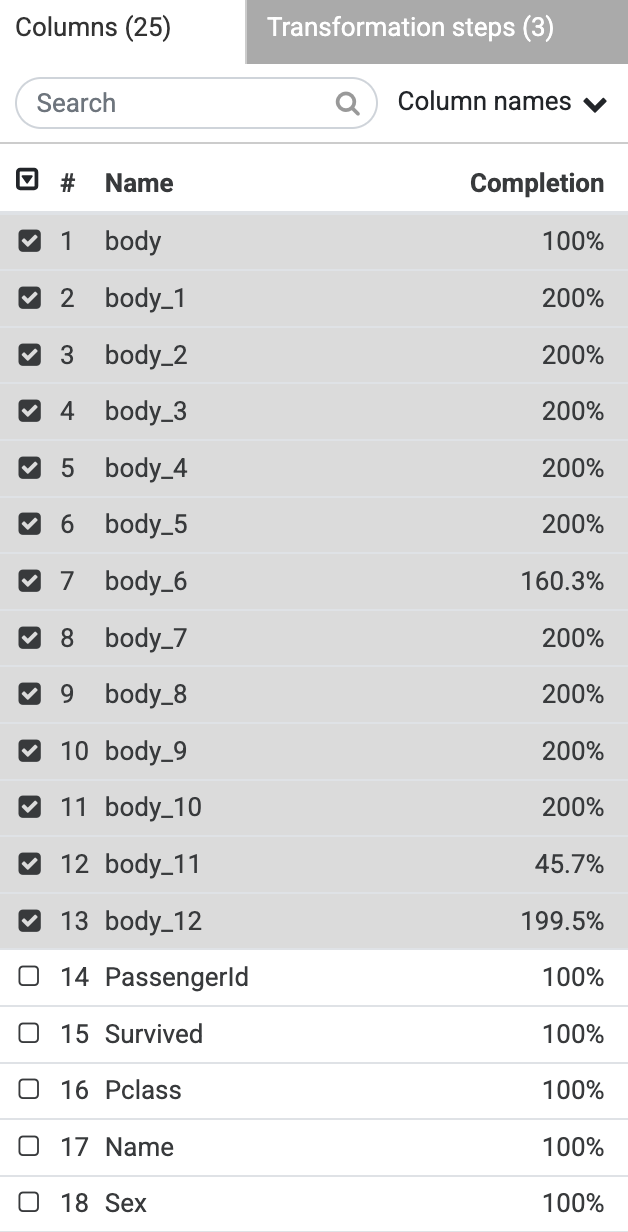
In the Columns pane, select all of the body fields.
-
Click the dropdown icon from the first column (body) heading, and select Delete selected columns.
-
Click on the Create a Pipeline button to jump into the next section to create a pipeline, where you’ll see how the ETL pipeline comes together.
-
When presented with the next dialog, select Batch pipeline to continue. This launches the Pipeline Studio.
Task 4. Continue building the pipeline in Pipeline Studio
-
The rest of the pipeline building tasks will take in the Pipeline Studio, the UI that lets you compose data pipelines visually. At the moment, you have the E (Extract) and T (Transform) nodes of our ETL pipeline. To complete this pipeline, you will add the BigQuery sink, the L portion of our ETL.
-
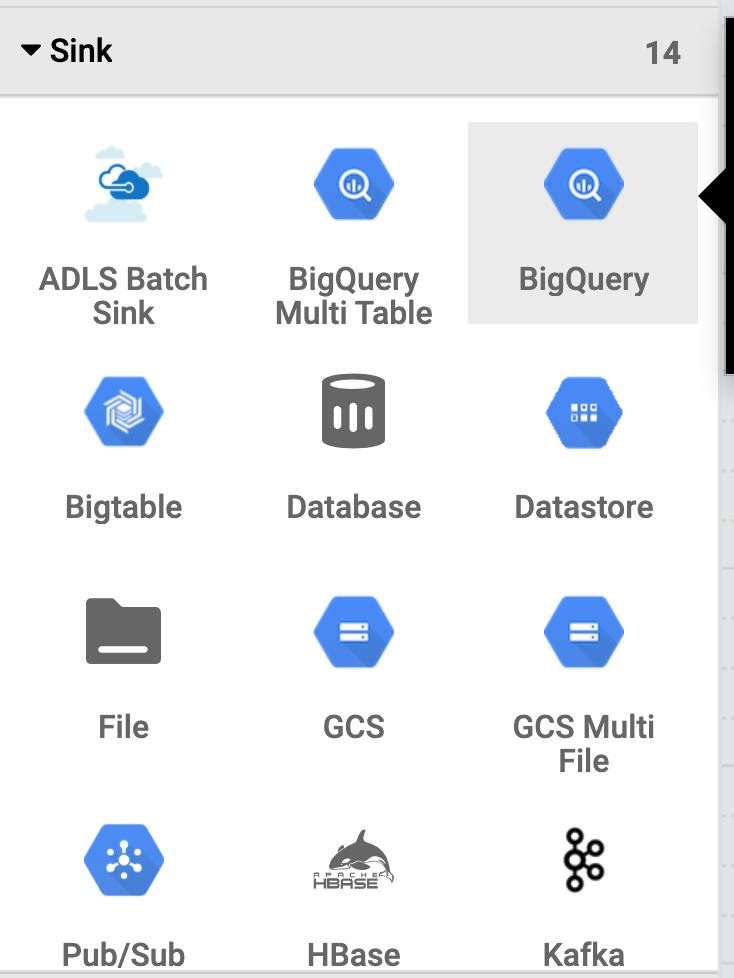
To add the BigQuery sink to the pipeline, navigate to the Sink section on the left of the screen and click on the BigQuery icon to place it on the canvas.
-
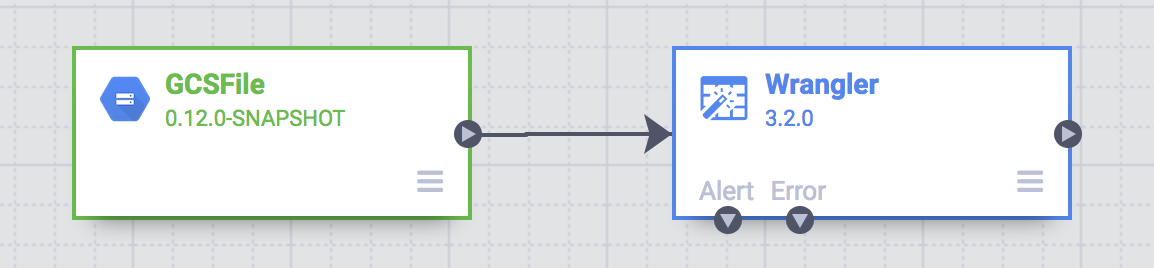
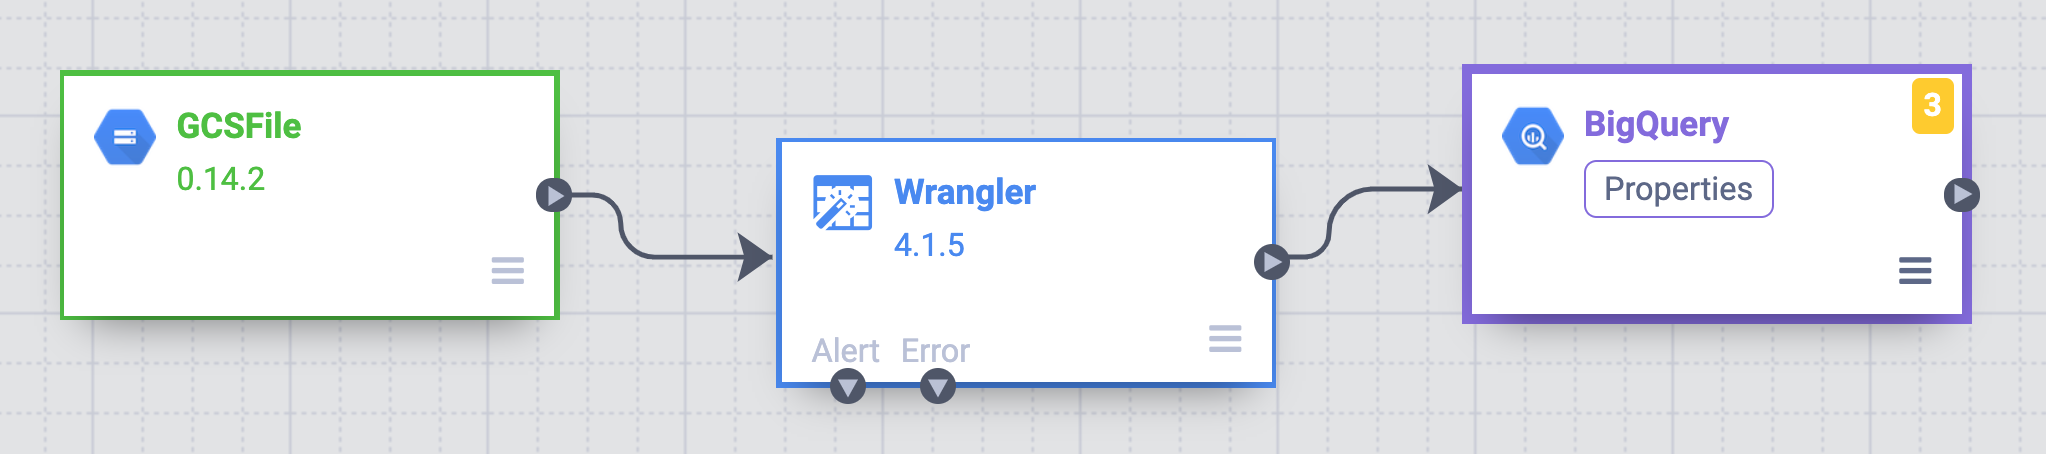
Once the sink has been placed on the canvas, connect the Wrangler node with the BigQuery node. Do this by dragging the arrow from the Wrangler node to connect to the BigQuery node as illustrated below.
All that’s left top do now is to specify some configuration options so that you can write the data to the dataset you want.
-
Hover your mouse over the BigQuery node and a Properties button will be displayed. Click on this button to open up the plugin’s configuration settings.
-
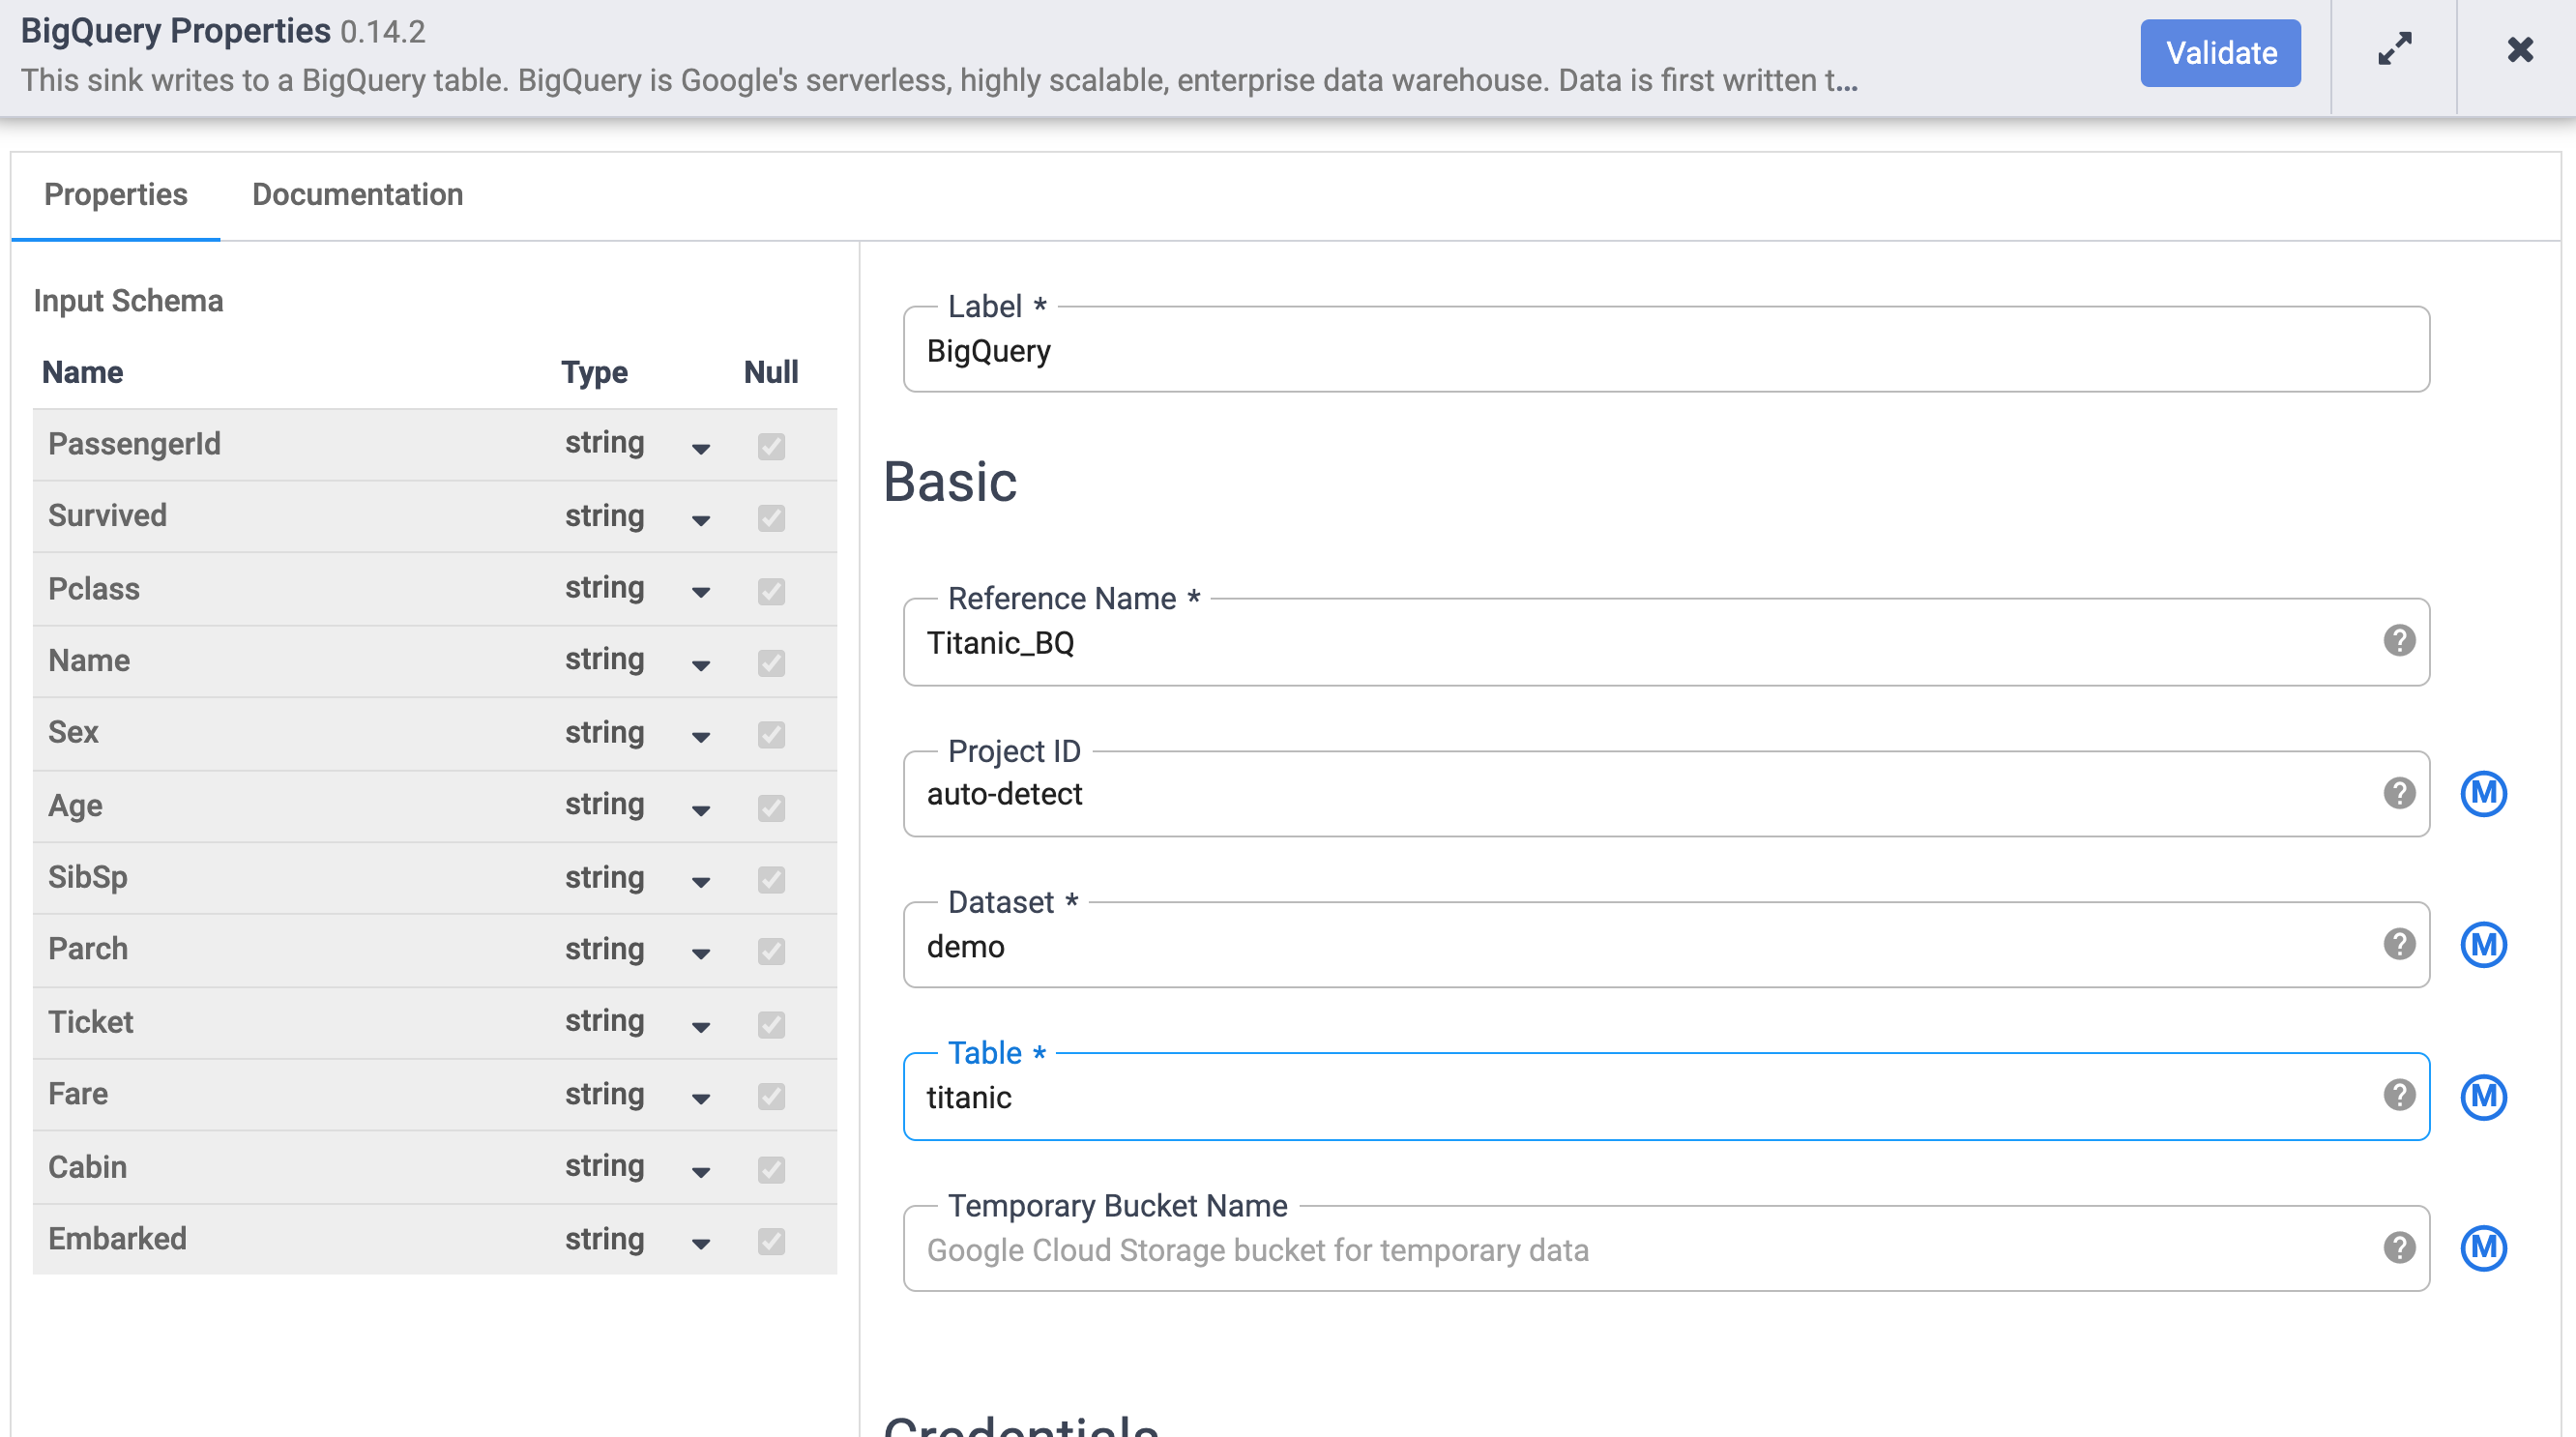
Set the properties of the BigQuery Sink as follows:
- Under Reference Name, enter
Titanic_BQ. - Under Dataset, enter
demo. - Under Table, enter
titanic.
- Under Reference Name, enter
-
Click on the Validate button on the top right to confirm there are no errors.
-
After it completes validating, click on the X to close the BigQuery properties dialog box.
Task 5. Test and deploy the pipeline
-
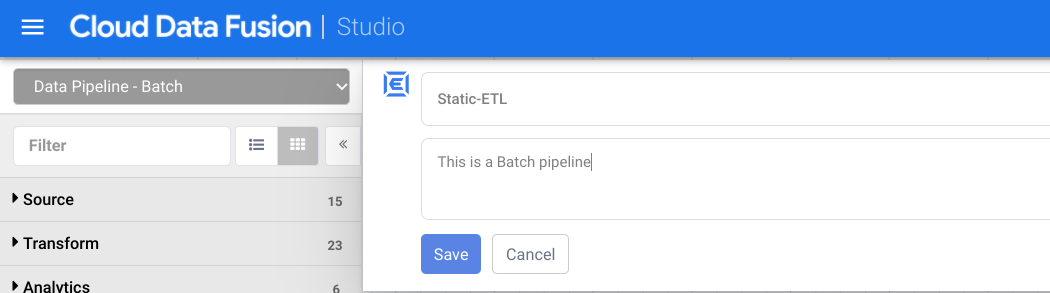
Make sure to name and save your draft so you won’t lose any of your work. At the top of your canvas, click on Name your pipeline and add a Name (like
Static-ETL) and an appropriate Description for your pipeline, as illustrated below, then click Save. -
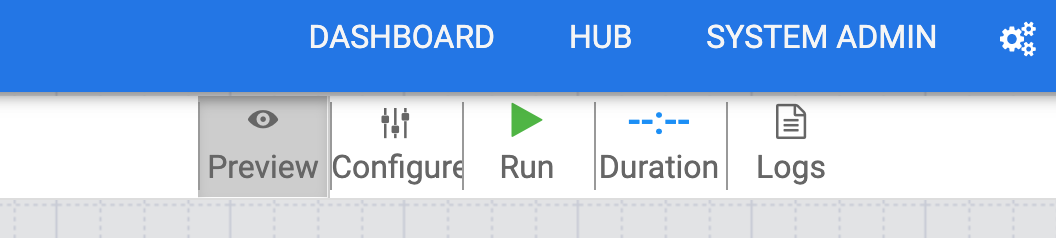
To test your pipeline, click on the Preview icon.
-
Next, click on the Run icon to run the pipeline in preview mode. While the pipeline is running in preview mode, no data is actually written to the BigQuery table, but you will be able to confirm that data is being read properly and that it will be written as expected once the pipeline is deployed. The Preview button is a toggle so be sure to click it again to get out of preview mode when done.
-
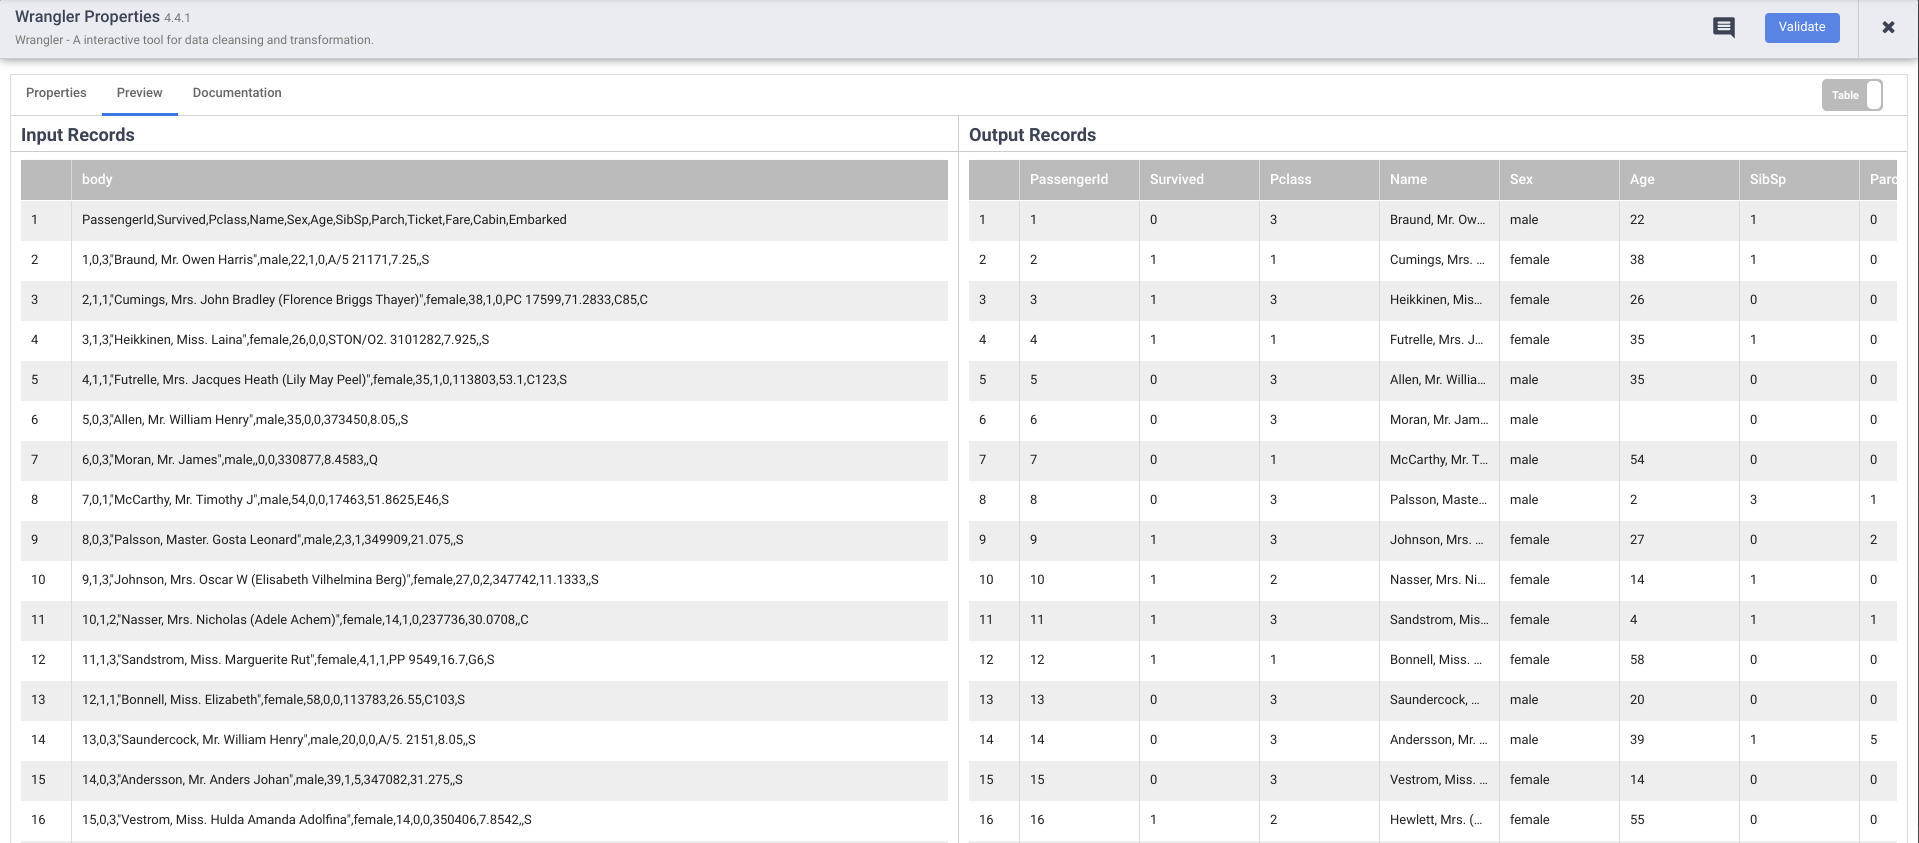
While still in preview mode, click on the Wrangler node. If all went well, you should see the raw data that came in from the input, the node to the left, and the parsed records that will be emitted as output, to the node on the right.
Each node that operates on data should show you similar output. This is a good way to proof your work to make sure you are on the right track before deploying your pipeline. If you encounter any errors you can easily fix it while in draft mode.
-
Click on the X in the top right to close the properties box.
-
If everything looks good so far, then click on Preview again to exit preview mode.
-
Next, deploy the pipeline by clicking on the Deploy icon.
-
You will see a confirmation dialog that your pipeline is being deployed.
Once your pipeline has successfully deployed, you’re ready to process some actual data and perform an ETL. Now it’s time to run the pipeline and load some data into BigQuery.
-
Click on the Run icon to execute the ETL job.
-
When done, you should see pipeline status changes to Succeeded indicating that the pipeline ran successfully.
-
As data is processed by the pipeline you will see metrics being emitted by each node in the pipeline indicating how many records have been processed.

So you have built and deployed an ETL pipeline. In the next section, you’ll learn how to turn this simple pipeline into something more dynamic so that you can process any number of records across many files and load them using the same transformation steps as before.
Click Check my progress to verify the objective.
Task 6. Perform dynamic loading and write data
The goal of this section is to take a sequence of files, [titanic1.csv, titanic2.csv, …, titanincN.csv] that you copied into your Cloud Storage bucket, and load them all through the same pipeline and apply the same transformations in parallel.
In order to include all the files that need to be processed as input to the E phase of the ETL, the input string must accommodate the parameterization of the file in sequence.
-
To get started, duplicate the pipeline you previously deployed. Click on the Actions button and Duplicate will be presented as a drop down option.
This will load the pipeline into the studio in draft mode and automatically increment the pipeline with a version number.

In the steps below, you will edit the Path field of Cloud Storage source plugin and use macro notation. You will do the same for the BigQuery sink and specify the Dataset and the Table as macros.
-
Click on the Properties of the Cloud Storage node.
-
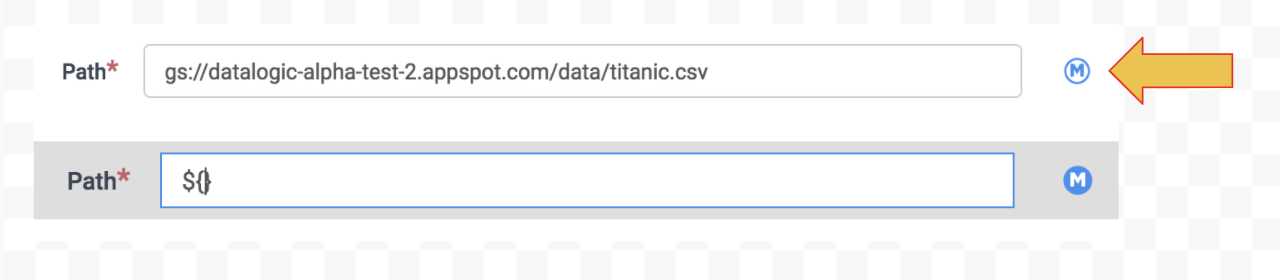
Under the Path setting, click the Macro icon to the right of the form field. This will clear out any text that was previously in the field and pre-populate the ${ } macro notation.
There are a number of choices available for consideration at this point. The goal is to convert the existing static path to one that will meet your needs in terms of how you organize your data, or the level of granularity you need for specifying paths.
For this example, you will read the five CSV files (titanic1.csv through titanic5.csv) from your Cloud Storage bucket.
- Set the Path as:
gs://YOUR-BUCKET-NAME/incremental/${file.name}. Be sure to replace YOUR-BUCKET-NAME with the name of your actual Cloud Storage bucket.

-
Click on the Validate button on the top right. Once validated, close the dialog box.
-
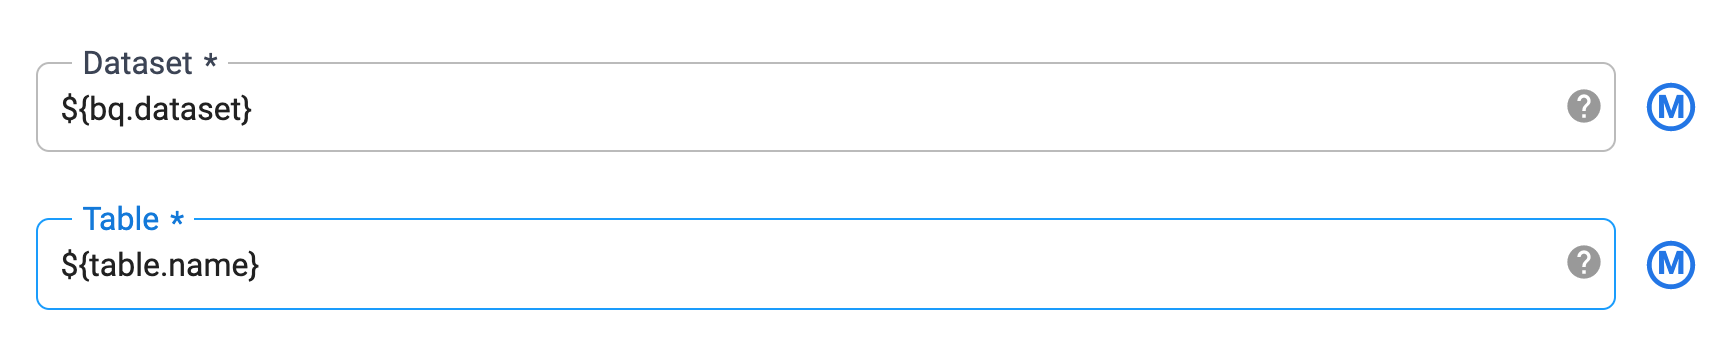
Now you will do the same for the BigQuery node of your pipeline. Click on the properties of the BigQuery node.
-
Replace the Dataset field with
${bq.dataset}and the Table field with${table.name}.
-
The changes to the pipeline nodes are now complete. Rename the pipeline as
Dynamic_ETLand update the description as appropriate. -
Click Deploy to deploy the pipeline.
-
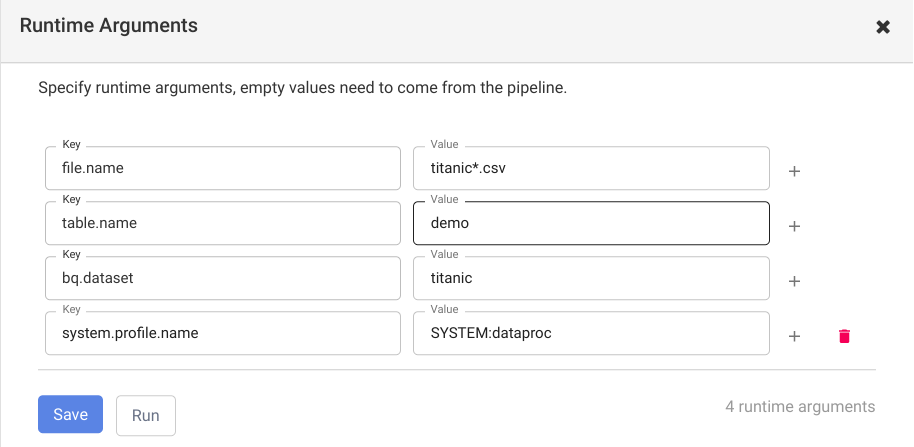
Next, click Run. You will now see that a new dialog box is presented where you see the macro names and the empty fields where you can type in the desired values:
- For file.name, enter
titanic*.csv. - For bq.dataset, enter
demo. - For table.name, enter
titanic.
- Click Save at the bottom of the dialog box and click Run to run the pipeline with the provided runtime values.
* to read all the files that begin with titanic and end with .csv. This will selectively read only the titanic files and filter out any other CSV files that may exist in that directory. Optionaly, if you only have CSV files in that directory you can simply set the value to an asterisk ( * ) or a forward slash ( / ) and read all the files in the directory.
Click Check my progress to verify the objective.
Congratulations!
You have now learned how to leverage Macros to make your Data Fusion pipelines more dynamic and be able to provide runtime arguments for your pipeline runs.
Continue your quest
A quest is a series of related labs that form a learning path. Completing a quest earns you a badge to recognize your achievement. You can make your badge or badges public and link to them in your online resume or social media account. Enroll in a quest and get immediate completion credit. Refer to the Google Cloud Skills Boost catalog for all available quests.
Take your next lab
Continue your learning with Creating Reusable Pipelines in Cloud Data Fusion.
Manual Last Updated December 21, 2023
Lab Last Tested December 21, 2023
Copyright 2022 Google LLC All rights reserved. Google and the Google logo are trademarks of Google LLC. All other company and product names may be trademarks of the respective companies with which they are associated.