Checkpoints
Build an Agent
/ 20
Create your first intent
/ 30
Create custom intent
/ 20
Use slot-filling
/ 30
Design Conversational Flows for your Agent
GSP791

Overview
Contact Center AI can increase customer satisfaction and operational efficiency by improving call deflection rates, and achieve shorter handling, while making overall operations faster and more effective.
In this lab you'll learn how to use Dialogflow to create a conversational interface and perform the following tasks:
- Design end-user's intentions
- Build a conversational agent for an online travel agency
- Define intents for our online travel agency use case to match typical user queries
Lab scenario
You have been asked to build a plan to increase the Net Promoter Score and increase customer satisfaction. With Contact Center AI you are able to increase call availability, remove complicated menu systems, and achieve shorter handling times. The heart of Contact Center AI is its conversational core, whose human-like interactions are redefining the possibilities of AI-powered conversation.
Dialogflow is one of the core components of Contact Center AI. Dialogflow will identify customer intent and determine what to say and do next. With this you are able to increase call availability and achieve shorter handling times, thus increasing your Net Promoter Scores and customer satisfaction.
Dialogflow components
Agents
A Dialogflow agent is a virtual agent that handles conversations with your end users. It is a natural language understanding module that understands the nuances of human language. Dialogflow translates end user text or audio during a conversation to structured data that your apps and services can understand. You design and build a Dialogflow agent to handle the types of conversations required for your system.
A Dialogflow agent is similar to a human call center agent. You train them both to handle expected conversation scenarios, and your training does not need to be overly explicit.
Intents
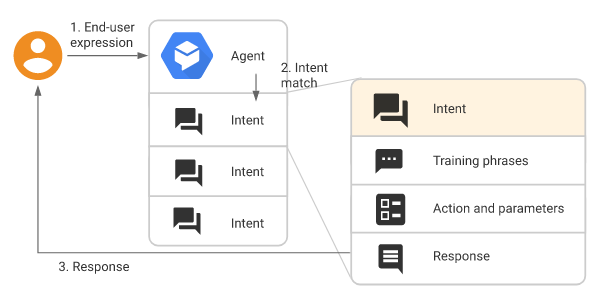
An intent categorizes an end-user's intention for one conversation turn. For each agent, you define many intents, where your combined intents can handle a complete conversation. When an end-user writes or says something, which is referred to as an end-user expression, Dialogflow matches the end-user expression to the best intent in your agent. Matching an intent is also known as intent classification.
For example, you could create a weather agent that recognizes and responds to end user questions about the weather. You would likely define an intent for questions about the weather forecast. If an end user says "What's the forecast?", Dialogflow would match that end user expression to the forecast intent. You can also define your intent to extract useful information from the end user expression, like a time or location for the desired weather forecast. This extracted data is important for your system to perform a weather query for the end user.

A basic intent contains the following:
- Training phrases: These are example phrases for what end users might say. When an end user expression resembles one of these phrases, Dialogflow matches the intent. You don't have to define every possible example, because Dialogflow's built-in machine learning expands on your list with other similar phrases.
- Action: You can define an action for each intent. When an intent is matched, Dialogflow provides the action to your system, and you can use the action to trigger certain actions defined in your system.
- Parameters: When an intent is matched at runtime, Dialogflow provides the extracted values from the end user expression as parameters. Each parameter has a type, called the entity type, which dictates exactly how the data is extracted. Unlike raw end user input, parameters are structured data that can easily be used to perform some logic or generate responses.
- Responses: You define text, speech, or visual responses to return to the end user. These may provide the end user with answers, ask the end user for more information, or terminate the conversation.
The following diagram shows the basic flow for intent matching and responding to the end-user:
Entities
Each intent parameter has a type, called the entity type, which dictates exactly how data from an end user expression is extracted.
Dialogflow provides predefined system entities that can match many common types of data. For example, there are system entities for matching dates, times, colors, email addresses, and so on. You can also create your own custom entities for matching custom data.
Contexts
Dialogflow contexts are similar to natural language context. If a person says to you "they are orange", you need context in order to understand what "they" is referring to. Similarly, for Dialogflow to handle an end user expression like that, it needs to be provided with context in order to correctly match an intent.
Using contexts, you can control the flow of a conversation. You can configure contexts for an intent by setting input and output contexts, which are identified by string names. When an intent is matched, any configured output contexts for that intent become active. While any contexts are active, Dialogflow is more likely to match intents that are configured with input contexts that correspond to the currently active contexts.
Follow-up intents
You can use follow-up intents to automatically set contexts for pairs of intents. A follow-up intent is a child of its associated parent intent. When you create a follow-up intent, an output context is automatically added to the parent intent and an input context of the same name is added to the follow-up intent. A follow-up intent is only matched when the parent intent is matched in the previous conversational turn. You can also create multiple levels of nested follow-up intents.
Dialogflow provides many predefined follow-up intents for common end user replies like "yes", "no", or "cancel". You can also create your own follow-up intents to handle custom replies.
Fulfillment for integrations
By default, your agent responds to a matched intent with a static response. If you're using one of the integration options, you can provide a more dynamic response by using fulfillment. When you enable fulfillment for an intent, Dialogflow responds to that intent by calling a service that you define. For example, if an end-user wants to schedule a haircut on Friday, your service can check your database and respond to the end-user with availability information for Friday.
Each intent has a setting to enable fulfillment. If an intent requires some action by your system or a dynamic response, you should enable fulfillment for the intent. If an intent without fulfillment enabled is matched, Dialogflow uses the static response you defined for the intent.
When an intent with fulfillment enabled is matched, Dialogflow sends a request to your webhook service with information about the matched intent. Your system can perform any required actions and respond to Dialogflow with information for how to proceed. The following diagram shows the processing flow for fulfillment.
Design your intents
Take five minutes and write down the intents for the lab use case. The key here is the training phrases associated with the intents: These are example phrases for what end-users might say. In this use case they can be as follows:
Intent: Change a name on a reservation
Training Phrases:
- I want to change name on my itinerary
- Change name on my reservation
- Change name
- I want to change my name on my hotel reservation
Think of other possibilities and write them down. The key here is to increase call availability, remove complicated menu systems and achieve shorter handling times. By having Contact Center AI handle these intents we can achieve these goals.
Setup and requirements
Before you click the Start Lab button
Read these instructions. Labs are timed and you cannot pause them. The timer, which starts when you click Start Lab, shows how long Google Cloud resources will be made available to you.
This hands-on lab lets you do the lab activities yourself in a real cloud environment, not in a simulation or demo environment. It does so by giving you new, temporary credentials that you use to sign in and access Google Cloud for the duration of the lab.
To complete this lab, you need:
- Access to a standard internet browser (Chrome browser recommended).
- Time to complete the lab---remember, once you start, you cannot pause a lab.
How to start your lab and sign in to the Google Cloud console
-
Click the Start Lab button. If you need to pay for the lab, a pop-up opens for you to select your payment method. On the left is the Lab Details panel with the following:
- The Open Google Cloud console button
- Time remaining
- The temporary credentials that you must use for this lab
- Other information, if needed, to step through this lab
-
Click Open Google Cloud console (or right-click and select Open Link in Incognito Window if you are running the Chrome browser).
The lab spins up resources, and then opens another tab that shows the Sign in page.
Tip: Arrange the tabs in separate windows, side-by-side.
Note: If you see the Choose an account dialog, click Use Another Account. -
If necessary, copy the Username below and paste it into the Sign in dialog.
{{{user_0.username | "Username"}}} You can also find the Username in the Lab Details panel.
-
Click Next.
-
Copy the Password below and paste it into the Welcome dialog.
{{{user_0.password | "Password"}}} You can also find the Password in the Lab Details panel.
-
Click Next.
Important: You must use the credentials the lab provides you. Do not use your Google Cloud account credentials. Note: Using your own Google Cloud account for this lab may incur extra charges. -
Click through the subsequent pages:
- Accept the terms and conditions.
- Do not add recovery options or two-factor authentication (because this is a temporary account).
- Do not sign up for free trials.
After a few moments, the Google Cloud console opens in this tab.

Task 1. Enable the API
-
In the Console go to Navigation menu > APIs & Services.
-
Click on Enable APIs and Services.
-
Search for Dialogflow.
-
Click on the Dialogflow API and if the API is not Enabled, click Enable.
Task 2. Create your first Dialogflow agent
You'll call your agent "pigeon-travel".
-
Open the Dialogflow Console.
-
If required first sign in with the Google button, and make sure to select the lab credentials you logged into this lab with. Then click Allow.
-
Accept the Terms of Service.
-
Click Create Agent.
-
Now add the agent information:
- Agent Name:
pigeon-travel - Default Time Zone:
America/Denver - Google Project: use your lab Project ID
- Click Create.
Click Check my progress to verify the objective.
The Dialogflow console menu
You should now see the Dialogflow console. On the left is the menu panel. If you're working on a smaller screen and the menu is hidden, click on the Navigation menu (
The middle of the page will show the list of intents for the agent. By default, Dialogflow agents start with two intents. Your agent matches Default Fallback Intent when it doesn't understand what your users say. The Default Welcome Intent greets your users. These can be altered to customize the experience.
On the right is the Dialogflow simulator. This lets you test out your agent by speaking or typing messages.
Querying your agent
Agents can be described as NLU (Natural Language Understanding) modules. These can be included in your app, product, or service and transform natural user requests into actionable data.
Try out your agent
- In the simulator on the right, click into the text field that says Try it now, type
Hi, and press Enter.
You just spoke to your Dialogflow agent! The Default Welcome Intent is preconfigured to understand basic greetings and to reply with a generic response.
Now replace the generic greeting with something that lets your users know who you are.
- In the Responses section of the Default Welcome Intent, remove all the predefined responses like Good Day! and Greetings! and add the following responses:
Welcome to Pigeon Travel. I can assist you with making a reservation or modifying a reservation. Which would you like ?Hello there. I can assist you with making a reservation or modifying a reservation. How may I help you today ?
-
Click Save.
-
Try it out by entering
HiorHelloin the agent simulator and see how it responds.
In the same way, you may customize the responses for your Default Fallback Intent.
Besides the ones provided by default, you will need custom intents that will answer specific queries for the use case. So, create your own intent.
Task 3. Create your first intent
Dialogflow uses intents to categorize a user's intentions. Intents have Training Phrases, which are examples of what a user might say to your agent. For example, someone wanting to change their name on a reservation "I want to change name on my itinerary", "I need to change my name on the booking" or "Can I change name on my reservation?". All of these queries are unique but have the same intention: to change their name on a reservation.
To cover this query, create a name.reservation intent:
-
Click on the ➕ next to Intents in the left menu.
-
Add the name "name.reservation" into the Intent name text field.
-
In the Training Phrases section, click on Add Training Phrases and enter the following, pressing enter after each entry:
- I want to change my name on my itinerary.
- Can I change my name on my reservation?
- I need to change my name on the booking.
- I want to change my name on my hotel reservation.
-
In the Responses section, under Text Responses, enter the following response in the text field:
Sure I can help you to change your name on the reservation. -
Click the Save button. You may also notice the messages Agent Training started and Agent Training completed on the bottom right of the screen. This lets you know that Dialogflow is retraining your agent model based on the phrases you added.
-
Once training is done, try it out using the simulator on the right by asking the question:
change name on booking?
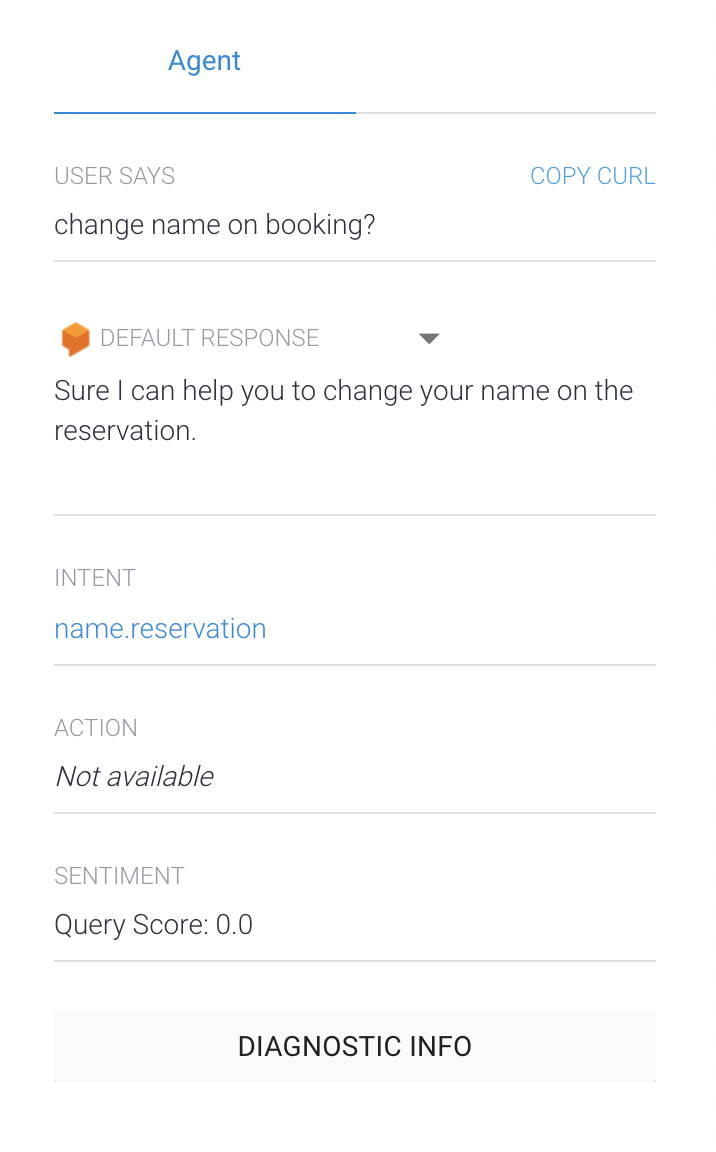
Your agent now responds to the query correctly. Notice that even though your query was a little different from the training phrases, Dialogflow still matched the query to the right intent, which in this case is the name.reservation intent as shown in the simulator output.
Dialogflow uses training phrases as examples for a machine learning model to match users' queries to the correct intent. The machine learning model checks the query against every intent in the agent, gives every intent a score, and the highest-scoring intent is matched. If the highest scoring intent has a very low score, the fallback intent is matched.
Click Check my progress to verify the objective.
Task 4. Extract data with entities
In this section you'll learn how to extract data from a user's query to let them change their name on the reservation. For this example, the agent will not only need to know that a user wants to change their name but also the reservation number and the new name.
Add parameters to your intents
Parameters are important and relevant words or phrases in a user's query that are extracted so that your agent can provide a proper response.
-
Click on Intents in the left menu.
-
Click on the name.reservation.
-
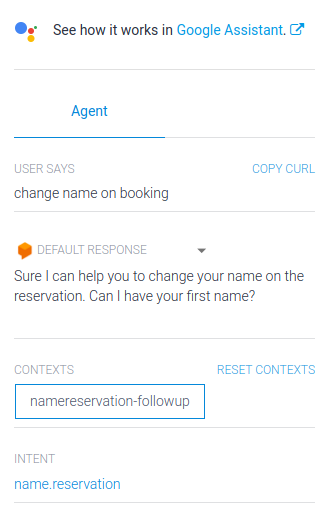
In the Responses, change the Text Response to:
Sure I can help you to change your name on the reservation. Can I have your first name? -
Click SAVE.
-
Click on Intents in the left menu.
-
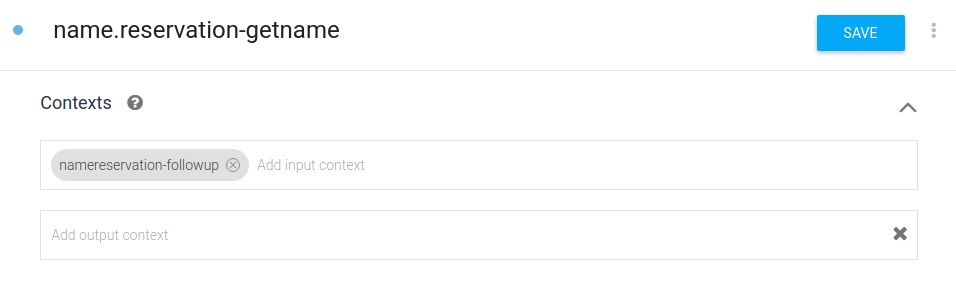
Hover over the name.reservation intent and click Add follow-up intent then choose custom.
-
Click on the newly created follow-up intent name.reservation - custom.
-
Name the intent name.reservation-getname at the top of the intent page.
-
It should look like this:
- Add the following as Training Phrases:
- sam
- john
- mary
-
Under Action and parameters, change the Entity to
@sys.given-name -
Click Save.
-
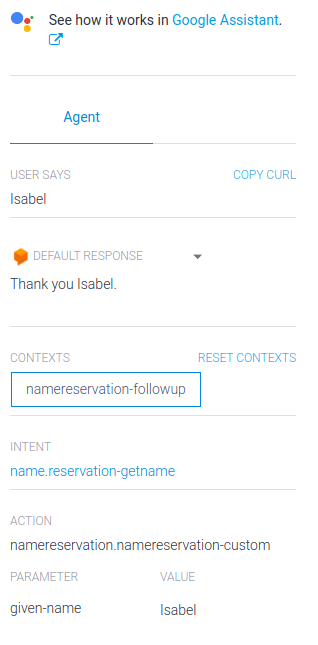
The value of a parameter can be used in your responses. In this case, you can use
given-namein your responses and it will be replaced with the name specified in the query to your agent. -
In the Responses section, add the following response, then click the Save button:
Thank you $given-name. -
Once the agent is done training click on Intents in the left menu.
-
Click on the drop down under the name.reservation intent.
-
It should look like this:

Click Check my progress to verify the objective.
Using parameter data
Try it out
- Now, query your agent with
change name on bookingin the simulator in the right panel.
You should see the simulator asking you for your first name.
- Now, in the query enter your first name and you will now have a personalized message to the user.
This is all great, but don't forget that you still need to extract other parameter values like last name and reservation number.
Task 5. Use slot-filling
Although you have updated the response to include the first name parameter, how can you ensure that you get all that info from the user? The answer is slot-filling. The agent needs to make sure that if the user does not provide this info, it will need to prompt the user to provide it.
-
Click on Intents in the left menu.
-
Expand the drop on the name.reservation intent.
-
Click on the intent name.reservation-getname.
-
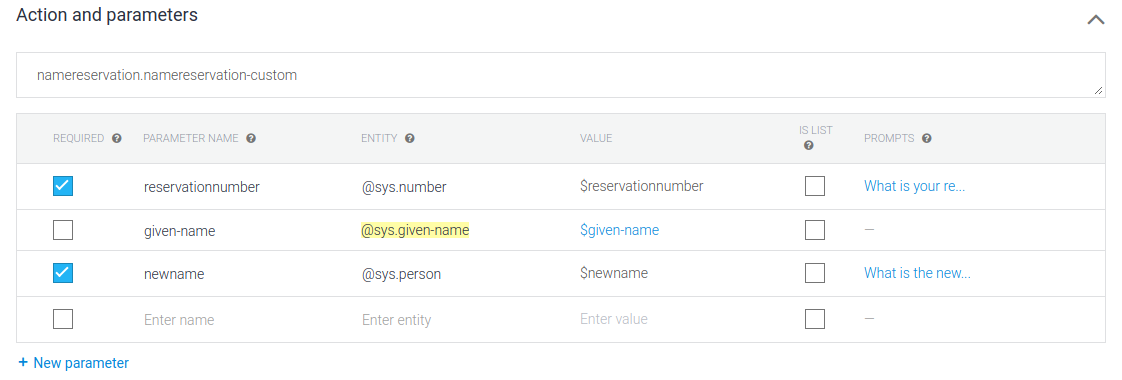
In the Actions and parameters enter the following parameters:
- Required: true
- Parameter name: reservationnumber
- Entity: @sys.number
- Value: $reservationnumber
- not defined as lists
- prompts: What is your reservation number?
And then add:
- Required: true
- Parameter name: newname
- Entity: @sys.person
- Value: $newname
- Not defined as lists
- Prompts: What is the new name for the reservation?
-
When completed it should look like this:
-
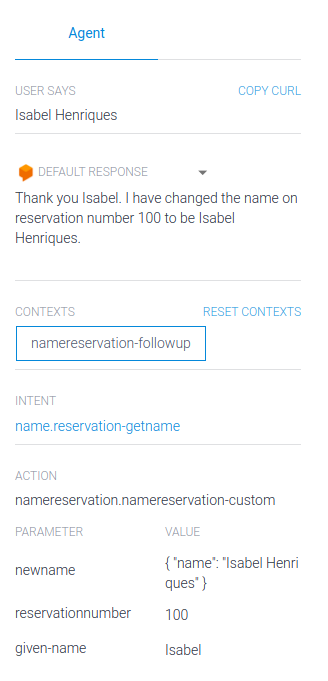
In the Responses section change the text response then click the Save button:
Thank you $given-name. I have changed the name on reservation number $reservationnumber to be $newname. -
Try it out in the simulator by typing out the question:
change name on bookingand follow along.
Click Check my progress to verify the objective.
Task 6. Export your agent
In this section you will export your agent as a zip file so that you can import it later when you start the next lab. This way you can reuse the intents and entities you've configured so far.
-
Click on the settings gear ⚙ icon next to your agent name in the left menu.
-
In the settings page that opens up, go to the Export and Import tab.
-
Click on EXPORT AS ZIP. This will download your agent into a local zip file.
Congratulations!
You have learned how to use Dialogflow to create a conversational interface and design the end-user's intentions.
Google Cloud training and certification
...helps you make the most of Google Cloud technologies. Our classes include technical skills and best practices to help you get up to speed quickly and continue your learning journey. We offer fundamental to advanced level training, with on-demand, live, and virtual options to suit your busy schedule. Certifications help you validate and prove your skill and expertise in Google Cloud technologies.
Manual Last Updated October 27, 2023
Lab Last Tested October 30, 2023
Copyright 2024 Google LLC All rights reserved. Google and the Google logo are trademarks of Google LLC. All other company and product names may be trademarks of the respective companies with which they are associated.