检查点
Add Cloud Data Fusion API Service Agent role to service account
/ 30
Import, Deploy and Run Shipment Data Cleansing pipeline
/ 35
Import, Deploy, and Run the Delayed Shipments data pipeline
/ 35
Exploring the Lineage of Data with Cloud Data Fusion
- GSP812
- Overview
- Setup and requirements
- Task 1. Add the necessary permissions for your Cloud Data Fusion instance
- Task 2. Open the Cloud Data Fusion UI
- Task 3. Import, deploy, and run the Shipment Data Cleansing pipeline
- Task 4. Import, deploy, and run the Delayed Shipments data pipeline
- Task 5. Discover some datasets
- Task 6. Use tags to discover datasets
- Task 7. Explore data lineage
- Congratulations!
GSP812

Overview
This lab will show you how to use Cloud Data Fusion to explore data lineage: The data's origins and its movement over time.
Cloud Data Fusion data lineage helps you:
- Detect the root cause of bad data events.
- Perform an impact analysis prior to making data changes.
Cloud Data Fusion provides lineage at the dataset level and field level, as well as being time-bound to show lineage over time.
- Dataset level lineage shows the relationship between datasets and pipelines in a selected time interval.
- Field level lineage shows the operations that were performed on a set of fields in the source dataset to produce a different set of fields in the target dataset.
For the purpose of this lab, you will use two pipelines that demonstrate a typical scenario in which raw data is cleaned then sent for downstream processing. This data trail -- from raw data to the cleaned shipment data to analytic output -- can be explored using the Cloud Data Fusion lineage feature.
Objectives
In this lab, you will explore how to:
- Run sample pipelines to produce lineage.
- Explore dataset and field level lineage.
- Learn how to pass handshaking information from the upstream pipeline to the downstream pipeline.
Setup and requirements
For each lab, you get a new Google Cloud project and set of resources for a fixed time at no cost.
-
Sign in to Google Cloud Skills Boost using an incognito window.
-
Note the lab's access time (for example, 02:00:00), and make sure you can finish within that time.
There is no pause feature. You can restart if needed, but you have to start at the beginning. -
When ready, click Start lab.
Note: Once you click Start lab, it will take about 15 - 20 minutes for the lab to provision necessary resources and create a Data Fusion instance. During that time, you can read through the steps below to get familiar with the goals of the lab. When you see lab credentials (Username and Password) in the left panel, the instance is created and you can continue logging into the console. -
Note your lab credentials (Username and Password). You will use them to sign in to the Google Cloud console.
-
Click Open Google console.
-
Click Use another account and copy/paste credentials for this lab into the prompts.
If you use other credentials, you'll receive errors or incur charges. -
Accept the terms and skip the recovery resource page.
Log in to Google Cloud Console
- Using the browser tab or window you are using for this lab session, copy the Username from the Connection Details panel and click the Open Google Console button.
- Paste in the Username, and then the Password as prompted.
- Click Next.
- Accept the terms and conditions.
Since this is a temporary account, which will last only as long as this lab:
- Do not add recovery options
- Do not sign up for free trials
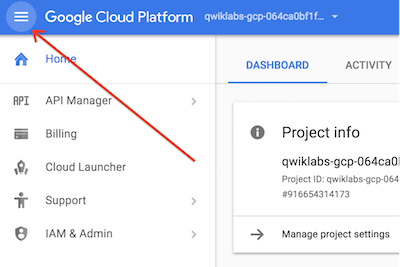
- Once the console opens, view the list of services by clicking the Navigation menu (
) at the top-left.
Activate Cloud Shell
Cloud Shell is a virtual machine that contains development tools. It offers a persistent 5-GB home directory and runs on Google Cloud. Cloud Shell provides command-line access to your Google Cloud resources. gcloud is the command-line tool for Google Cloud. It comes pre-installed on Cloud Shell and supports tab completion.
-
Click the Activate Cloud Shell button (
) at the top right of the console.
-
Click Continue.
It takes a few moments to provision and connect to the environment. When you are connected, you are also authenticated, and the project is set to your PROJECT_ID.
Sample commands
- List the active account name:
(Output)
(Example output)
- List the project ID:
(Output)
(Example output)
Check project permissions
Before you begin working on Google Cloud, you must ensure that your project has the correct permissions within Identity and Access Management (IAM).
-
In the Google Cloud console, on the Navigation menu (
-
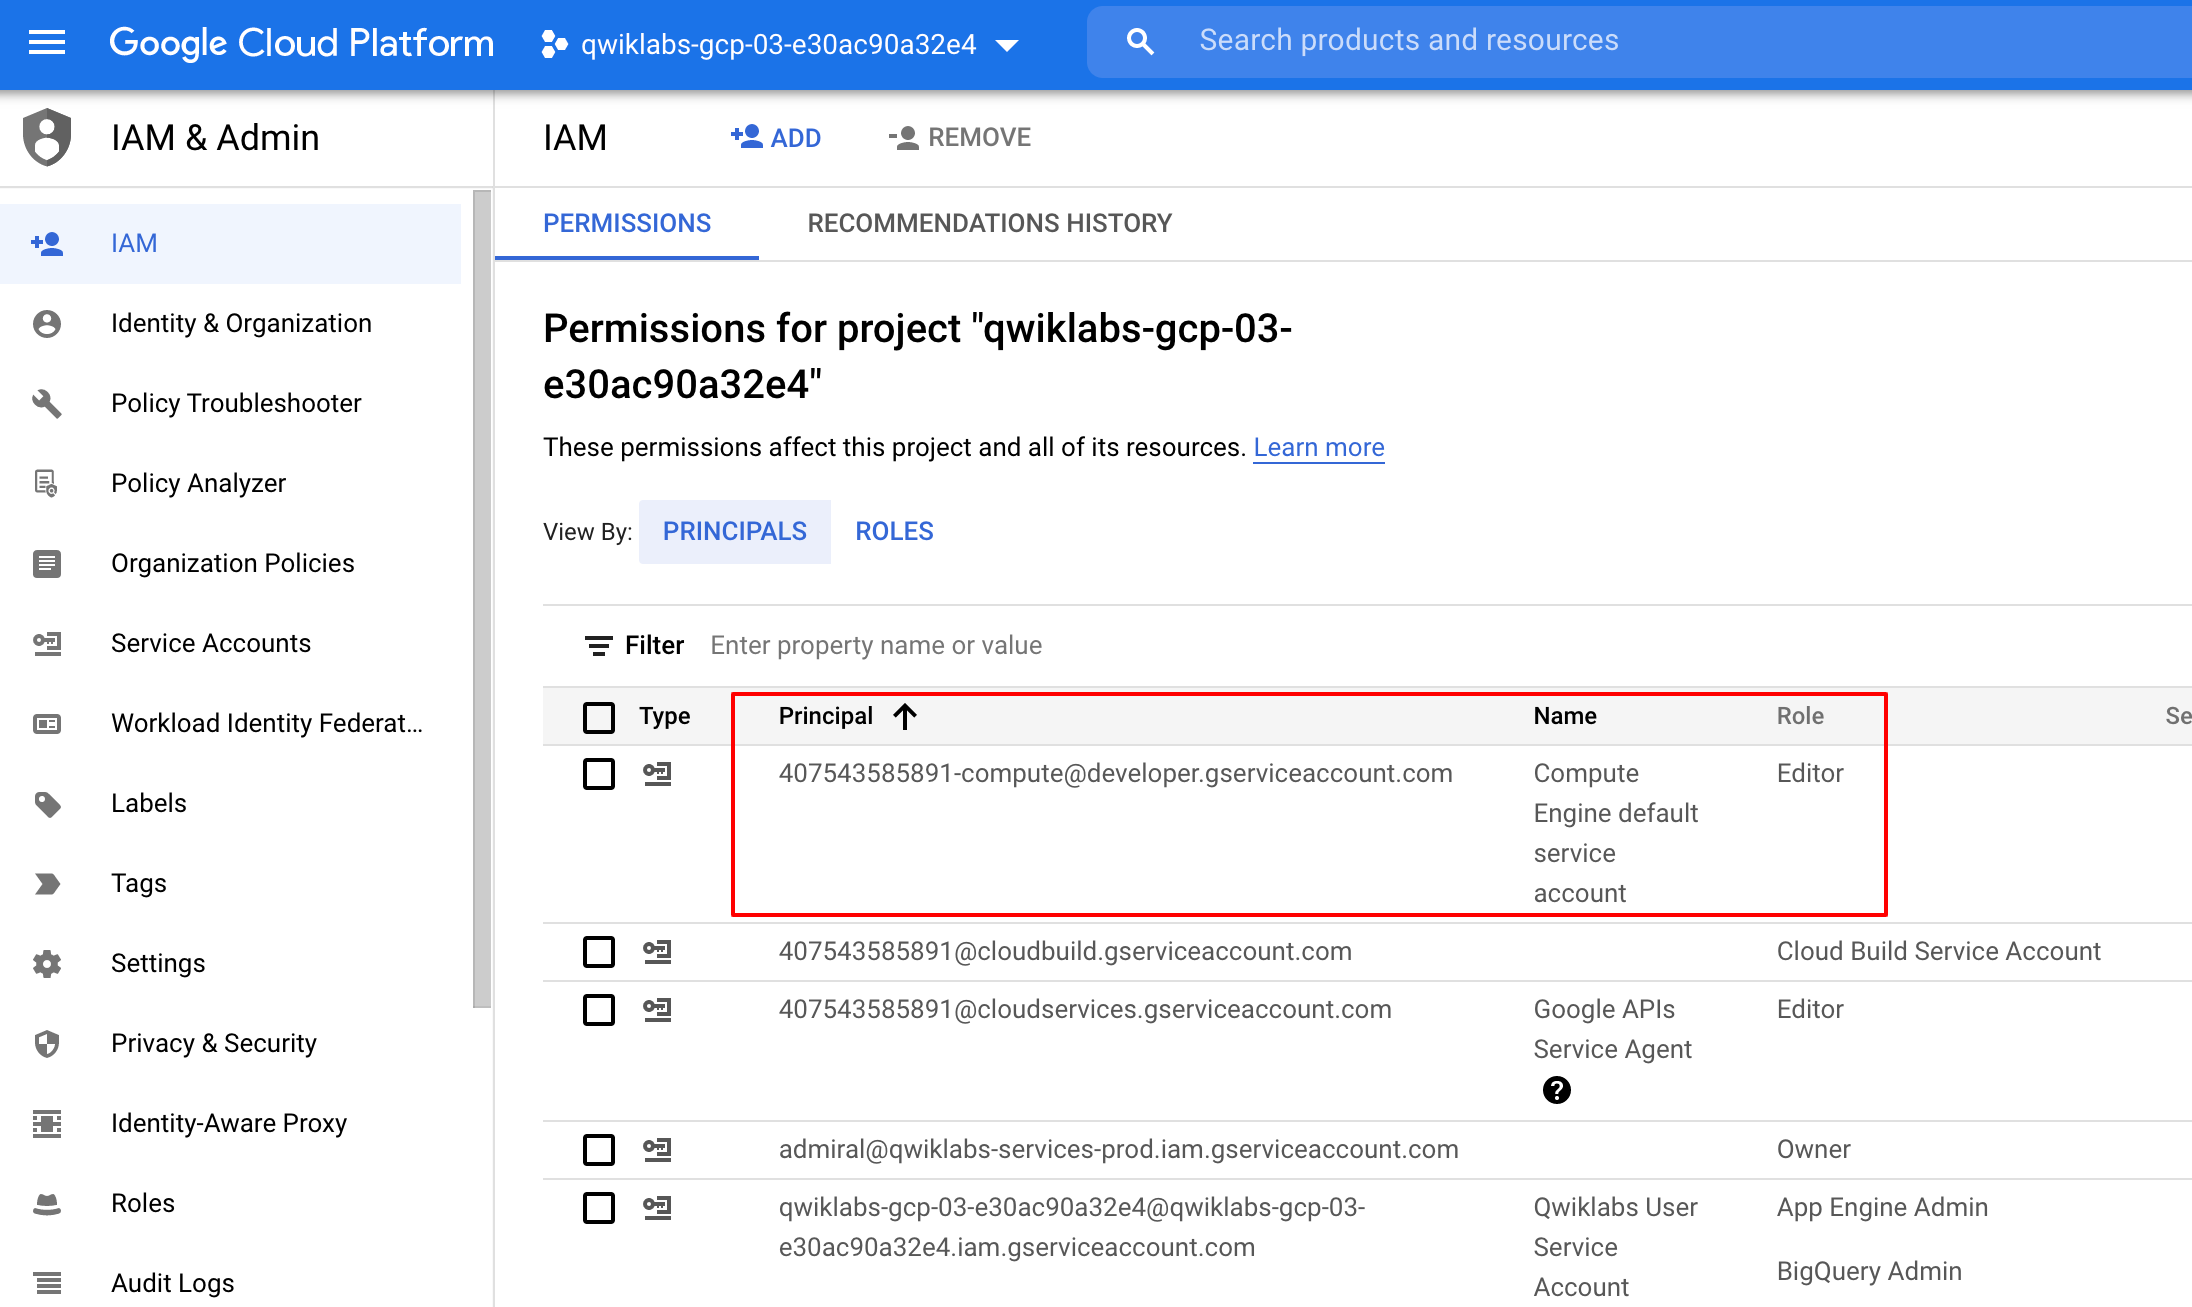
Confirm that the default compute Service Account
{project-number}-compute@developer.gserviceaccount.comis present and has theeditorrole assigned. The account prefix is the project number, which you can find on Navigation menu > Cloud overview.
If the account is not present in IAM or does not have the editor role, follow the steps below to assign the required role.
-
In the Google Cloud console, on the Navigation menu, click Cloud overview.
-
From the Project info card, copy the Project number.
-
On the Navigation menu, click IAM & Admin > IAM.
-
At the top of the IAM page, click Add.
-
For New principals, type:
Replace {project-number} with your project number.
-
For Select a role, select Basic (or Project) > Editor.
-
Click Save.
Prerequisites
In this lab, you will work with two pipelines:
- The Shipment Data Cleansing pipeline, which reads raw shipment data from a small sample dataset and applies transformations to clean the data.
- The Delayed Shipments USA pipeline, which reads the cleansed shipment data, analyzes it, and finds shipments within the USA that were delayed by more than a threshold.
Use the Shipment Data Cleansing and Delayed Shipments USA links to download these sample datasets to your local machine.
Task 1. Add the necessary permissions for your Cloud Data Fusion instance
- In the Google Cloud console, from the Navigation menu select Data Fusion > Instances.
Next, you will grant permissions to the service account associated with the instance, using the following steps.
-
From the Google Cloud console, navigate to the IAM & Admin > IAM.
-
Confirm that the Compute Engine Default Service Account
{project-number}-compute@developer.gserviceaccount.comis present, copy the Service Account to your clipboard. -
On the IAM Permissions page, click +Grant Access.
-
In the New principals field paste the service account.
-
Click into the Select a role field and start typing "Cloud Data Fusion API Service Agent", then select it.
-
Click Save.
Click Check my progress to verify the objective.
Grant service account user permission
-
In the console, on the Navigation menu, click IAM & admin > IAM.
-
Select the Include Google-provided role grants checkbox.
-
Scroll down the list to find the Google-managed Cloud Data Fusion service account that looks like
service-{project-number}@gcp-sa-datafusion.iam.gserviceaccount.comand then copy the service account name to your clipboard.

-
Next, navigate to the IAM & admin > Service Accounts.
-
Click on the default compute engine account that looks like
{project-number}-compute@developer.gserviceaccount.com, and select the Permissions tab on the top navigation. -
Click on the Grant Access button.
-
In the New Principals field, paste the service account you copied earlier.
-
In the Role dropdown menu, select Service Account User.
-
Click Save.
Task 2. Open the Cloud Data Fusion UI
-
In the Console, return to Navigation menu > Data Fusion, then click the View Instance link next to your Data Fusion instance. Select your lab credentials to sign in. If prompted to take a tour of the service, click on No, Thanks. You should now be in the Cloud Data Fusion UI.
-
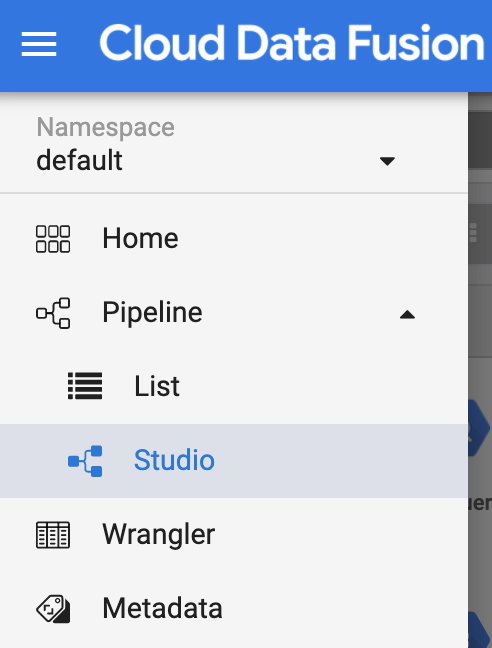
Click Studio from the left navigation panel to open the Cloud Data Fusion Studio page.
Task 3. Import, deploy, and run the Shipment Data Cleansing pipeline
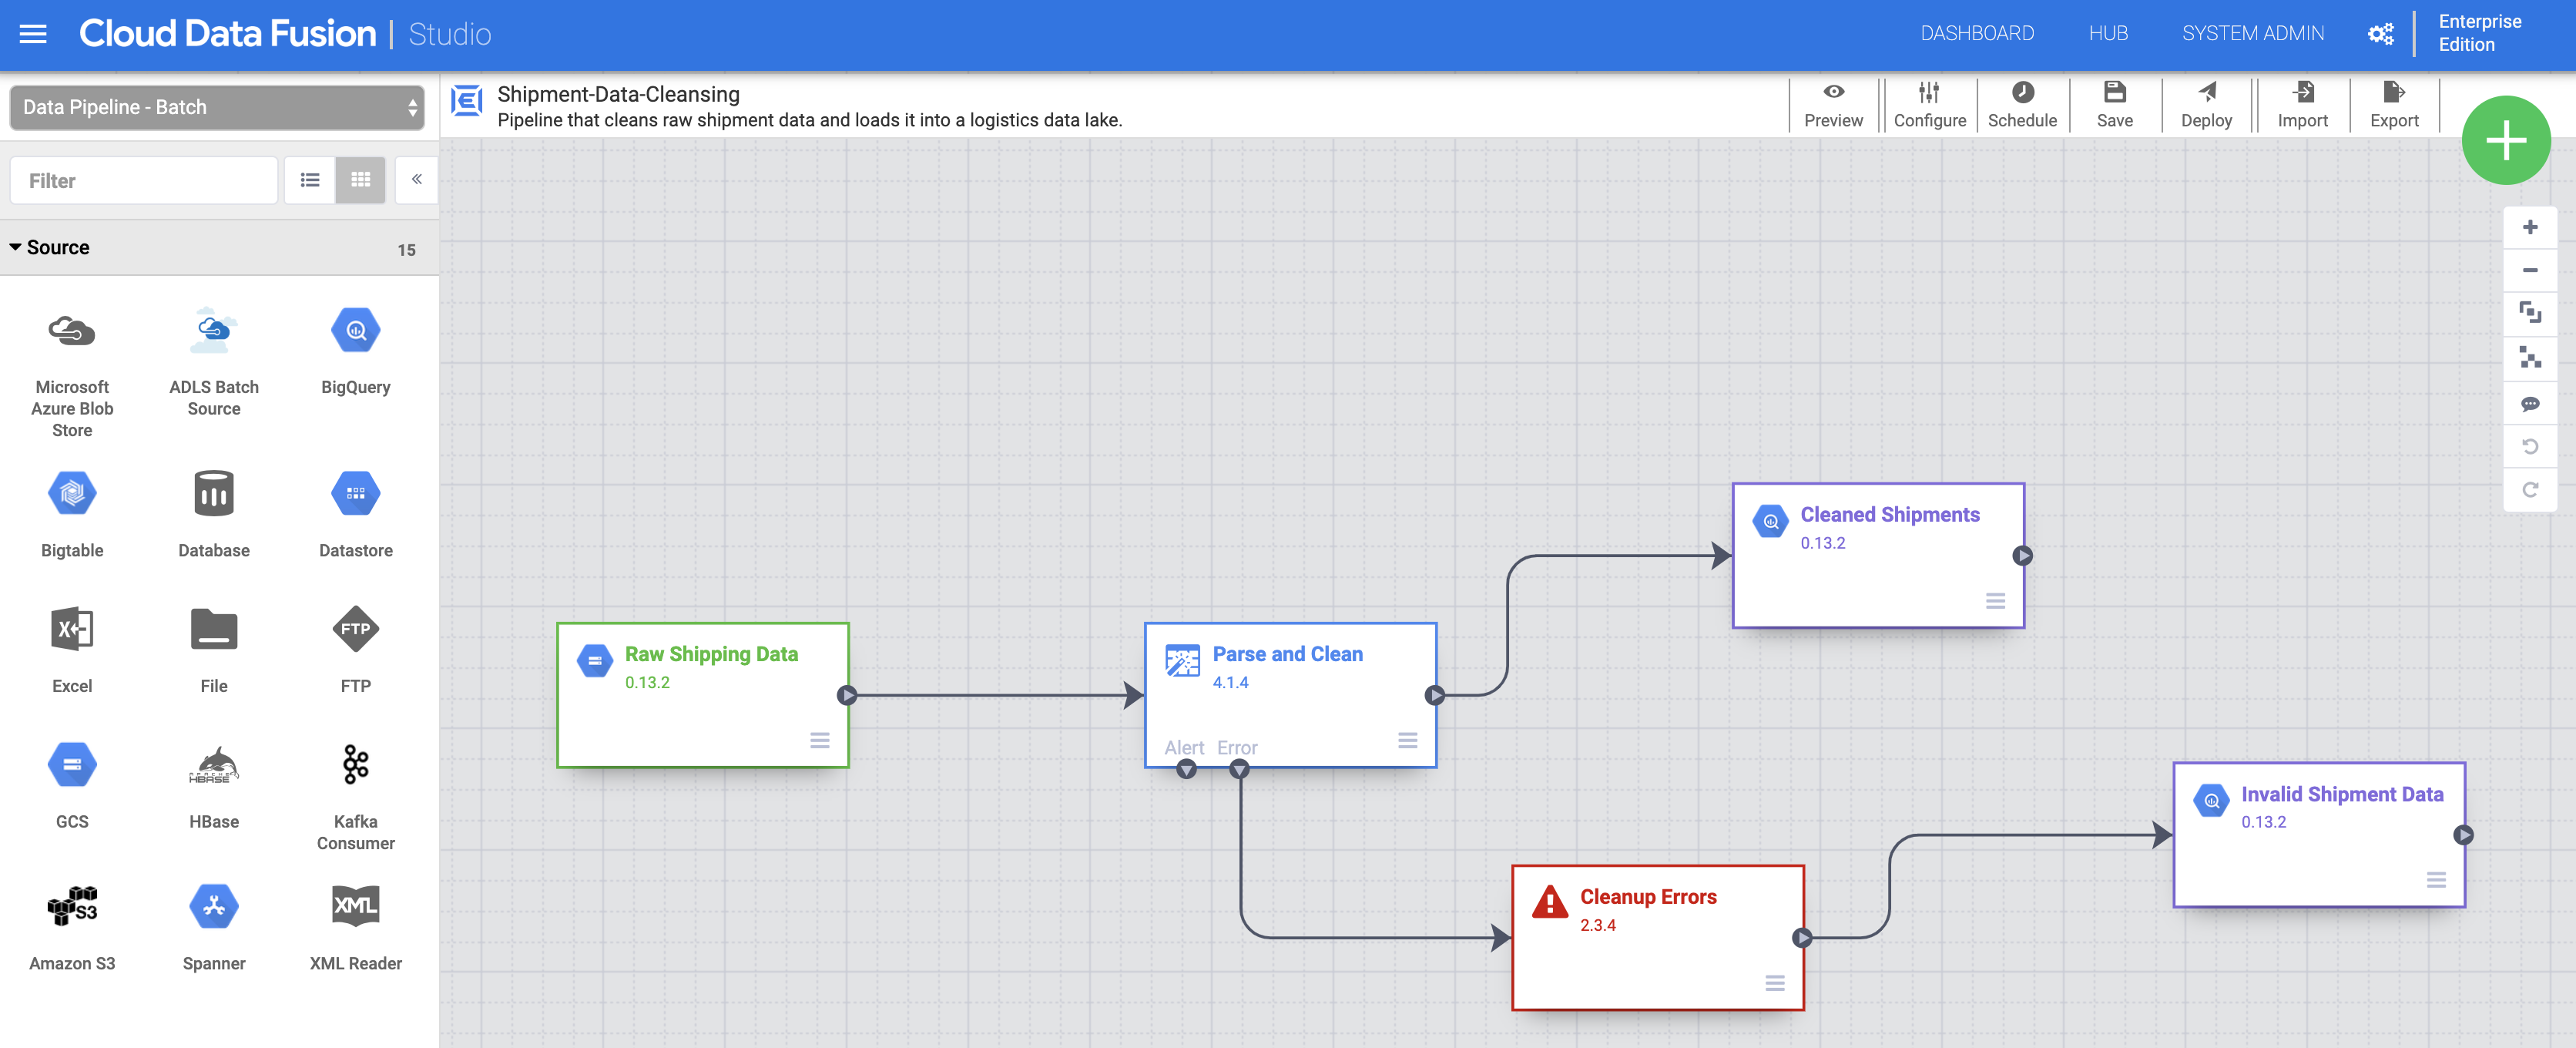
- Next, you need to import the raw Shipping Data. Click Import in the top-right of the Studio page, then select and import the Shipment Data Cleansing pipeline that you downloaded earlier.
-
Now deploy the pipeline. Click Deploy in the top-right of the Studio page. After deployment, the Pipeline page opens.
-
Click Run at the top of the center on the Pipeline page to run the pipeline.
Click Check my progress to verify the objective.
Task 4. Import, deploy, and run the Delayed Shipments data pipeline
After the status of the Shipping Data Cleansing shows Succeeded, you will proceed to import and deploy the Delayed Shipments USA data pipeline that you downloaded earlier.
-
Click Studio from the left navigation panel to return to the Cloud Data Fusion Studio page.
-
Click Import in the top right of the Studio page, then select and import the Delayed Shipments USA data pipeline that you downloaded earlier.
-
Deploy the pipeline by clicking Deploy in the top right of the Studio page. After deployment, the Pipeline page opens.
-
Click Run in the top center of the Pipeline page to run the pipeline.
After this second pipeline successfully completes, you can continue to perform the remaining steps below.
Click Check my progress to verify the objective.
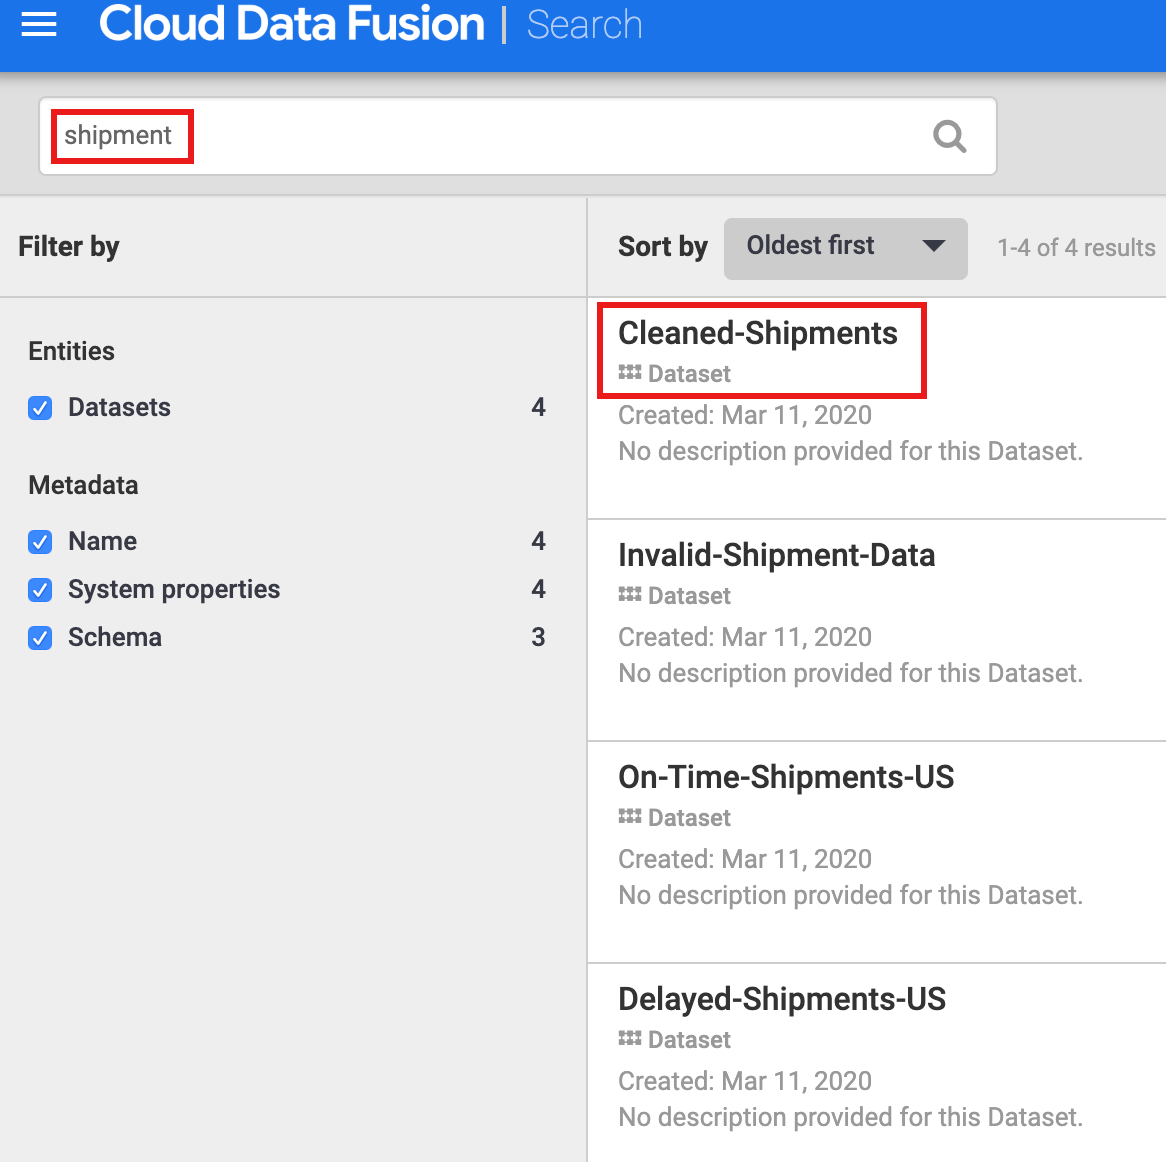
Task 5. Discover some datasets
You must discover a dataset before exploring its lineage.
- Select Metadata from the Cloud Data Fusion UI left navigation panel to open the metadata Search page.
- Since the Shipment Data Cleansing dataset specified "Cleaned-Shipments" as the reference dataset, enter
shipmentin the Search box. The search results include this dataset.
Task 6. Use tags to discover datasets
A Metadata search discovers datasets that have been consumed, processed, or generated by Cloud Data Fusion pipelines. Pipelines execute on a structured framework that generates and collects technical and operational metadata. The technical metadata includes dataset name, type, schema, fields, creation time, and processing information. This technical information is used by the Cloud Data Fusion metadata search and lineage features.
Although the Reference Name of sources and sinks is a unique dataset identifier and an excellent search term, you can use other technical metadata as search criteria, such as a dataset description, schema, field name, or metadata prefix.
Cloud Data Fusion also supports the annotation of datasets with business metadata, such as tags and key-value properties, which can be used as search criteria. For example, to add and search for a business tag annotation on the Raw Shipping Data dataset:
-
Select Metadata from the Cloud Data Fusion UI left navigation panel to open the metadata Search page.
-
Enter
Raw shipping datain the search page of metadata option. -
Click on Raw_Shipping_Data.
-
Under Business tags, click + then insert a tag name (alphanumeric and underscore characters are allowed) and press Enter.
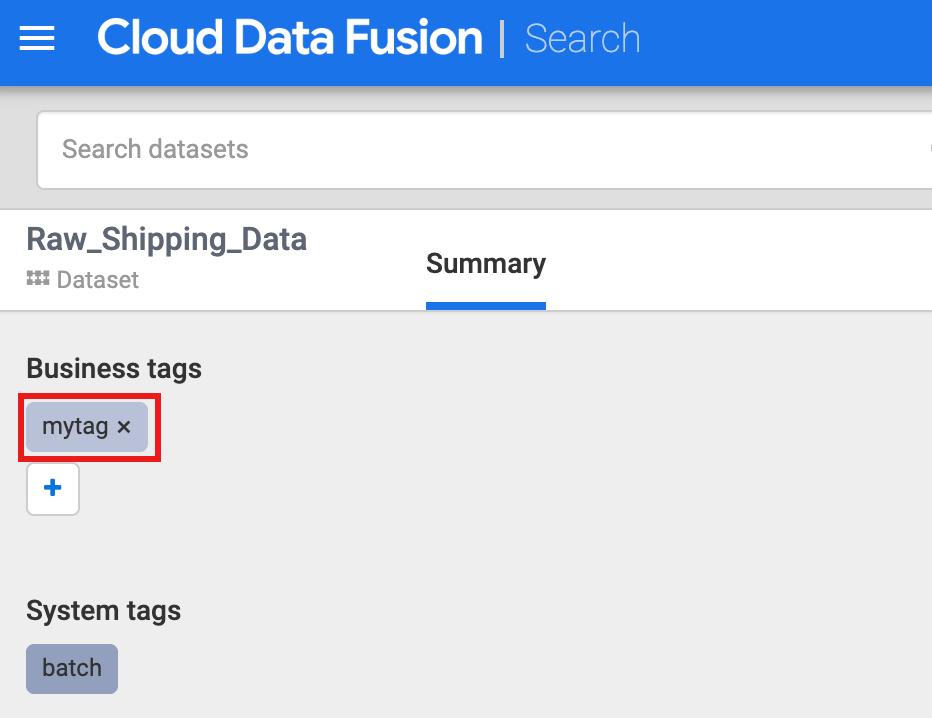
You can perform a search on a tag by clicking the tag name or by entering tags: tag_name in the search box on the Metadata search page.
Task 7. Explore data lineage
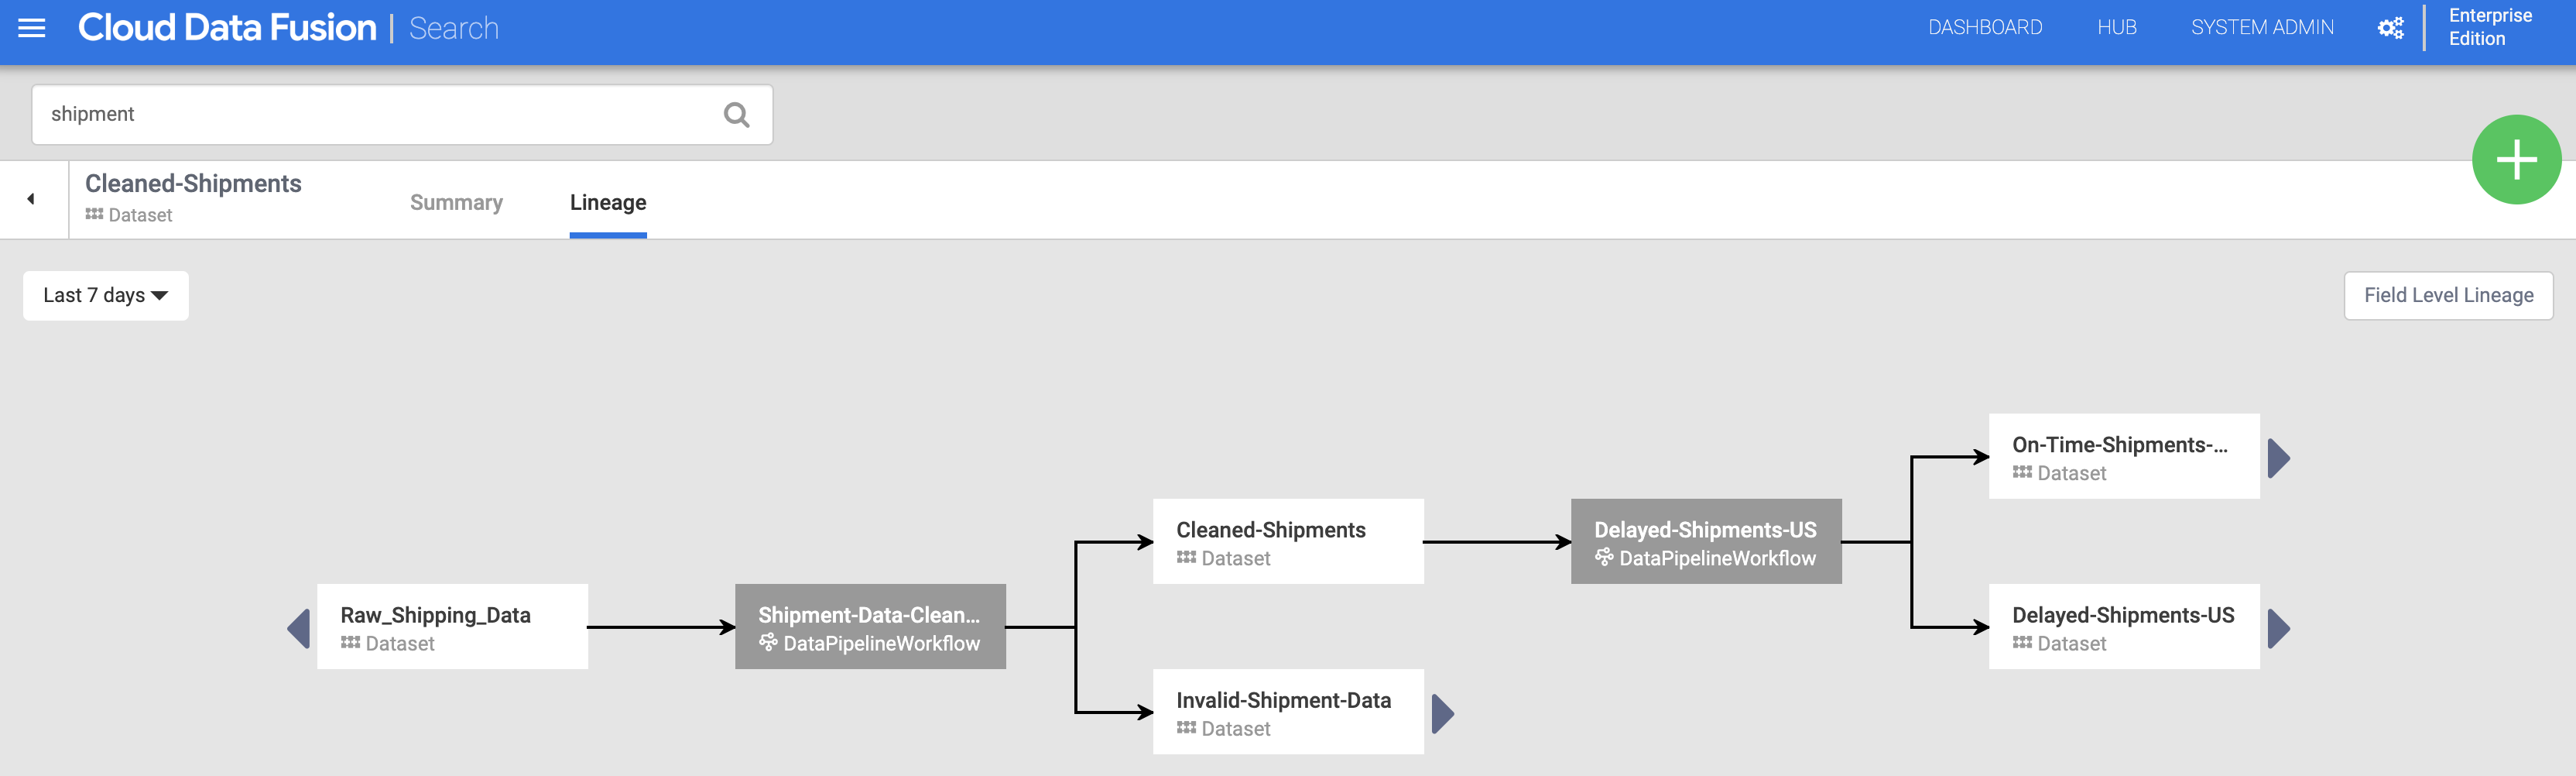
Dataset level lineage
-
Select Metadata from the Cloud Data Fusion UI left navigation panel to open the metadata Search page, and enter
shipmentin the Search box. -
Click on the Cleaned-Shipments dataset name listed on the Search page.
-
Then click the Lineage tab. The lineage graph shows that this dataset was generated by the Shipments-Data-Cleansing pipeline, which had consumed the Raw_Shipping_Data dataset.
Field level lineage
Cloud Data Fusion field level lineage shows the relationship between the fields of a dataset and the transformations that were performed on a set of fields to produce a different set of fields. Like dataset level lineage, field level lineage is time-bound, and its results change with time.
- Continuing from the Dataset level lineage step, click the Field Level Lineage button in the top right of the Cleaned Shipments dataset-level lineage graph to display its field level lineage graph.
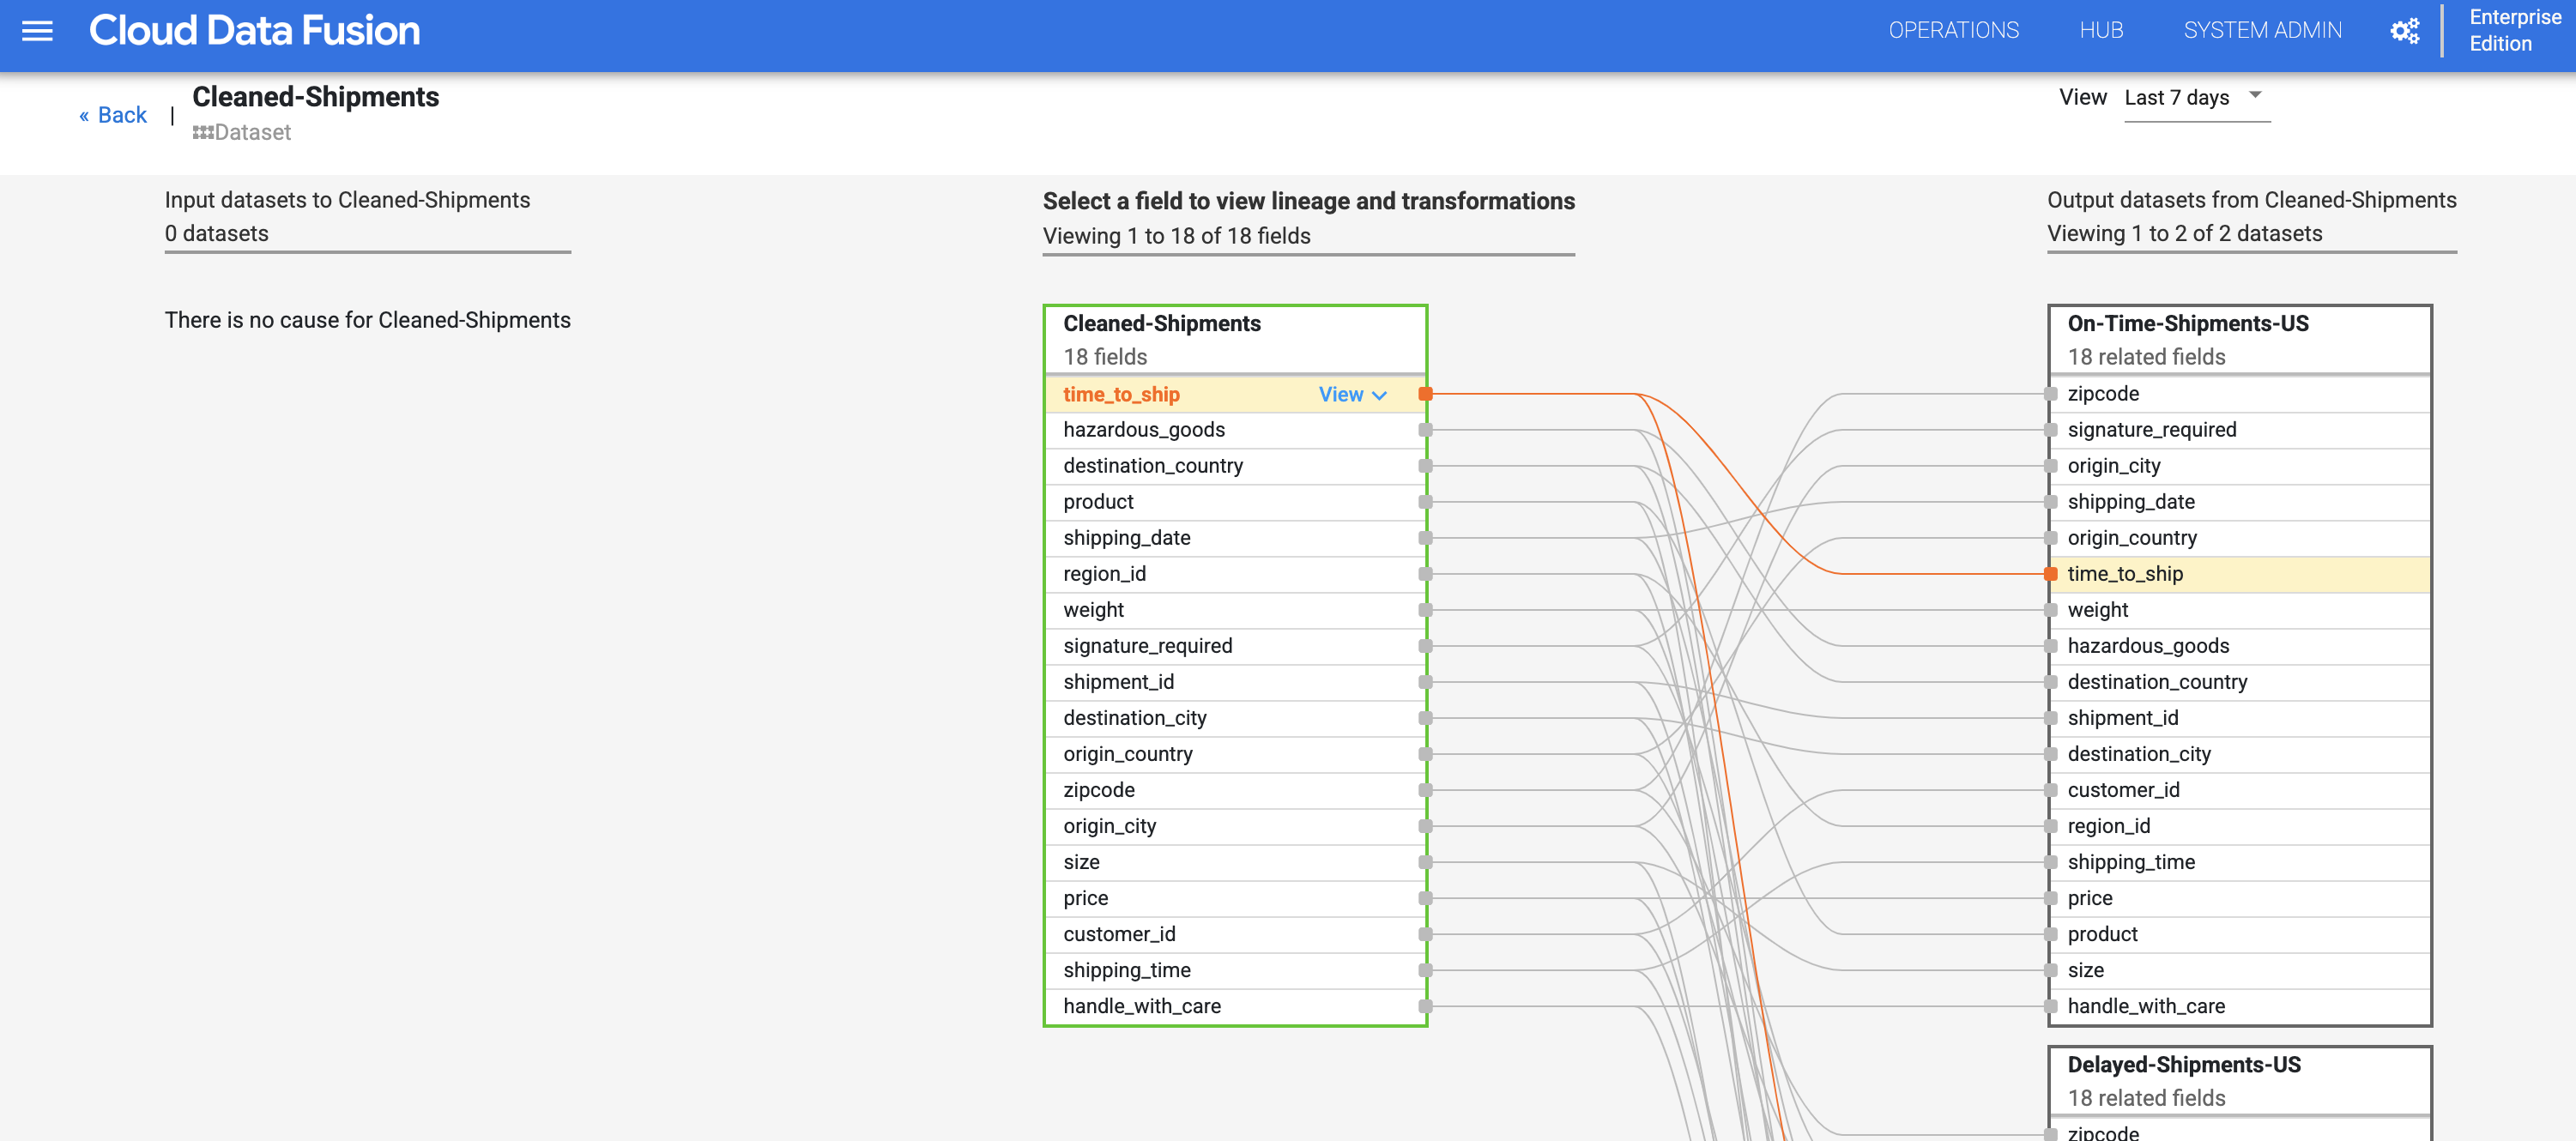
- The field level lineage graph shows connections between fields. You can select a field to view its lineage. Select View, then select Pin field to view that field's lineage only.
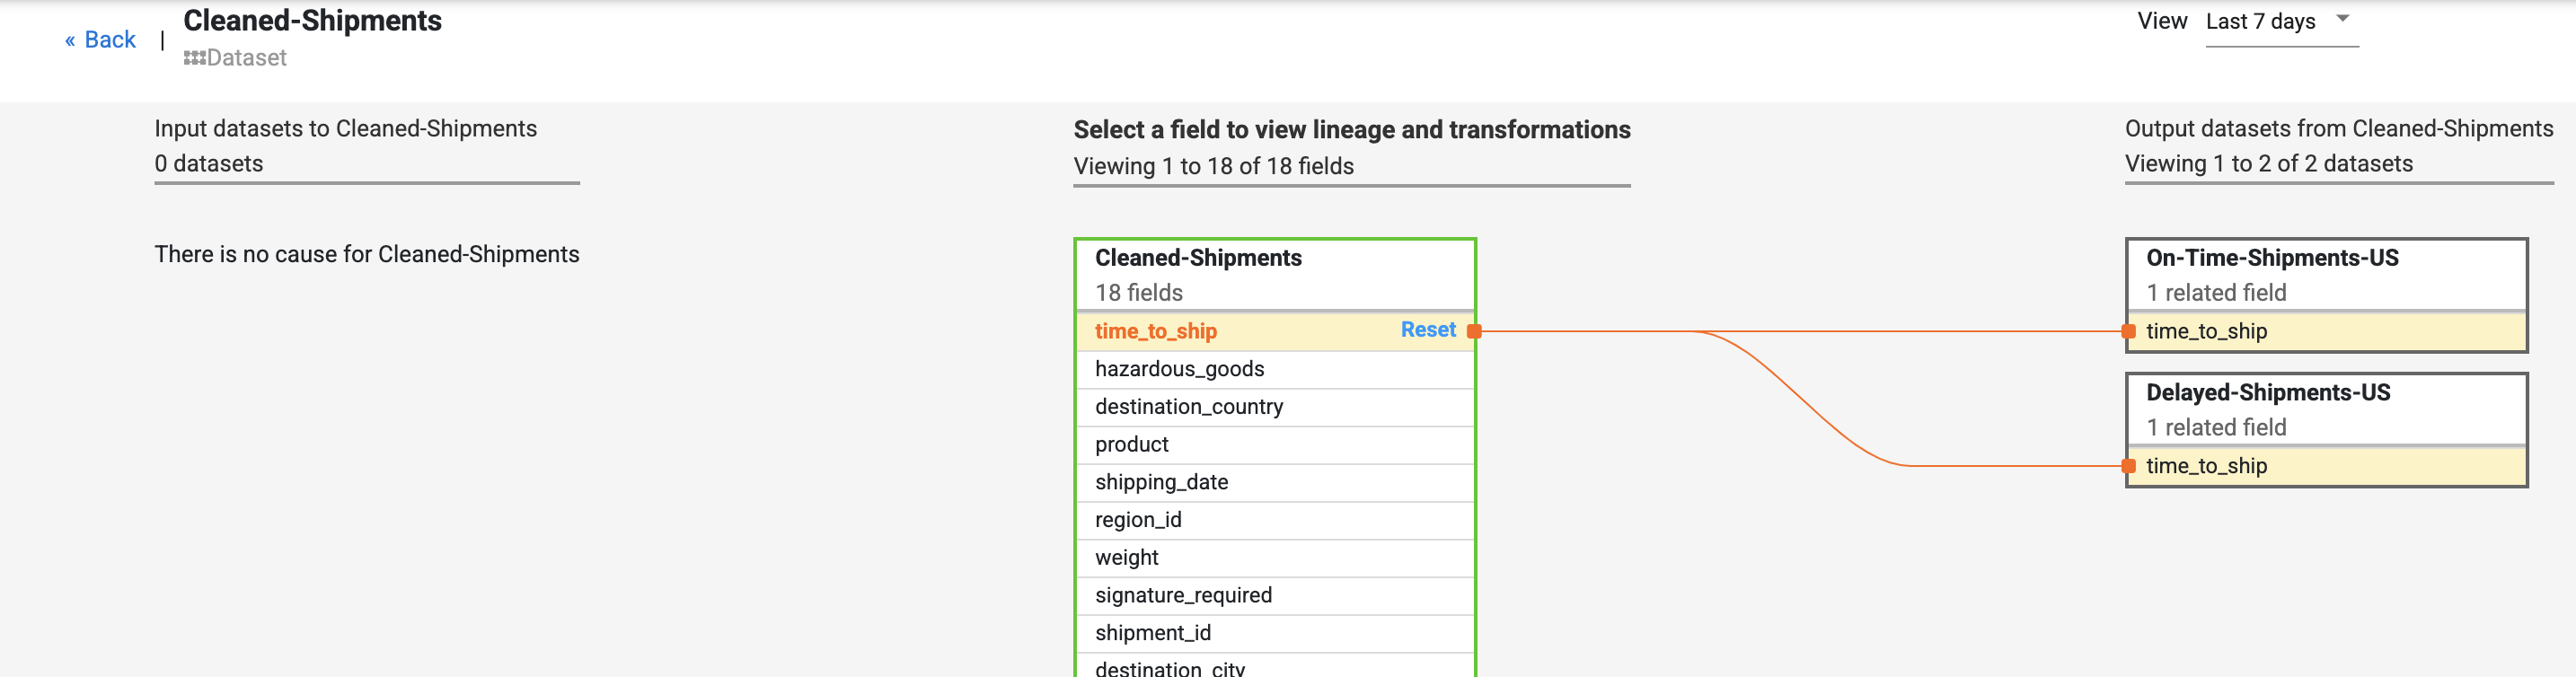
- Locate the time_to_ship field under the Cleaned-Shipments dataset, Select View, then select View impact to perform a impact analysis.

The field level lineage shows how this field has tansformed over time. Notice the transformations for the time_to_ship field: (i)converting it to a float type column, (ii) determining whether the value is redirected into the next node or down the error path.
The lineage exposes the history of changes the particular field has gone through. Other examples include concatenation of few fields to compose a new field (like first name and last name combined to produce name, or computations done on a field (like converting a number to a percentage against total count).
The cause and impact links show the transformations performed on both sides of a field in a human-readable ledger format.
Congratulations!
In this lab, you have learned how to explore the lineage of your data. This information can be essential for reporting and governance. It can help different audiences understand how data came about to be in the state it is in.
Continue your quest
This self-paced lab is part of the Building Advanced Codeless Pipelines on Cloud Data Fusion quest. A quest is a series of related labs that form a learning path. Completing this quest earns you a badge to recognize your achievement. You can make your badge or badges public and link to them in your online resume or social media account. Enroll in this quest and get immediate completion credit. Refer to the Google Cloud Skills Boost catalog for all available quests.
Explore other quests
Next, it is suggested that you continue with Building Codeless Pipelines on Cloud Data Fusion.
Manual Last Updated November 14, 2022
Lab Last Tested August 08, 2023
Copyright 2022 Google LLC All rights reserved. Google and the Google logo are trademarks of Google LLC. All other company and product names may be trademarks of the respective companies with which they are associated.