Checkpoints
Create a Cloud Source Repository
/ 30
Launch the site at TCP port 8080
/ 30
Configure the cloud build and initiate it
/ 40
Deploy a Hugo Website with Cloud Build and Firebase Pipeline
GSP747

Overview
In this lab you will create a pipeline for deploying websites based on Hugo, a static website builder. You will store the website content in Cloud Source Repositories and deploy the website with Firebase, then use Cloud Build to create a pipeline to automatically deploy new content that is committed to the repository.
Objectives
In this lab you will learn the following:
- An overview of static websites
- Setting up a website with Hugo
- Storing the website content in Cloud Source Repositories
- Deploying the website with Firebase
- Creating a build pipeline with Cloud Build to automate the deployment
Prerequisites
The instructions provided here are sufficient to guide you through this lab. You may also find it helpful to have some hands-on experience with the services you will be using. Here are some other labs you may find helpful:
- Cloud Source Repositories: Qwik Start
- Build a Serverless App with Cloud Run that Creates PDF Files
- Firebase Web
The benefits of static websites
Static site builders like Hugo have become popular because of their ability to produce websites that do not require web servers. With static web platforms there are no server operating systems or software to maintain. There are, however, various operational considerations. For example, you may want to version control your postings, host your web site on a content delivery network ("CDN") and provision an SSL certificate.
You can address these needs by using a Continuous Integration / Continuous Deployment pipeline on Google Cloud. A deployment pipeline enables developers to rapidly innovate by automating the entire deployment process. In this lab, you will learn to build a pipeline that demonstrates this automation.
Setup and requirements
Before you click the Start Lab button
Read these instructions. Labs are timed and you cannot pause them. The timer, which starts when you click Start Lab, shows how long Google Cloud resources will be made available to you.
This hands-on lab lets you do the lab activities yourself in a real cloud environment, not in a simulation or demo environment. It does so by giving you new, temporary credentials that you use to sign in and access Google Cloud for the duration of the lab.
To complete this lab, you need:
- Access to a standard internet browser (Chrome browser recommended).
- Time to complete the lab---remember, once you start, you cannot pause a lab.
How to start your lab and sign in to the Google Cloud console
-
Click the Start Lab button. If you need to pay for the lab, a pop-up opens for you to select your payment method. On the left is the Lab Details panel with the following:
- The Open Google Cloud console button
- Time remaining
- The temporary credentials that you must use for this lab
- Other information, if needed, to step through this lab
-
Click Open Google Cloud console (or right-click and select Open Link in Incognito Window if you are running the Chrome browser).
The lab spins up resources, and then opens another tab that shows the Sign in page.
Tip: Arrange the tabs in separate windows, side-by-side.
Note: If you see the Choose an account dialog, click Use Another Account. -
If necessary, copy the Username below and paste it into the Sign in dialog.
{{{user_0.username | "Username"}}} You can also find the Username in the Lab Details panel.
-
Click Next.
-
Copy the Password below and paste it into the Welcome dialog.
{{{user_0.password | "Password"}}} You can also find the Password in the Lab Details panel.
-
Click Next.
Important: You must use the credentials the lab provides you. Do not use your Google Cloud account credentials. Note: Using your own Google Cloud account for this lab may incur extra charges. -
Click through the subsequent pages:
- Accept the terms and conditions.
- Do not add recovery options or two-factor authentication (because this is a temporary account).
- Do not sign up for free trials.
After a few moments, the Google Cloud console opens in this tab.

Process overview
Here's a diagram of what you are going to build:
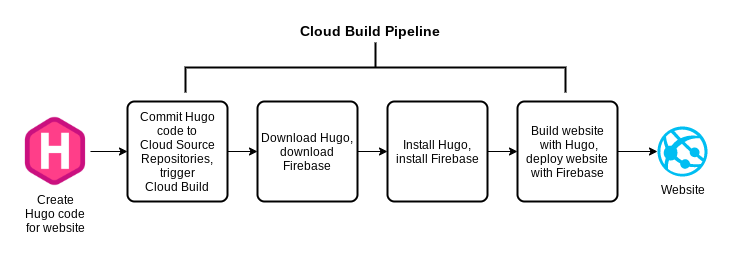
The goal is to be able to commit code and have it trigger the pipeline which will in turn deploy the website. Your journey will be divided into two parts. First, you will build the website locally and deploy it to Firebase manually so you can gain an understanding of the entire process. Second, you will automate the process by building a pipeline with Cloud Build.
Task 1. Manual deployment
First build the website manually on a Linux instance to learn the end-to-end process. You will also use the Linux instance to perform some of the one-time tasks that are needed to get Firebase up and running.
Connect to the Linux instance
- From the Navigation menu select Compute Engine > VM Instances. You will see one instance that has been built for you.
- At the end of the line you should see an External IP address and an SSH button as shown in the figure below. If these are obscured by an information panel, close that panel so you can see the entire line.
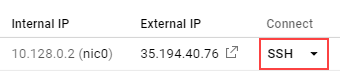
- Make a note of the External IP address for later use.
- Click SSH. A window will appear and you will see a shell prompt.
Install Hugo locally
Now install Hugo locally in the Linux instance so that you can test the website locally before deploying it with Firebase. A shell script has been provided to make this easier.
- In the Linux instance shell, examine the file installhugo.sh.
You can also see the contents below:
Output:
-
Note the use of the
wgetcommand to download Hugo and thetarcommand to unpack the Hugo archive. You will see similar commands later in this lab when you create the pipeline. -
Enter the commands below to run the script and install Hugo:
You will receive a message saying that Hugo has been installed into the /tmp directory as shown below. You are ready to build the website infrastructure.

Create a repository and the initial web site
Now create a Cloud Source Repository to hold the web site and then clone the repository to the Linux instance. Cloning a repository creates a mirror of it in the shell. This allows you to implement the web site while in the shell and later commit your changes to the file system. Later in this lab, you will set up a pipeline that responds to these commits to the repository.
- Install git on the Linux VM
Enter the following commands in the Linux instance shell:
If prompted, answer Yes to all prompts.
- Create and clone a code repository. Enter the following commands in the Linux instance shell:
You will receive confirmations about the creation of the repository and the cloning of the repository as shown in the figure below. You can ignore the two warning messages about the charge for the repository and that the repository is empty.

Click Check my progress to verify the objective.
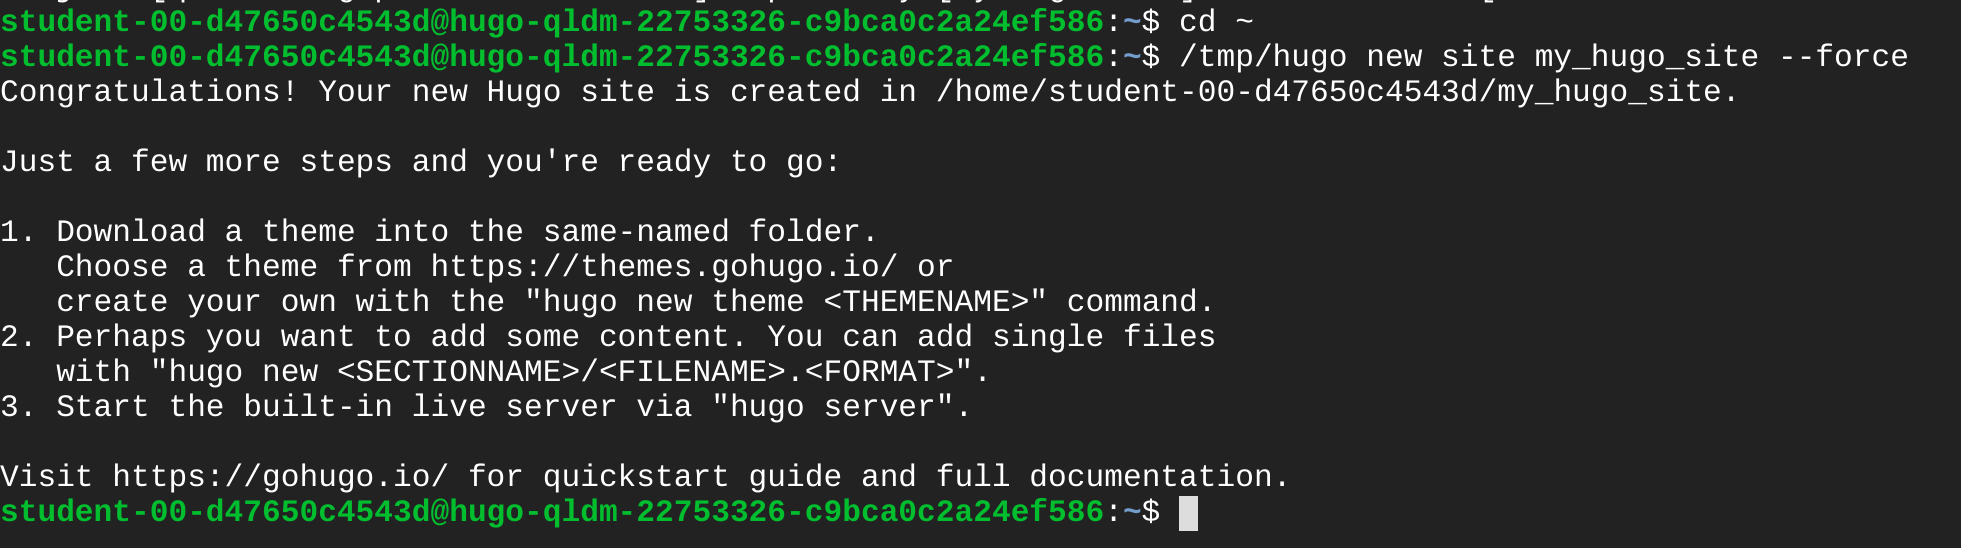
- Now you are ready to create the site structure. Enter the commands below in the Linux shell.
Normally the hugo command creates the directory. The --force option will create the site in the repository directory, which already exists. This allows you to keep the Git-related information in the directory that you just cloned. You will see messages indicating that the site has been created as shown in the figure below.
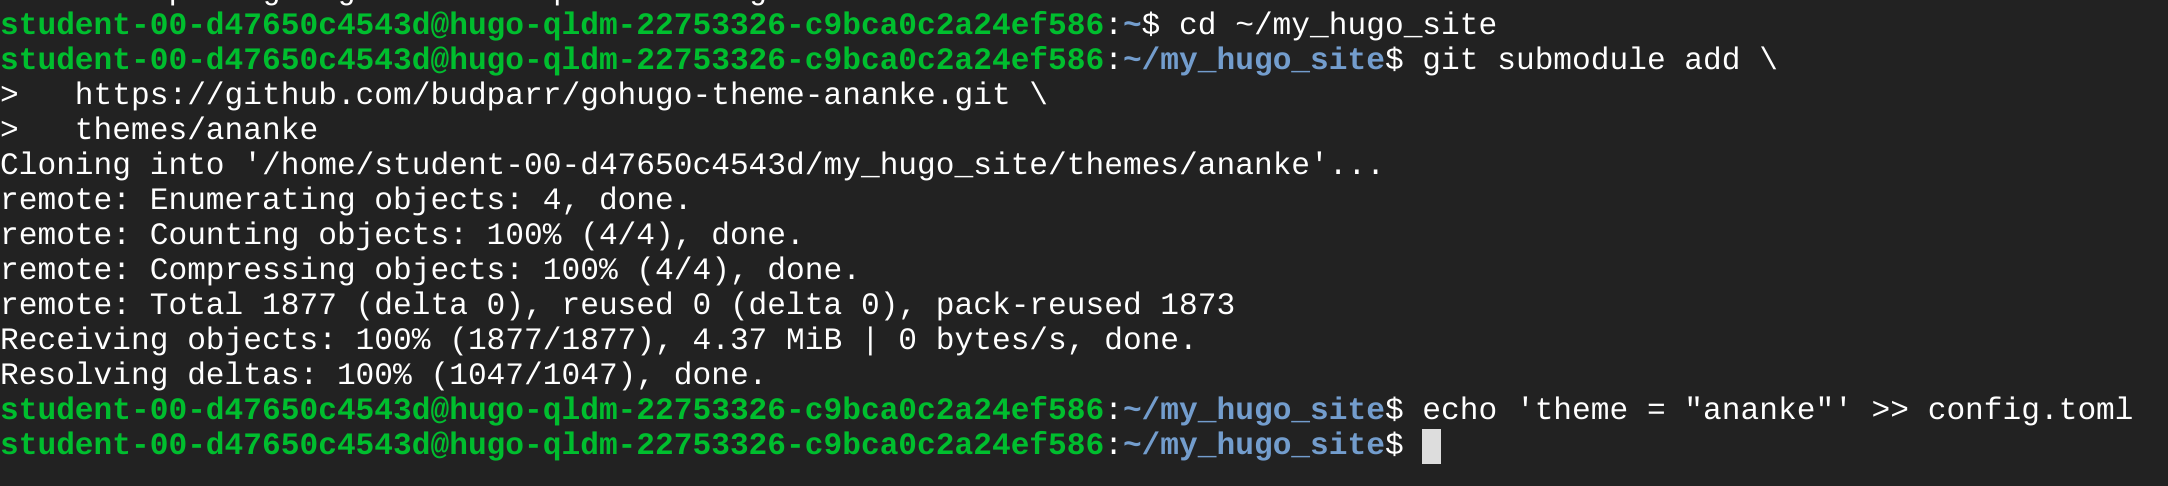
- Now install the Ananke theme to provide a layout for your site. Enter the following commands in the Linux instance shell:
You will see messages indicating that the theme has been cloned, as shown below.
- Remove the git files from the themes directory:
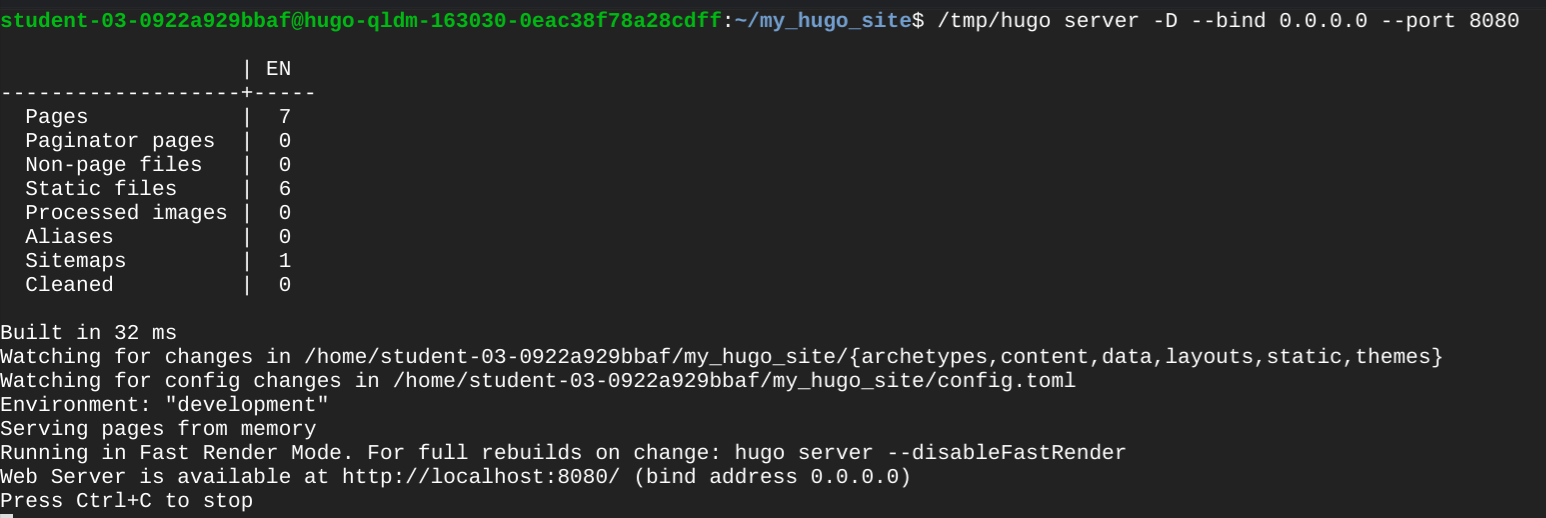
- With the structure of the web site set up, you can now preview it. Enter the command below to launch the site at TCP port 8080:
Hugo will build the site and serve it for access on TCP port 8080 as shown in the figure below. The server will run until it is stopped by pressing CTRL+C.
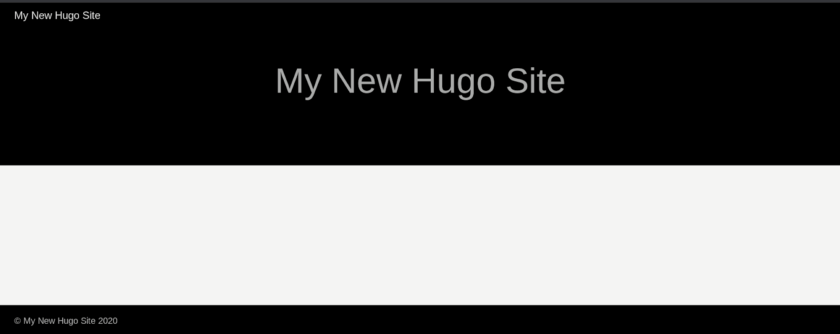
- Open a browser tab and browse to the external IP address at port 8080. Use the following URL, replacing
[EXTERNAL IP]with the external IP address of your instance:
The web site should look like this.
Click Check my progress to verify the objective.
- Go back to the Linux shell and press CTRL+C to stop the Hugo server.
Add Firebase to your project
Now that you know what the website looks like, it's time to deploy it to Firebase. First enable Firebase within your existing project.
-
Open a new tab in the browser you are using to access the Google Cloud Console, then open Firebase in it to go to the Firebase console.
-
Now click Add project.
You will be asked to select a name for your project.
- Click inside of the name field and select your existing Google Cloud project that starts with "qwiklabs-gcp-..." as shown in the figure below:
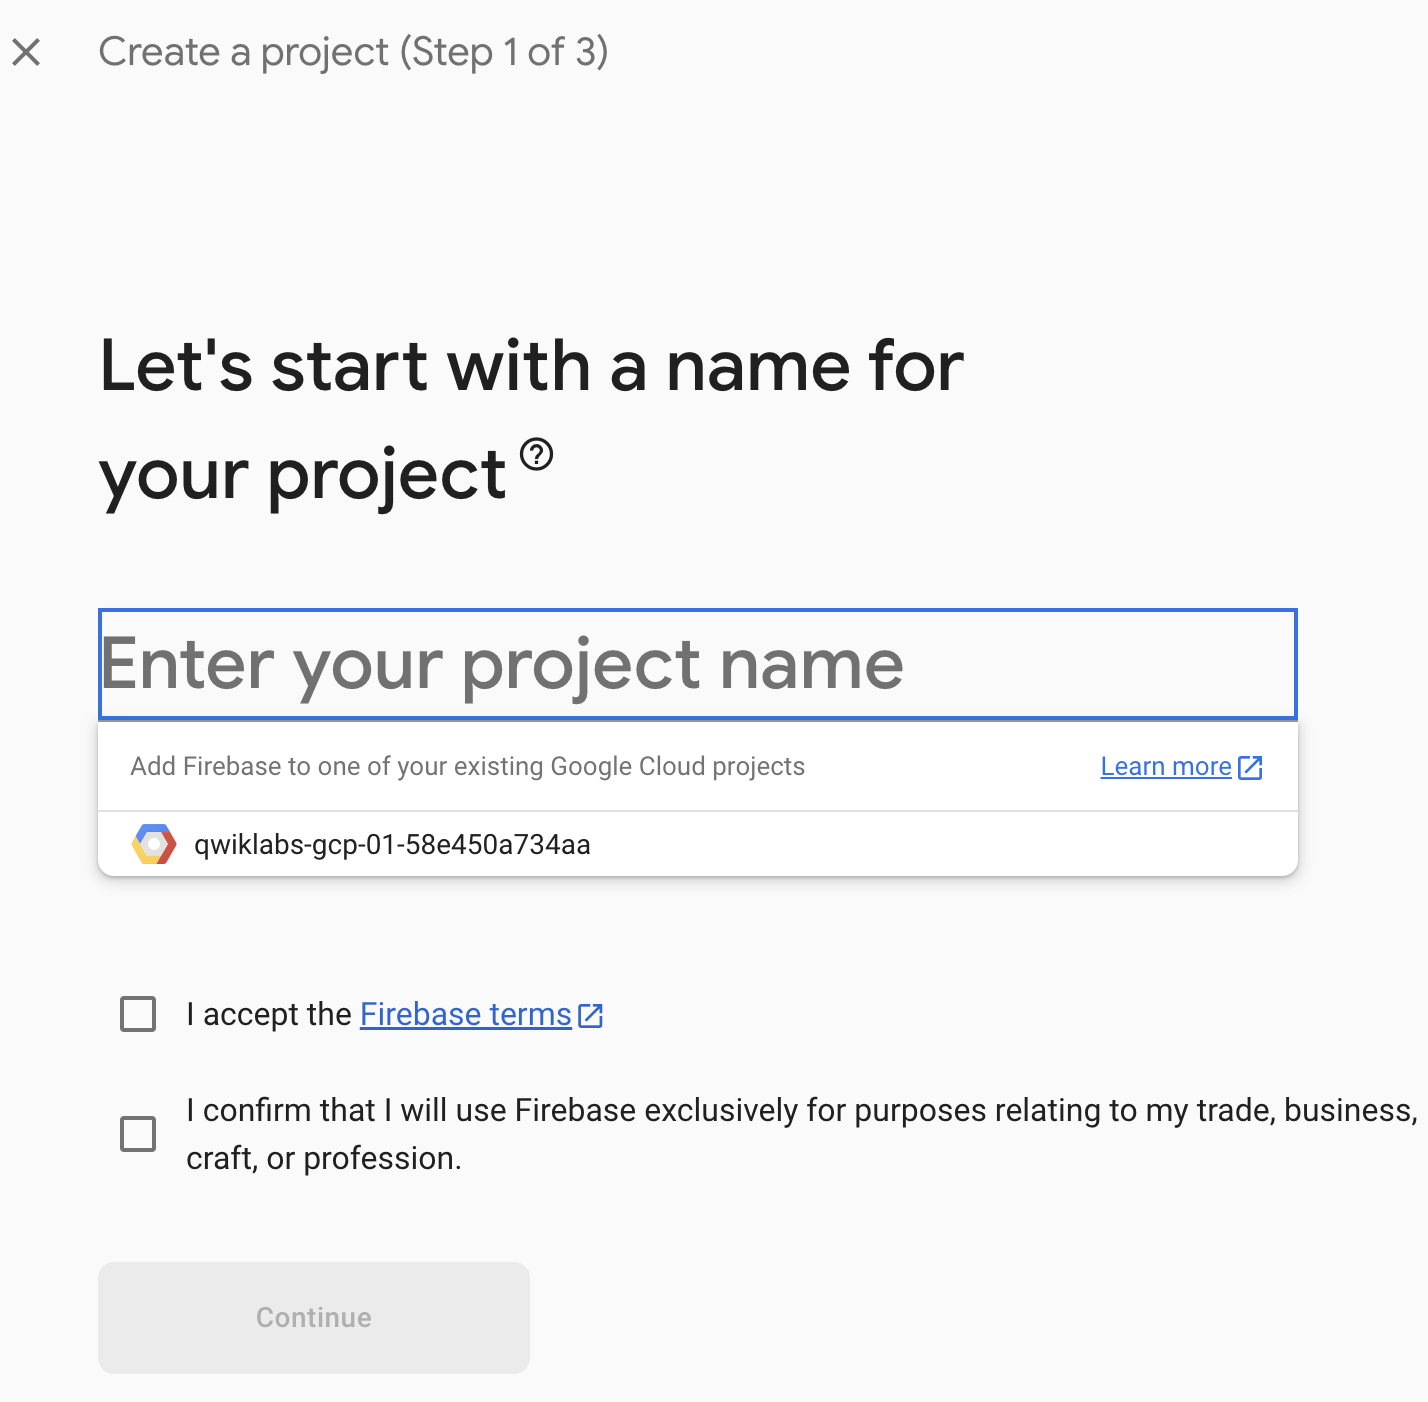
- Check I accept the Firebase terms and I confirm that I will use Firebase exclusively for purposes relating to my trade, business, craft, or profession. Click Continue.
- You may be asked to confirm the Firebase billing plan. The Firebase costs are included with the lab. If you are prompted, click Confirm plan.
- You will be asked to acknowledge some of the criteria when adding Firebase to a project. Click Continue.
- You will be asked to confirm the use of Google Analytics for this Firebase project. Since this is a lab environment, use the toggle to disable Google Analytics and click Add Firebase. It will take about one minute for Firebase to be added to the project.
- Click Continue if prompted after Firebase is added.
Deploy the site to Firebase
- Install Firebase CLI in the Linux instance shell:
- Now you need to initialize Firebase. Enter the command below into the shell:
- Select Hosting: Configure files for Firebase Hosting and (optionally) set up GitHub Action deploys using the arrow keys and spacebar and press Enter. When asked for a project option, select Use an existing project, then use the arrow keys, spacebar, and the Enter key to select the Project ID provided on the lab instruction page. For the public directory, select the default value public. For configuring as a single page application, select the default value of N. For setting up automatic builds and deploys with GitHub, select N.
If asked to overwrite any existing files, select Y.
- You are ready to deploy the application. Enter the commands below into the Linux instance shell to rebuild the site with Hugo and to deploy it with Firebase:
- After the application has been deployed, you will receive a hosting URL. Click on it and you will see the same website being served from the Firebase CDN (content delivery network). If you receive a generic "welcome" message, wait a few minutes for the CDN to be initialized and refresh the browser window. Save this hosting URL for later use.
You have now performed the entire deployment locally. Next, automate the process from end to end using Cloud Build.
Task 2. Automate the deployment
Perform the initial commit
The goal of building the pipeline is to be able to trigger builds when changes are made to the repository. You will start by performing an initial commit to the repository so that you can validate your ability to make future changes.
- Configure the git commands global parameters by entering the commands below into the Linux shell. Make sure to include the quotation marks:
- Enter the commands below in the Linux shell to create a
.gitignorefile to exclude certain directories from the repository:
- Perform the initial commit to the repository by entering the commands below:
You have now committed (uploaded) the initial version of the website to Google Cloud.
Configure the build
Cloud Build uses a file named cloudbuild.yaml in the root directory of the repository to perform the build. The file is in YAML format. Spacing and indentation are important, so it has already been placed on the Linux instance for you.
- Enter the command below in the Linux shell. Note the final period (".") at the end of the
cpcommand:
- Run the following to see what the
cloudbuild.yamlfile looks like. Some of the lines have wrapped because of their length.
Output:
- Here are some observations about the
cloudbuild.yamlfile:
- There are three named steps in this file each of which is performed by a container image. The first two steps use a Google-supported builder to use
wgetto download the Hugo and Firebase tools. These two steps run in parallel. Using the wget builder is faster than installingwgetmanually. - The third step uses a standard Ubuntu container to install Hugo and Firebase after which the site is built and deployed. Installing Hugo and Firebase for each deployment allows you to change the version of Hugo whenever you desire while also using the latest version of Firebase.
- The
tarandwgetcommands are nearly identical to those used earlier in theinstallhugo.shscript. - The file also uses a custom substitution variable (_HUGO_VERSION) and a Google-provided substitution variable (PROJECT_ID) to allow for this template to be used in different environments.
- The Hugo and Firebase binaries are created and installed in a temporary directory so that they do not inadvertently get deployed to the website itself.
Create the Cloud Build trigger
Now create a trigger that will respond to commits to the master branch of the repository.
- From the command line enter the following command:
- The trigger configuration contains the following details:
| Field | Value |
|---|---|
| Name | commit-to-master-branch |
| Description | Push to master |
| Event | Push to a branch |
| Repository | my_hugo_site |
| Branch (regex) | ^master$ (be sure Invert Regex is unchecked) |
| Build Configuration | Cloud Build configuration file (yaml or json) |
| Cloud Build Configuration file location | / cloudbuild.yaml |
The Cloud Build service account
The Cloud Build Service account needs to have permissions to use Firebase to deploy the website.
| Cloud Build | Role | Description |
|---|---|---|
| [PROJECT_NUMBER@cloudbuild.gserviceaccount.com | roles/firebasehosting.admin | Full read/write access to Hosting resources |
Test the pipeline
Now that you have created the pipeline, you can make a change to the site then commit it to see if the change propagates.
- In the Linux shell enter the command below to move to the repository directory:
- Edit the file config.toml and change the title:
- In the Linux shell, enter the commands below to commit the changes to the repository and trigger the Cloud Build pipeline:
- Check the build history to see the status of the build:
- Check the build logs for the current build:
- Grab the URL from the build performed:
- Browse to the hosting URL to see the results. You can also go to the Firebase console and examine the project to find the domain name.
Click Check my progress to verify the objective.
Congratulations!
You have learned how Cloud Build can orchestrate a pipeline to quickly deploy Hugo websites to Firebase, which provides a CDN and SSL certificate. Cloud Build allows you to tailor the process to adapt to your needs. The short deployment times allow you to innovate quickly and test your website revisions with little effort. Consult the Cloud Build and Firebase documentation for more information.
Google Cloud training and certification
...helps you make the most of Google Cloud technologies. Our classes include technical skills and best practices to help you get up to speed quickly and continue your learning journey. We offer fundamental to advanced level training, with on-demand, live, and virtual options to suit your busy schedule. Certifications help you validate and prove your skill and expertise in Google Cloud technologies.
Manual Last Updated January 30, 2024
Lab Last Tested December 11, 2023
Copyright 2024 Google LLC All rights reserved. Google and the Google logo are trademarks of Google LLC. All other company and product names may be trademarks of the respective companies with which they are associated.