检查点
Build with Cloud Build
/ 25
REST API Deployed
/ 25
Firestore database created
/ 25
Build image revision 0.2
/ 25
Developing a REST API with Go and Cloud Run
GSP761

Overview
For the labs in the Serverless Cloud Run Development course, you will read through a fictitious business scenario and assist the characters with their serverless migration plan.
Twelve years ago, Lily started the Pet Theory chain of veterinary clinics. As the chain of clinics has grown, Lily spends more time on the phone with insurance companies than treating pets. If only the insurance companies could see the totals of the treatments online!
In previous labs in this series, Ruby, the computer consultant, and Patrick, the DevOps Engineer, moved Pet Theory's customer database to a serverless Firestore database in the cloud, and then opened up access so customers can make appointments online. Since Pet Theory's Ops team is a single person, they need a serverless solution that doesn't require a lot of ongoing maintenance.
In this lab, you'll help Ruby and Patrick to give insurance companies access to customer data without exposing Personal Identifiable Information (PII). You will build a secure Representational State Transfer (REST) API gateway using Cloud Run, which is serverless. This will let the insurance companies see the total cost of treatments without seeing customers' PII.
Objectives
In this lab, you will:
- Develop a REST API with Go
- Import test customer data into Firestore
- Connect the REST API to the Firestore database
- Deploy the REST API to Cloud Run
Prerequisites
This is a intermediate level lab. This assumes familiarity with the Cloud Console and Cloud Shell environments. This lab is part of a series. Taking the previous labs could be helpful, but is not necessary:
- Importing Data to a Serverless Database
- Build a Serverless Web App with Firebase and Firestore
- Build a Serverless App that Creates PDF Files
Setup and requirements
Before you click the Start Lab button
Read these instructions. Labs are timed and you cannot pause them. The timer, which starts when you click Start Lab, shows how long Google Cloud resources will be made available to you.
This hands-on lab lets you do the lab activities yourself in a real cloud environment, not in a simulation or demo environment. It does so by giving you new, temporary credentials that you use to sign in and access Google Cloud for the duration of the lab.
To complete this lab, you need:
- Access to a standard internet browser (Chrome browser recommended).
- Time to complete the lab---remember, once you start, you cannot pause a lab.
How to start your lab and sign in to the Google Cloud console
-
Click the Start Lab button. If you need to pay for the lab, a pop-up opens for you to select your payment method. On the left is the Lab Details panel with the following:
- The Open Google Cloud console button
- Time remaining
- The temporary credentials that you must use for this lab
- Other information, if needed, to step through this lab
-
Click Open Google Cloud console (or right-click and select Open Link in Incognito Window if you are running the Chrome browser).
The lab spins up resources, and then opens another tab that shows the Sign in page.
Tip: Arrange the tabs in separate windows, side-by-side.
Note: If you see the Choose an account dialog, click Use Another Account. -
If necessary, copy the Username below and paste it into the Sign in dialog.
{{{user_0.username | "Username"}}} You can also find the Username in the Lab Details panel.
-
Click Next.
-
Copy the Password below and paste it into the Welcome dialog.
{{{user_0.password | "Password"}}} You can also find the Password in the Lab Details panel.
-
Click Next.
Important: You must use the credentials the lab provides you. Do not use your Google Cloud account credentials. Note: Using your own Google Cloud account for this lab may incur extra charges. -
Click through the subsequent pages:
- Accept the terms and conditions.
- Do not add recovery options or two-factor authentication (because this is a temporary account).
- Do not sign up for free trials.
After a few moments, the Google Cloud console opens in this tab.

Activate Cloud Shell
Cloud Shell is a virtual machine that is loaded with development tools. It offers a persistent 5GB home directory and runs on the Google Cloud. Cloud Shell provides command-line access to your Google Cloud resources.
- Click Activate Cloud Shell
at the top of the Google Cloud console.
When you are connected, you are already authenticated, and the project is set to your Project_ID,
gcloud is the command-line tool for Google Cloud. It comes pre-installed on Cloud Shell and supports tab-completion.
- (Optional) You can list the active account name with this command:
- Click Authorize.
Output:
- (Optional) You can list the project ID with this command:
Output:
gcloud, in Google Cloud, refer to the gcloud CLI overview guide.
|
Lily, Founder of Pet Theory |
Hi Ruby, Remember our conversation last week when I expressed how swamped I am with paperwork and phone calls from the insurance company? If only there was a way to allow the representatives to access customer records in an efficient, secure way. This current level of workload isn't sustainable. Can you help? Lily |
|
Ruby, Software Consultant |
Hi Lily, Yesterday I had lunch with Patrick and we drew up a plan to make it easier for authorized 3rd parties to securely access Pet Theory's digital records. We will build this in four steps:
Patrick and I already have the skillset for steps 1 + 2, so we are off to a good start. We plan to have a working prototype by the end of the week. Ruby |


Help Ruby manage the activities necessary to build the REST API for Pet Theory.
Task 1. Enable Google APIs
For this lab, 2 APIs have been enabled for you:
| Name | API |
|---|---|
| Cloud Build | cloudbuild.googleapis.com |
| Cloud Run | run.googleapis.com |
Task 2. Developing the REST API
- Activate your project:
- Clone the pet-theory repository and access the source code:
-
Use your favorite text editor, or use the Code Editor button in the Cloud Shell ribbon, to view the
go.modandgo.sumfiles. -
Create the file
main.goand add the below contents to the file:
- Now create a file named
Dockerfileand add the following to it:
The file server is the execution binary built from main.go.
- Run the following command to build the binary:
- After running the build command, make sure that you have the necessary Dockerfile and server in the same directory:
For most Cloud Run Go based apps, a template Dockerfile like the one above can typically be used without modifying it.
- Deploy your simple REST API by running:
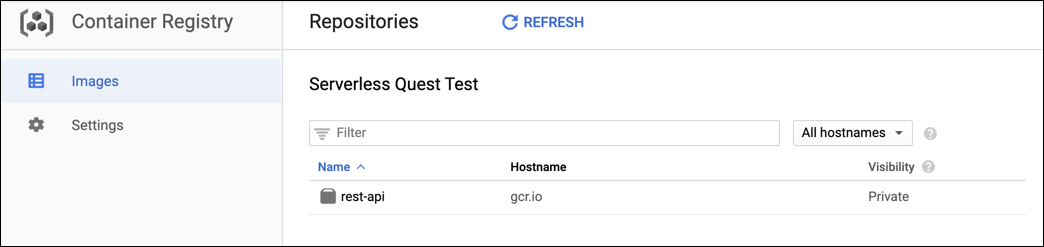
This command builds a container with your code and puts it in the Container Registry of your project. You can see the container if you click: Navigation menu > Container Registry. If you don't see rest-api, click Refresh.
Click Check my progress to verify that you've performed the above task.
- Once the container has been built, deploy it:
- When the deployment is complete, you will see a message like this:
Click Check my progress to verify that you've performed the above task.
- Click on the Service URL at the end of that message to open it in a new browser tab. Append
/v1/to the end of the URL and then press Enter.
You should see this message:
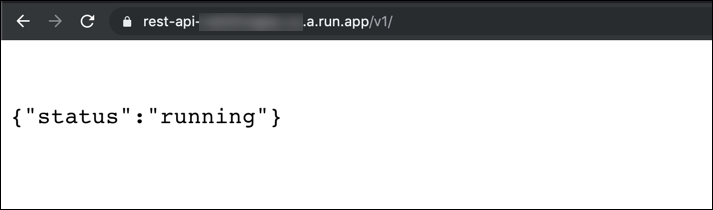
The REST API is up and running. With the prototype service available, in the next section the API will be used to retrieve "customer" information from a Firestore database.
Task 3. Import test customer data
|
Ruby, Software Consultant |
Hey Patrick, Do you still have the pseudo customer data we created a while back? We will need that for testing. Do you remember how to set up a Firestore database and import data? Ruby |
|
Patrick, IT Administrator |
Hi Ruby, Yes, I still have the test data. I will migrate it to Firestore today so you can use it for testing. Patrick |

Ruby and Patrick have previously created a test database of 10 customers, with some proposed treatments for one customer's cat.
Help Patrick configure the Firestore database and import the customer test data. First, enable Firestore in your project.
-
Return to the Cloud Console and click the Navigation Menu > Firestore.
-
Click the Create Database button.
-
Click the Native Mode button.
-
Select the location
from the list available and click Create.
Wait for the database to be created before proceeding.
Click Check my progress to verify that you've performed the above task.
- Migrate the import files into a Cloud Storage bucket that has been created for you:
- Now import this data into Firebase:
Reload the Cloud Console browser to see the Firestore results.
- In Firestore, click customers under "Root". You should see the imported pet data, browse around. If you don't see any data, try refreshing the page.
Nice work, the Firestore database has been successfully created and populated with test data!
Task 4. Connect the REST API to the Firestore database
|
Ruby, Software Consultant |
Hi Lily, Just a quick update: Patrick and I have completed the first two tasks on the list. Now I'm moving on to structuring the REST API so it can access the customer data in Firestore. Ruby |
|
Lily, Founder of Pet Theory |
Hi Ruby, Great work, Ruby! Looking forward to seeing the next stage in action. Lily |
In this section you'll help Ruby create another end-point in the REST API that will look like this:
For example, that URL should return the total amounts for all proposed, accepted, and rejected treatments for the customer with id 22530, if they exist in the Firestore database:
This new functionality requires a package to access the Firestore database and another one to handle cross-origin resource sharing (CORS).
- Get the value of the $GOOGLE_CLOUD_PROJECT environment variable
- Open the existing
main.gofile in the pet-theory/lab08 directory.
- Replace the content of the file with the code below, ensure the
PROJECT_IDis set to:
- Add handler support at the bottom of the file:
- Add Customer support to the bottom of the file:
- Save the file.
Task 6. Pop quiz
Task 7. Deploying a new revision
- Rebuild the source code:
- Build a new image for the REST API:
Click Check my progress to verify the objective.
- Deploy the updated image:
- Go back to the browser tab that already points to that URL (with
/v1/at the end). Refresh it and make sure you get the same message as before, that indicates that the API status is still running.
- Append
/customer/22530to the application URL in your browser's address bar. You should get this JSON response, listing the sum total of the customer's proposed, approved and rejected treatments:

- Here are some additional client IDs you can put in the URL instead of 22530:
- 34216
- 70156 (all amounts should be zero)
- 12345 (client/pet doesn't exist, should return an error e.g. Query is nil)
You have built a scalable, low-maintenance, serverless REST API that reads from a database.
Congratulations!
Congratulations! In this lab, you helped Ruby and Patrick successfully build a prototype REST API for Pet Theory. You created a REST API that connects to a Firestore database and deployed it to Cloud Run. You also tested the API to ensure it works as expected.
Google Cloud training and certification
...helps you make the most of Google Cloud technologies. Our classes include technical skills and best practices to help you get up to speed quickly and continue your learning journey. We offer fundamental to advanced level training, with on-demand, live, and virtual options to suit your busy schedule. Certifications help you validate and prove your skill and expertise in Google Cloud technologies.
Manual Last Updated February 01, 2024
Lab Last Tested December 08, 2023
Copyright 2024 Google LLC All rights reserved. Google and the Google logo are trademarks of Google LLC. All other company and product names may be trademarks of the respective companies with which they are associated.