Punkty kontrolne
Build with Cloud Build
/ 25
Deploy to Cloud Run
/ 25
Service Account created
/ 25
Check PubSub Subscription
/ 25
Creating PDFs with Go and Cloud Run
- GSP762
- Overview
- Objectives
- Setup and requirements
- Architecture
- Using Google APIs
- Task 1. Get the source code
- Task 2. Creating an invoice microservice
- Task 3. Create a pdf-conversion service
- Task 4. Create a Service Account
- Task 5. Testing the Cloud Run service
- Task 6. Cloud Storage trigger
- Task 7. Testing Cloud Storage notification
- Congratulations!
GSP762
Overview
In this lab you will build a PDF converter web app on Cloud Run, which is a serverless service, that automatically converts files stored in Google Drive into PDFs stored in segregated Google Drive folders.
Objectives
In this lab, you will:
- Convert a Go application to a container
- Learn how to build containers with Google Cloud Build
- Create a Cloud Run service that converts files to PDF files in the cloud.
- Understand how to create Service Accounts and add permissions
- Use event processing with Cloud Storage
Setup and requirements
Before you click the Start Lab button
Read these instructions. Labs are timed and you cannot pause them. The timer, which starts when you click Start Lab, shows how long Google Cloud resources will be made available to you.
This hands-on lab lets you do the lab activities yourself in a real cloud environment, not in a simulation or demo environment. It does so by giving you new, temporary credentials that you use to sign in and access Google Cloud for the duration of the lab.
To complete this lab, you need:
- Access to a standard internet browser (Chrome browser recommended).
- Time to complete the lab---remember, once you start, you cannot pause a lab.
How to start your lab and sign in to the Google Cloud console
-
Click the Start Lab button. If you need to pay for the lab, a pop-up opens for you to select your payment method. On the left is the Lab Details panel with the following:
- The Open Google Cloud console button
- Time remaining
- The temporary credentials that you must use for this lab
- Other information, if needed, to step through this lab
-
Click Open Google Cloud console (or right-click and select Open Link in Incognito Window if you are running the Chrome browser).
The lab spins up resources, and then opens another tab that shows the Sign in page.
Tip: Arrange the tabs in separate windows, side-by-side.
Note: If you see the Choose an account dialog, click Use Another Account. -
If necessary, copy the Username below and paste it into the Sign in dialog.
{{{user_0.username | "Username"}}} You can also find the Username in the Lab Details panel.
-
Click Next.
-
Copy the Password below and paste it into the Welcome dialog.
{{{user_0.password | "Password"}}} You can also find the Password in the Lab Details panel.
-
Click Next.
Important: You must use the credentials the lab provides you. Do not use your Google Cloud account credentials. Note: Using your own Google Cloud account for this lab may incur extra charges. -
Click through the subsequent pages:
- Accept the terms and conditions.
- Do not add recovery options or two-factor authentication (because this is a temporary account).
- Do not sign up for free trials.
After a few moments, the Google Cloud console opens in this tab.

Activate Cloud Shell
Cloud Shell is a virtual machine that is loaded with development tools. It offers a persistent 5GB home directory and runs on the Google Cloud. Cloud Shell provides command-line access to your Google Cloud resources.
- Click Activate Cloud Shell
at the top of the Google Cloud console.
When you are connected, you are already authenticated, and the project is set to your Project_ID,
gcloud is the command-line tool for Google Cloud. It comes pre-installed on Cloud Shell and supports tab-completion.
- (Optional) You can list the active account name with this command:
- Click Authorize.
Output:
- (Optional) You can list the project ID with this command:
Output:
gcloud, in Google Cloud, refer to the gcloud CLI overview guide.
Architecture
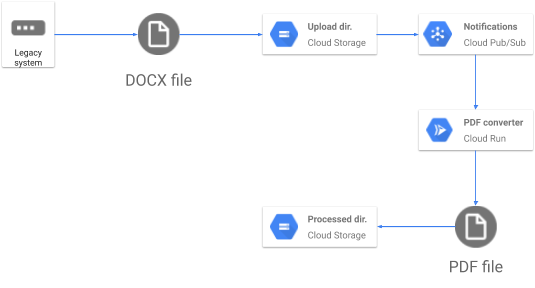
In this lab you will assist the Pet Theory Veterinary practice to automatically convert their invoices into PDFs so that customers can open them reliably.
Using Google APIs
During this lab you will use Google APIs. The following APIs have been enabled for you:
| Name | API |
|---|---|
| Cloud Build | cloudbuild.googleapis.com |
| Cloud Storage | storage-component.googleapis.com |
| Cloud Run | run.googleapis.com |
Task 1. Get the source code
Get started by downloading the code necessary for this lab.
- Activate your lab account:
- Run the following to clone the Pet Theory repository:
- Move to the correct directory:
Task 2. Creating an invoice microservice
In this section you will create a Go application to process requests. As outlined in the architecture diagram, you will integrate Cloud Storage as part of the solution.
-
Click the Open Editor icon and then click Open in a new window.
-
Navigate to pet-theory > lab03 > server.go
-
Open the
server.gosource code and edit it to match the text below:
- Now run the following to build the application:
The functions called by this top-level code are in source files:
- server.go
- notification.go
- gcs.go
With the application has been successfully built, you can create the pdf-conversion service.
Task 3. Create a pdf-conversion service
The PDF service will use Cloud Run and Cloud Storage to initiate a process each time a file is uploaded to the designated storage.
To achieve this you will use a common pattern of event notifications together with Cloud Pub/Sub. Doing this enables the application to concentrate only on processing information. Transporting and passing information is performed by other services, which allows you to keep the application simple.
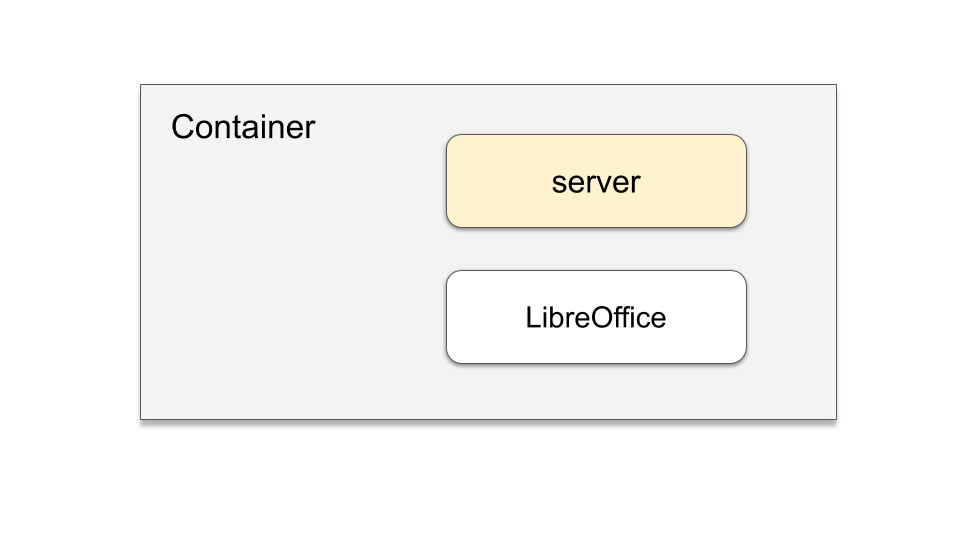
Building the invoice module requires the integration of two components:
Adding the LibreOffice package means it can be used in your application.
- In the Open editor, Open the existing
Dockerfilemanifest and update the file as shown below:
-
Save the updated
Dockerfile. -
Initiate a rebuild of the
pdf-converterimage using Cloud Build:
Click Check my progress to verify that you've performed the above task.
- Deploy the updated pdf-converter service.
--memory option.- Run these commands to build the container and to deploy it:
Click Check my progress to verify that you've performed the above task.
The Cloud Run service has now been successfully deployed. However we deployed an application that requires the correct permissions to access it.
Task 4. Create a Service Account
A Service Account is a special type of account with access to Google APIs.
In this lab uses a Service Account to access Cloud Run when a Cloud Storage event is processed. Cloud Storage supports a rich set of notifications that can be used to trigger events.
Next, update the code to notify the application when a file has been uploaded.
- Click the Navigation menu > Cloud Storage, and verify that two buckets have been created. You should see:
- PROJECT_ID-processed
- PROJECT_ID-upload
- Create a Pub/Sub notification to indicate a new file has been uploaded to the docs bucket ("uploaded"). The notifications will be labeled with the topic "new-doc".
- Create a new service account to trigger the Cloud Run services:
- Give the service account permission to invoke the PDF converter service:
- Find your project number by running this command:
- Enable your project to create Cloud Pub/Sub authentication tokens:
Click Check my progress to verify that you've performed the above task.
With the Service Account created it can be used to invoke the Cloud Run Service.
Task 5. Testing the Cloud Run service
Before progressing further, test the deployed service. Remember the service requires authentication, so test that to ensure it is actually private.
- Save the URL of your service in the environment variable $SERVICE_URL:
- Display the SERVICE URL:
- Make an anonymous GET request to your new service:
The anonymous GET request will result in an error message
"Your client does not have permission to get URL".
This is good; you don't want the service to be callable by anonymous users.
- Now try invoking the service as an authorized user:
- You will get the response "Ready to process POST requests from Cloud Storage trigger"
Great work, you have successfully deployed an authenticated Cloud Run service.
Task 6. Cloud Storage trigger
To initiate a notification when new content is uploaded to Cloud Storage, add a subscription to your existing Pub/Sub Topic.
-
Create a Pub/Sub subscription so that the PDF converter will be run whenever a message is published to the topic
new-doc:gcloud pubsub subscriptions create pdf-conv-sub \ --topic new-doc \ --push-endpoint=$SERVICE_URL \ --push-auth-service-account=pubsub-cloud-run-invoker@$GOOGLE_CLOUD_PROJECT.iam.gserviceaccount.com
Click Check my progress to verify that you've performed the above task.
Now whenever a file is uploaded the Pub/Sub subscription will interact with your Service Account. The Service Account will then initiate your PDF Converter Cloud Run service.
Task 7. Testing Cloud Storage notification
To test the Cloud Run service, use the example files available.
- Copy the test files into your upload bucket:
-
In the Cloud Console, click Cloud Storage > Buckets followed by the bucket name whose name ends in "-upload" and click the Refresh button a few times and see how the files are deleted, one by one, as they are converted to PDFs.
-
Then click Buckets, followed by the bucket whose name ends in "-processed". It should contain PDF versions of all files. Feel free to open the PDF files to make sure they were properly converted.
-
Once the upload is done, click Navigation menu > Cloud Run and click on the pdf-converter service.
-
Select the LOGS tab and add a filter of "Converting" to see the converted files.
-
Navigate to Navigation menu > Cloud Storage and open the bucket name ending in "-upload" to confirm all files uploaded have been processed.
Excellent work, you have successfully built a new service to create a PDF using files uploaded to Cloud Storage.
Congratulations!
In this lab, you've learned how to convert a Go application into a container, learned how to construct containers utilizing Google Cloud Build, and launched a Cloud Run service. You've also gained skills in enabling permissions through a Service Account and leveraging Cloud Storage event processing, all of which are integral to the operation of the pdf-converter service that transforms documents into PDFs and stores them in the "processed" bucket.
Google Cloud training and certification
...helps you make the most of Google Cloud technologies. Our classes include technical skills and best practices to help you get up to speed quickly and continue your learning journey. We offer fundamental to advanced level training, with on-demand, live, and virtual options to suit your busy schedule. Certifications help you validate and prove your skill and expertise in Google Cloud technologies.
Manual Last Updated Feb 01, 2024
Lab Last Tested November 29, 2023
Copyright 2024 Google LLC All rights reserved. Google and the Google logo are trademarks of Google LLC. All other company and product names may be trademarks of the respective companies with which they are associated.


