Punkty kontrolne
Scale Up Hello App
/ 30
Create node pool
/ 30
Managing a Regional Cluster
/ 20
Simulate Traffic
/ 20
Exploring Cost-optimization for GKE Virtual Machines
GSP767

Overview
The underlying infrastructure of a Google Kubernetes Engine cluster is made up of nodes which are individual Compute VM instances. This lab shows how optimization of your cluster's infrastructure can help save costs and lead to a more efficient architecture for your applications.
You will learn strategy to help maximize utilization (and avoid underutilization) of your valuable infrastructure resources through selecting properly shaped machine types for an example workload. In addition to the type of infrastructure you’re using, the physical geographical location of that infrastructure also impacts cost. Through this exercise, you will explore how to create a cost effective strategy for managing higher availability regional clusters.
Objectives
In this lab, you will learn how to:
- Examine Resource Usage of a Deployment
- Scale Up a Deployment
- Migrate Your Workload to a Node Pool with an Optimized Machine Type
- Explore Location Options for your Cluster
- Monitor Flow Logs between Pods in Different Zones
- Move a Chatty Pod to Minimize Cross-Zonal Traffic Costs
Setup and requirements
Before you click the Start Lab button
Read these instructions. Labs are timed and you cannot pause them. The timer, which starts when you click Start Lab, shows how long Google Cloud resources will be made available to you.
This hands-on lab lets you do the lab activities yourself in a real cloud environment, not in a simulation or demo environment. It does so by giving you new, temporary credentials that you use to sign in and access Google Cloud for the duration of the lab.
To complete this lab, you need:
- Access to a standard internet browser (Chrome browser recommended).
- Time to complete the lab---remember, once you start, you cannot pause a lab.
How to start your lab and sign in to the Google Cloud console
-
Click the Start Lab button. If you need to pay for the lab, a pop-up opens for you to select your payment method. On the left is the Lab Details panel with the following:
- The Open Google Cloud console button
- Time remaining
- The temporary credentials that you must use for this lab
- Other information, if needed, to step through this lab
-
Click Open Google Cloud console (or right-click and select Open Link in Incognito Window if you are running the Chrome browser).
The lab spins up resources, and then opens another tab that shows the Sign in page.
Tip: Arrange the tabs in separate windows, side-by-side.
Note: If you see the Choose an account dialog, click Use Another Account. -
If necessary, copy the Username below and paste it into the Sign in dialog.
{{{user_0.username | "Username"}}} You can also find the Username in the Lab Details panel.
-
Click Next.
-
Copy the Password below and paste it into the Welcome dialog.
{{{user_0.password | "Password"}}} You can also find the Password in the Lab Details panel.
-
Click Next.
Important: You must use the credentials the lab provides you. Do not use your Google Cloud account credentials. Note: Using your own Google Cloud account for this lab may incur extra charges. -
Click through the subsequent pages:
- Accept the terms and conditions.
- Do not add recovery options or two-factor authentication (because this is a temporary account).
- Do not sign up for free trials.
After a few moments, the Google Cloud console opens in this tab.

This lab generates a small cluster you will use. The provisioning of the cluster takes about 2-5 minutes.
If you've pressed the Start Lab button and see a blue resources being provisioned message with a loading circle, your cluster is still being created.
You can begin reading the next instructions and explanations while you wait, but any shell commands won't work until your resources are done provisioning.
Task 1. Understanding Node machine types
General overview
A machine type is a set of virtualized hardware resources available to a virtual machine (VM) instance, including the system memory size, virtual CPU (vCPU) count, and persistent disk limits. Machine types are grouped and curated by families for different workloads.
When choosing a machine type for your node pool, the general purpose machine type family typically offers the best price-performance ratio for a variety of workloads. The general purpose machine types consist of the N-series and E2-series:

The differences between the machine types might help your app and they might not. In general, E2s have similar performance to N1s but are optimized for cost. Usually, utilizing the E2 machine type alone can help save on costs.
However, with a cluster, it's most important that the resources utilized are optimized based on your application’s needs. For bigger applications or deployments that need to scale heavily, it can be cheaper to stack your workloads on a few optimized machines rather than spreading them across many general purpose ones.
Understanding the details of your app is important for this decision making progress. If your app has specific requirements, you can make sure the machine type is shaped to fit the app.
In the following section, you will take a look at a demo app and migrate it to a node pool with a well-shaped machine type.
Task 2. Choosing the right machine type for the Hello app
Inspect the Hello demo cluster's requirements
On startup, your lab generated a Hello Demo Cluster with two E2 medium (2vCPU, 4GB memory) nodes. This cluster is deploying one replica of a simple web application called Hello App, a web server written in Go that responds to all requests with the message "Hello, World!".
- Once your lab has finished provisioning, in the Cloud Console, click on your Navigation Menu and then click on Kubernetes Engine.
-
In the Kubernetes Clusters window, select your hello-demo-cluster.
-
In the following window, select the Nodes tab:
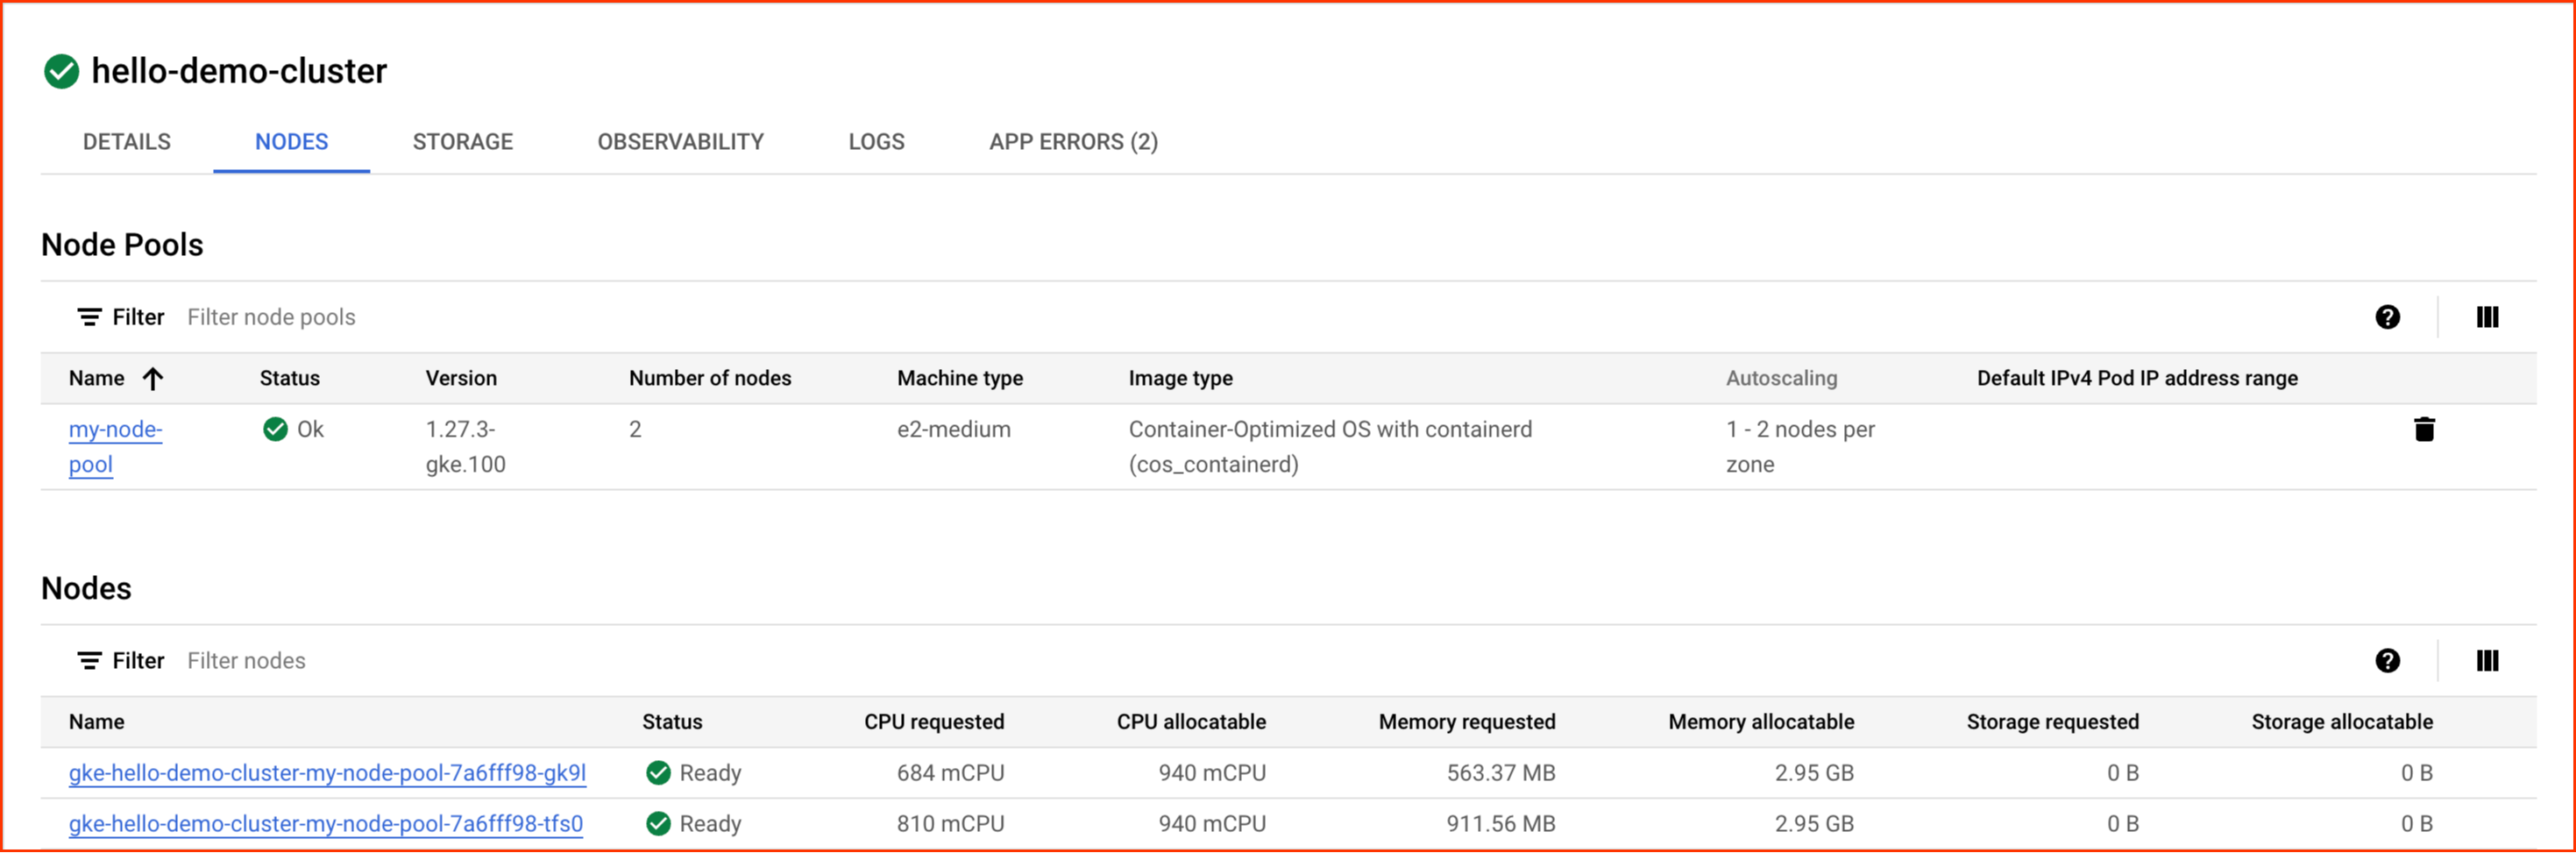
You should now see a list of your cluster's nodes:

Observe how GKE has utilized the resources of your cluster. You can see how much cpu and memory is being requested by each node as well as how much your nodes could potentially allocate.
- Click on the first node of your cluster.
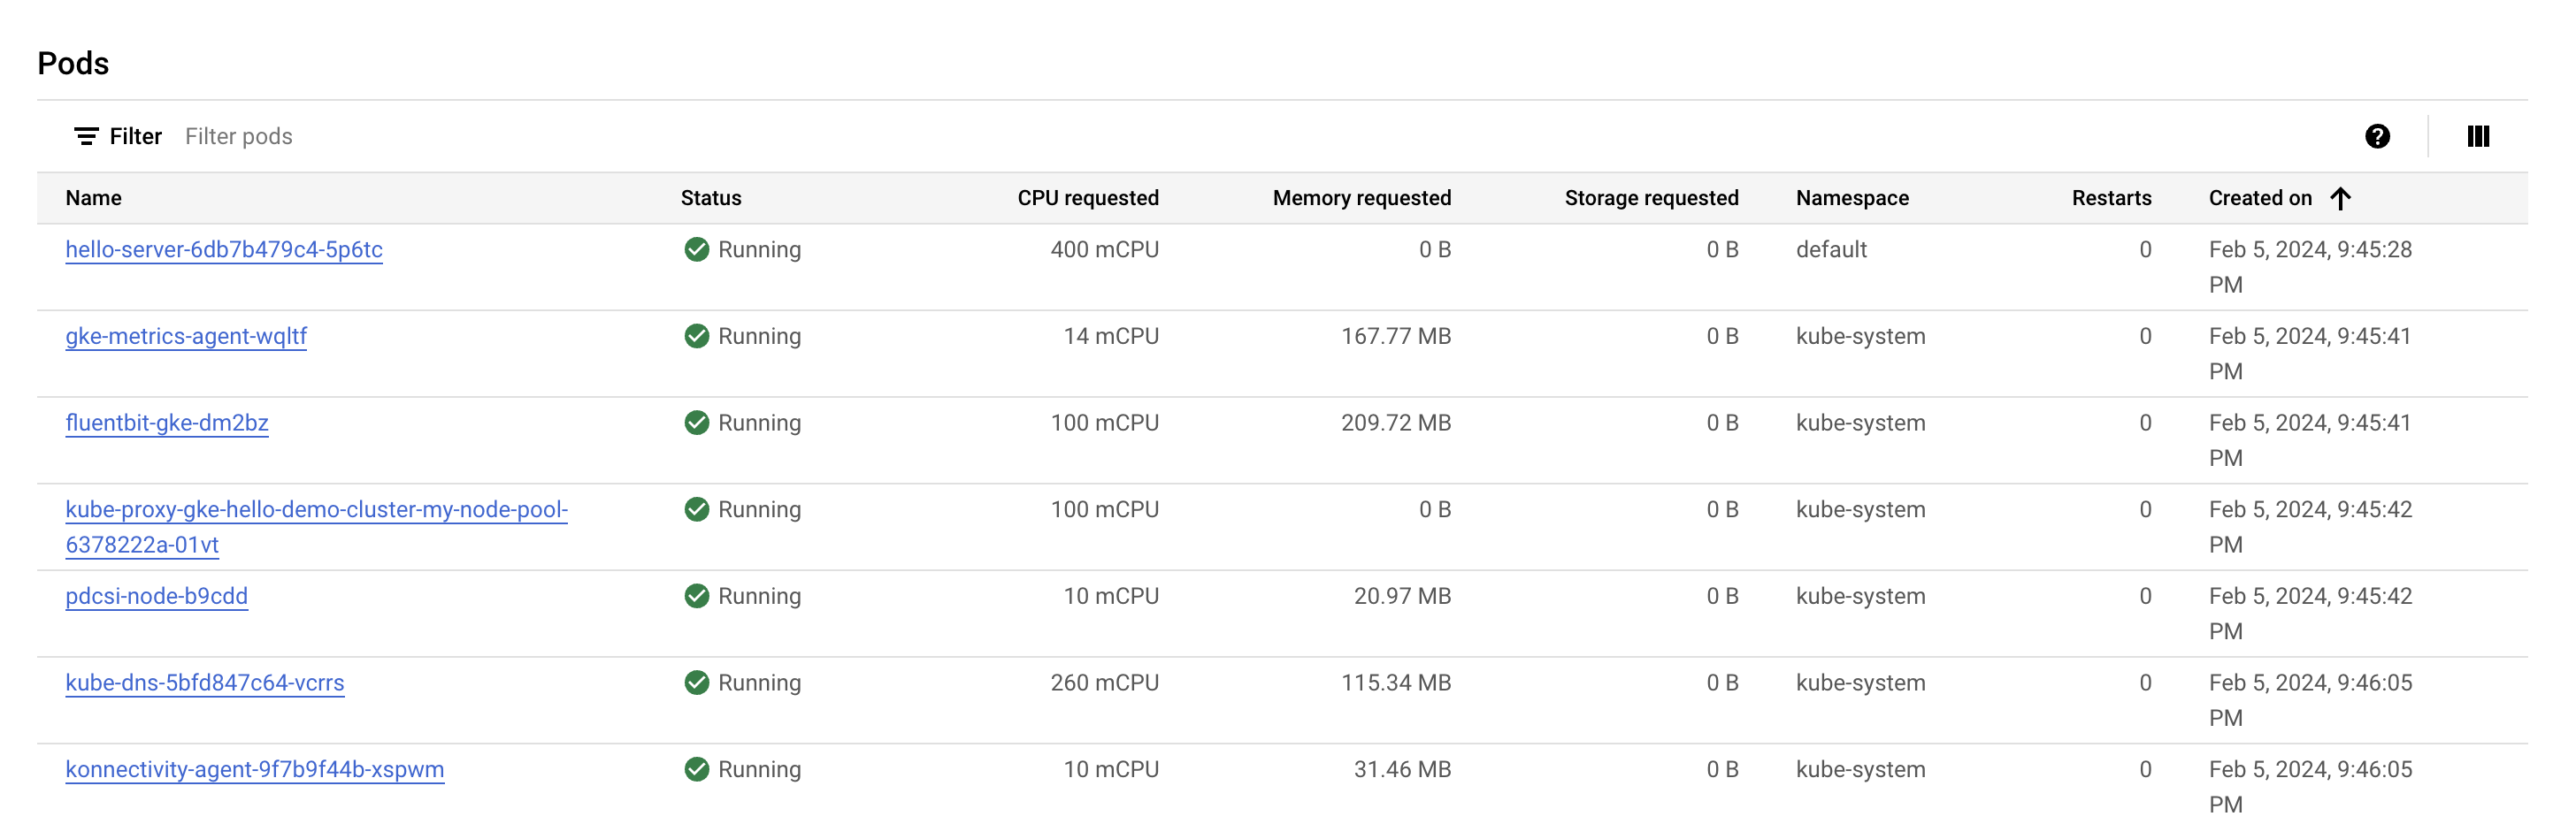
Look at the Pods section. You should see your hello-server pod in the default namespace. If you don't see a hello-server pod, go back and select the second node of your cluster instead.
You'll notice the hello-server pod is requesting 400 mcpu. You should also see a handful of other kube-system pods running. These are loaded to help enable GKE's cluster services, like monitoring.
- Press the Back button to return to the previous Nodes page.
Already, you'll notice that it takes two E2-medium nodes to run one replica of your Hello-App along with the essential kube-system services. Also, while you're using most of the cluster's cpu resources, you're only using about 1/3rd of its allocatable memory.
If the workload for this app were completely static, you could create a machine type with a custom fitted shape that has the exact amount of cpu and memory needed. By doing this, you would consequently save costs on your overall cluster infrastructure.
However, GKE clusters often run multiple workloads and those workloads will typically need to be scaled up and down.
What would happen if the Hello App were to be scaled up?
Activate Cloud Shell
Cloud Shell is a virtual machine that is loaded with development tools. It offers a persistent 5GB home directory and runs on the Google Cloud. Cloud Shell provides command-line access to your Google Cloud resources.
- Click Activate Cloud Shell
at the top of the Google Cloud console.
When you are connected, you are already authenticated, and the project is set to your Project_ID,
gcloud is the command-line tool for Google Cloud. It comes pre-installed on Cloud Shell and supports tab-completion.
- (Optional) You can list the active account name with this command:
- Click Authorize.
Output:
- (Optional) You can list the project ID with this command:
Output:
gcloud, in Google Cloud, refer to the gcloud CLI overview guide.
Scale up Hello app
- Access your cluster's credentials:
- Scale up your
Hello-Server:
Click Check my progress to verify that you've performed the above task.
- Back in the Console, select Workloads from the Kubernetes Engine menu on the left.
You might see your hello-server with the Does not have minimum availability error status.
- Click on the error message to get status details. You will see that the reason is
Insufficient cpu.
This is to be expected. If you remember, the cluster barely had any more cpu resources and you requested another 400m with another replica of the hello-server.
- Increase your node pool to handle your new request:
-
When asked to continue, type
yand pressenter. -
In the Console, refresh the Workloads page until you see the status of your
hello-serverworkload turn to OK:

Examine your cluster
With the workload successfully scaled up, navigate back to the nodes tab of your cluster.
- Click on hello-demo-cluster:

- Then, click on the Nodes tab.
The larger node pool is able to handle the heavier workload, but look at how your infrastructure's resources are being utilized.
Although GKE uses a cluster's resources to the best of its ability, there is room for some optimization here. You can see that one of your nodes is using most of its memory, but two of your nodes have a considerable amount of unused memory.
At this point, if you continued to scale up the app, you would start to see a similar pattern. Kubernetes would attempt to find a node for each new replica of the hello-server deployment, fail, and then create a new node with roughly 600m of cpu.
A binpacking problem
A binpacking problem is one in which you must fit items of various volumes/shapes into a finite number of regularly shaped “bins” or containers. Essentially, the challenge is to fit the items into the fewest number of bins, “packing” them as efficiently as possible.
This is similar to the challenge faced when trying to optimize Kubernetes clusters for the applications they run. You have a number of applications, likely with various resource requirements (i.e. memory and cpu). You must try to fit these applications into the infrastructure resources Kubernetes manages for you (where most of your cluster’s cost likely lies) as efficiently as possible.
Your Hello Demo Cluster does not employ very efficient binpacking. It would be more cost-efficient to configure Kubernetes to use a machine type more fitted to this workload.
Migrate to optimized node pool
- Create a new node pool with a larger machine type:
Click Check my progress to verify that you've performed the above task.
Now, you can migrate pods to the new node pool by following these steps:
-
Cordon the existing node pool: This operation marks the nodes in the existing node pool (
node) as unschedulable. Kubernetes stops scheduling new Pods to these nodes once you mark them as unschedulable. -
Drain the existing node pool: This operation evicts the workloads running on the nodes of the existing node pool (
node) gracefully.
- First, cordon the original node pool:
- Next, drain the pool:
At this point, you should see that your pods are running on the new, larger-pool, node pool:
- With the pods migrated, it's safe to delete the old node pool:
- When asked to continue, type
yandenter.
Deletion can take about 2 minutes. Read the next section while you wait.
Cost analysis
You're now running the same workload which required three e2-medium machines on one e2-standard-2 machine.
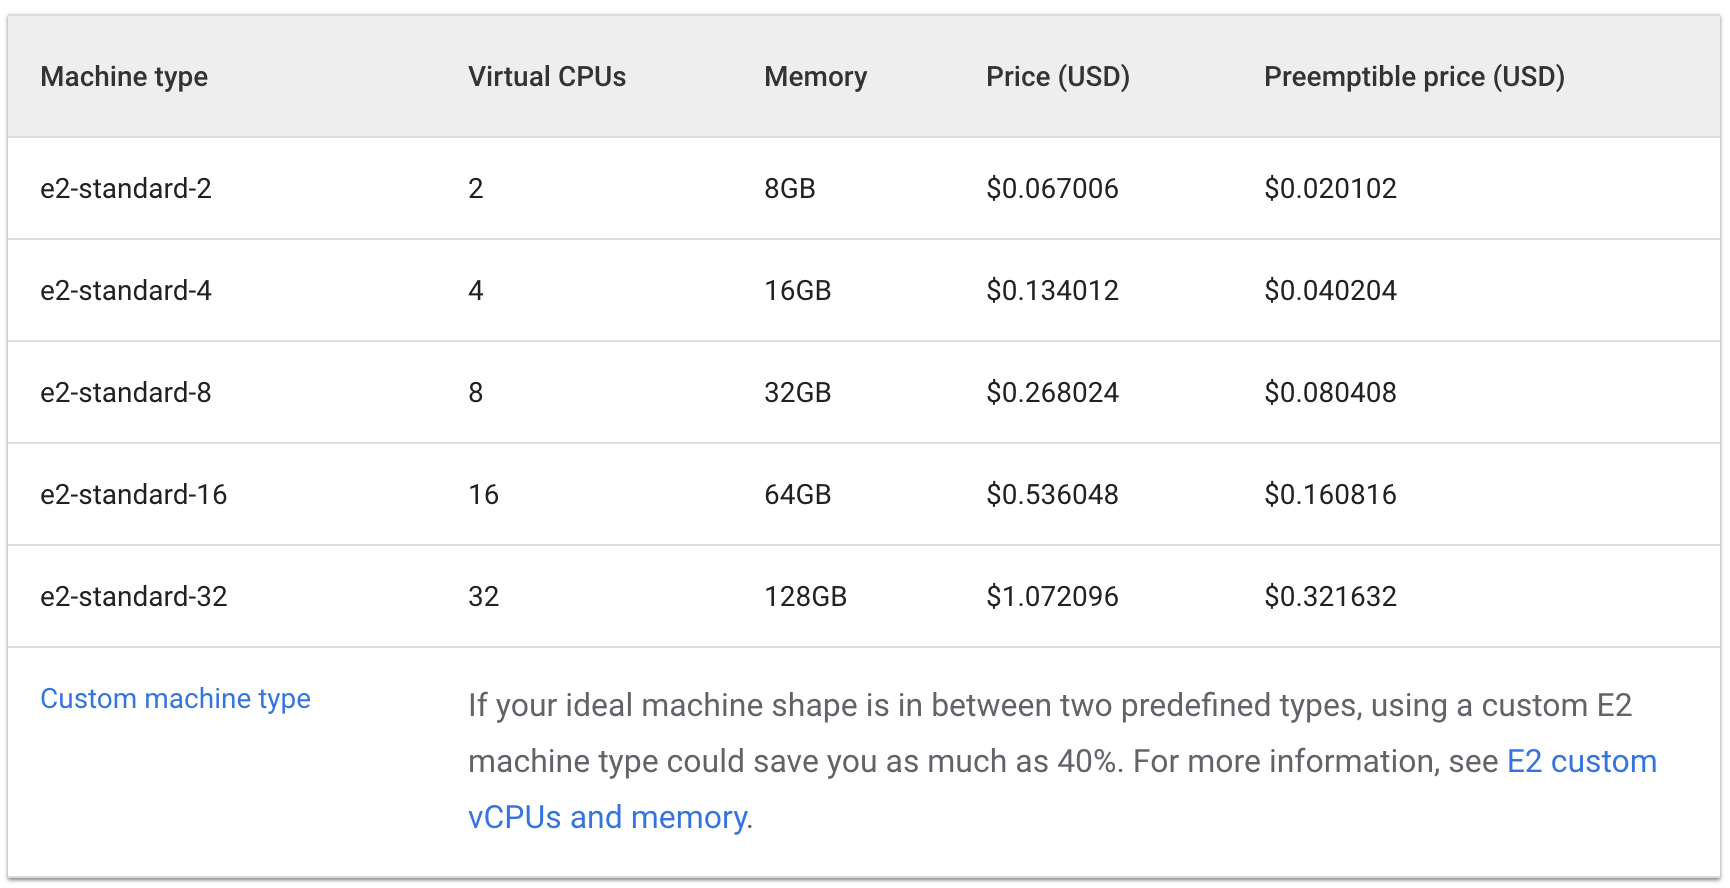
Take a look at the hourly cost for having an e2 standard and shared core machine types up:
Standard:
Shared Core:
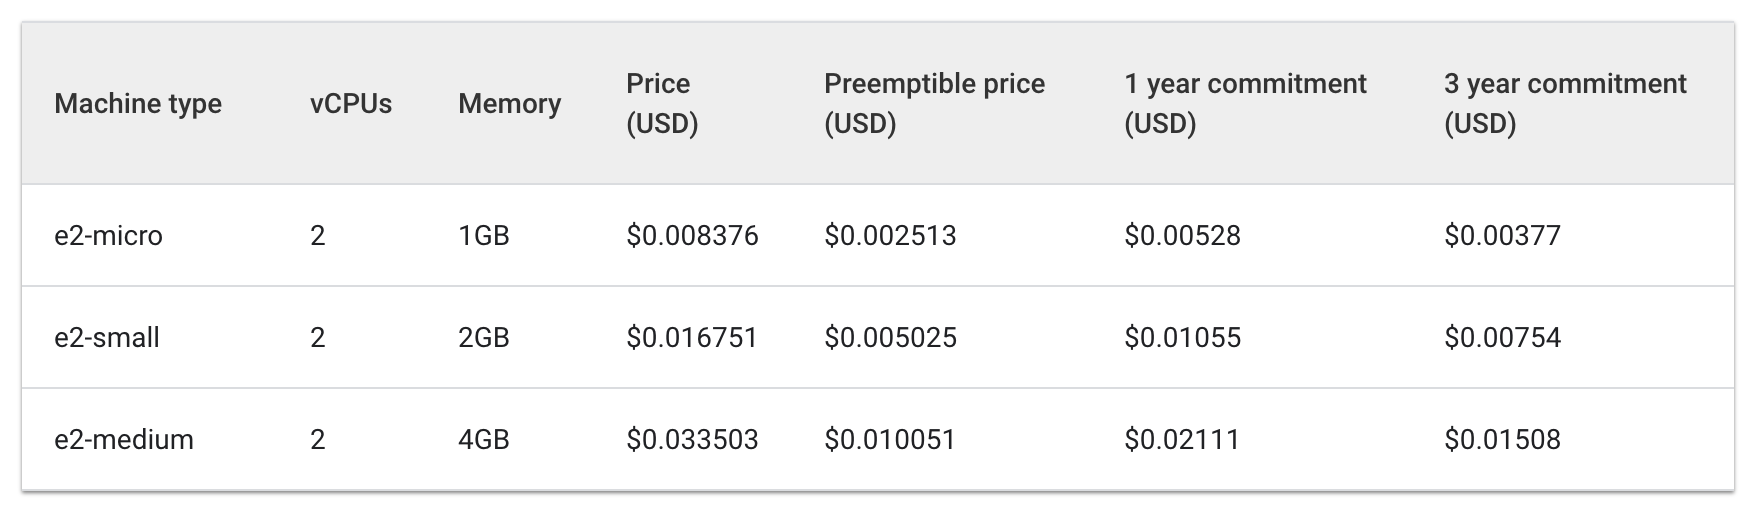
The cost of three e2-medium machines would be about $0.1 an hour while one e2-standard-2 is listed at about $0.067 an hour.
Saving $.04 an hour may seem small, but this cost can add up over the lifetime of a running application. It would be even more noticeable at a larger scale too. Because the e2-standard-2 machine can pack your workload more efficiently and there's less unused space, the cost of scaling up would grow less quickly.
This is interesting because E2-medium is a shared cored machine type which is designed to be cost effective for small, non resource intensive applications. But, for the Hello-App's current workload, you see that using a node pool with a larger machine type ends up being a more cost effective strategy.
In the Cloud Console, you should still be on the Nodes tab of your hello-demo cluster. Refresh this tab and examine the CPU Requested and CPU Allocatable fields for your larger-pool node.
Notice there's room for further optimization. The new node could fit another replica of your workload without needing to provision another node. Or again, you could potentially choose a custom sized machine type that fits the CPU and memory needs of the application saving even more resources.
It should be noted that these prices will vary depending on the location of your cluster. The next part of this lab will deal with selecting the best region and managing a regional cluster.
Selecting the appropriate location for a cluster
Regions and zones overview
Compute Engine resources, used for your cluster's nodes, are hosted in multiple locations worldwide. These locations are composed of regions and zones. A region is a specific geographical location where you can host your resources. Regions have three or more zones.
Resources that live in a zone, such as virtual machine instances or zonal persistent disks, are referred to as zonal resources. Other resources, like static external IP addresses, are regional. Regional resources can be used by any resource in that region, regardless of zone, while zonal resources can only be used by other resources in the same zone.
When choosing a region or zone, it's important to think about:
- Handling failures - If your resources for your app are only distributed in one zone and that zone becomes unavailable, your app will also become unavailable. For larger scale, high demand apps it's often best practice to distribute resources across multiple zones or regions in order to handle failures.
- Decreased network latency - To decrease network latency, you might want to choose a region or zone that is close to your point of service. For example, if you mostly have customers on the East Coast of the US, then you might want to choose a primary region and zone that is close to that area.
Best practices for clusters
Costs vary between regions based on a variety of factors. For example, resources in the us-west2 region tend to be more expensive than those in us-central1.
When selecting a region or zone for your cluster, examine what your app is doing. For a latency-sensitive production environment, placing your app in a region/zone with decreased network latency and increased efficiency would likely give you the best performance-to-cost ratio.
However, a non-latency-sensitive dev environment could be placed in a less expensive region to reduce costs.
Handling cluster availability
The types of available clusters in GKE include zonal (single-zone or multi-zonal) and regional. At face value, a single-zone cluster will be the least expensive option. However, for high-availability of your applications, it is best to distribute your cluster’s infrastructure resources across zones.
For many cases, prioritizing availability in your cluster through a multi-zonal or regional cluster results in the best cost-to-performance architecture.
Task 3. Managing a regional cluster
Setup
Managing your cluster's resources across multiple zones becomes a little more complex. If not careful, it's possible to accumulate extra costs from unnecessary inter-zonal communication between your pods.
In this section, you'll observe the network traffic of your cluster and move two chatty pods, pods which are generating a lot of traffic to one another, to be in the same zone.
- In your Cloud Shell tab, create a new regional cluster (this command will take a few minutes to complete):
In order to demonstrate traffic between your pods and nodes, you will create two pods on separate nodes in your regional cluster. We will use ping to generate traffic from one pod to the other to generate traffic which we can then monitor.
- Run this command to create a manifest for your first pod:
- Create the first pod in Kubernetes by using this command:
- Next, run this command to create a manifest for your second pod:
- Create the second pod in Kubernetes:
Click Check my progress to verify that you've performed the above task.
The pods you created use the node-hello container and output a Hello Kubernetes message when requested.
If you look back at the pod-2.yaml file you created, you can see that Pod Anti Affinity is a defined rule. This enables you to ensure that the pod is not scheduled on the same node as pod-1. This is done by matching an expression based on pod-1’s security: demo label. Pod Affinity is used to ensure pods are scheduled on the same node, while Pod Anti Affinity is used to ensure pods are not scheduled on the same node.
In this case, Pod Anti Affinity is being used to help illustrate traffic between nodes, but smart use of Pod Anti Affinity and Pod Affinity can help you utilize your regional cluster's resources even better.
- View the pods you created:
You will see both pods returned with a Running status and internal IPs.
Sample output:
Take note of the IP address of pod-2. You will use it in the following command.
Simulate traffic
- Get a shell to your
pod-1container:
- In your shell, send a request to
pod-2replacing [POD-2-IP] with the internal IP displayed forpod-2:
Take note of the average latency it takes to ping pod-2 from pod-1.
Examine flow logs
With pod-1 pinging pod-2, you can enable flow logs on the subnet of the VPC the cluster was created to observe traffic.
- In the Cloud Console, open the Navigation Menu and select VPC Network in the Networking section.
- Locate the
defaultsubnet in theregion and click on it.
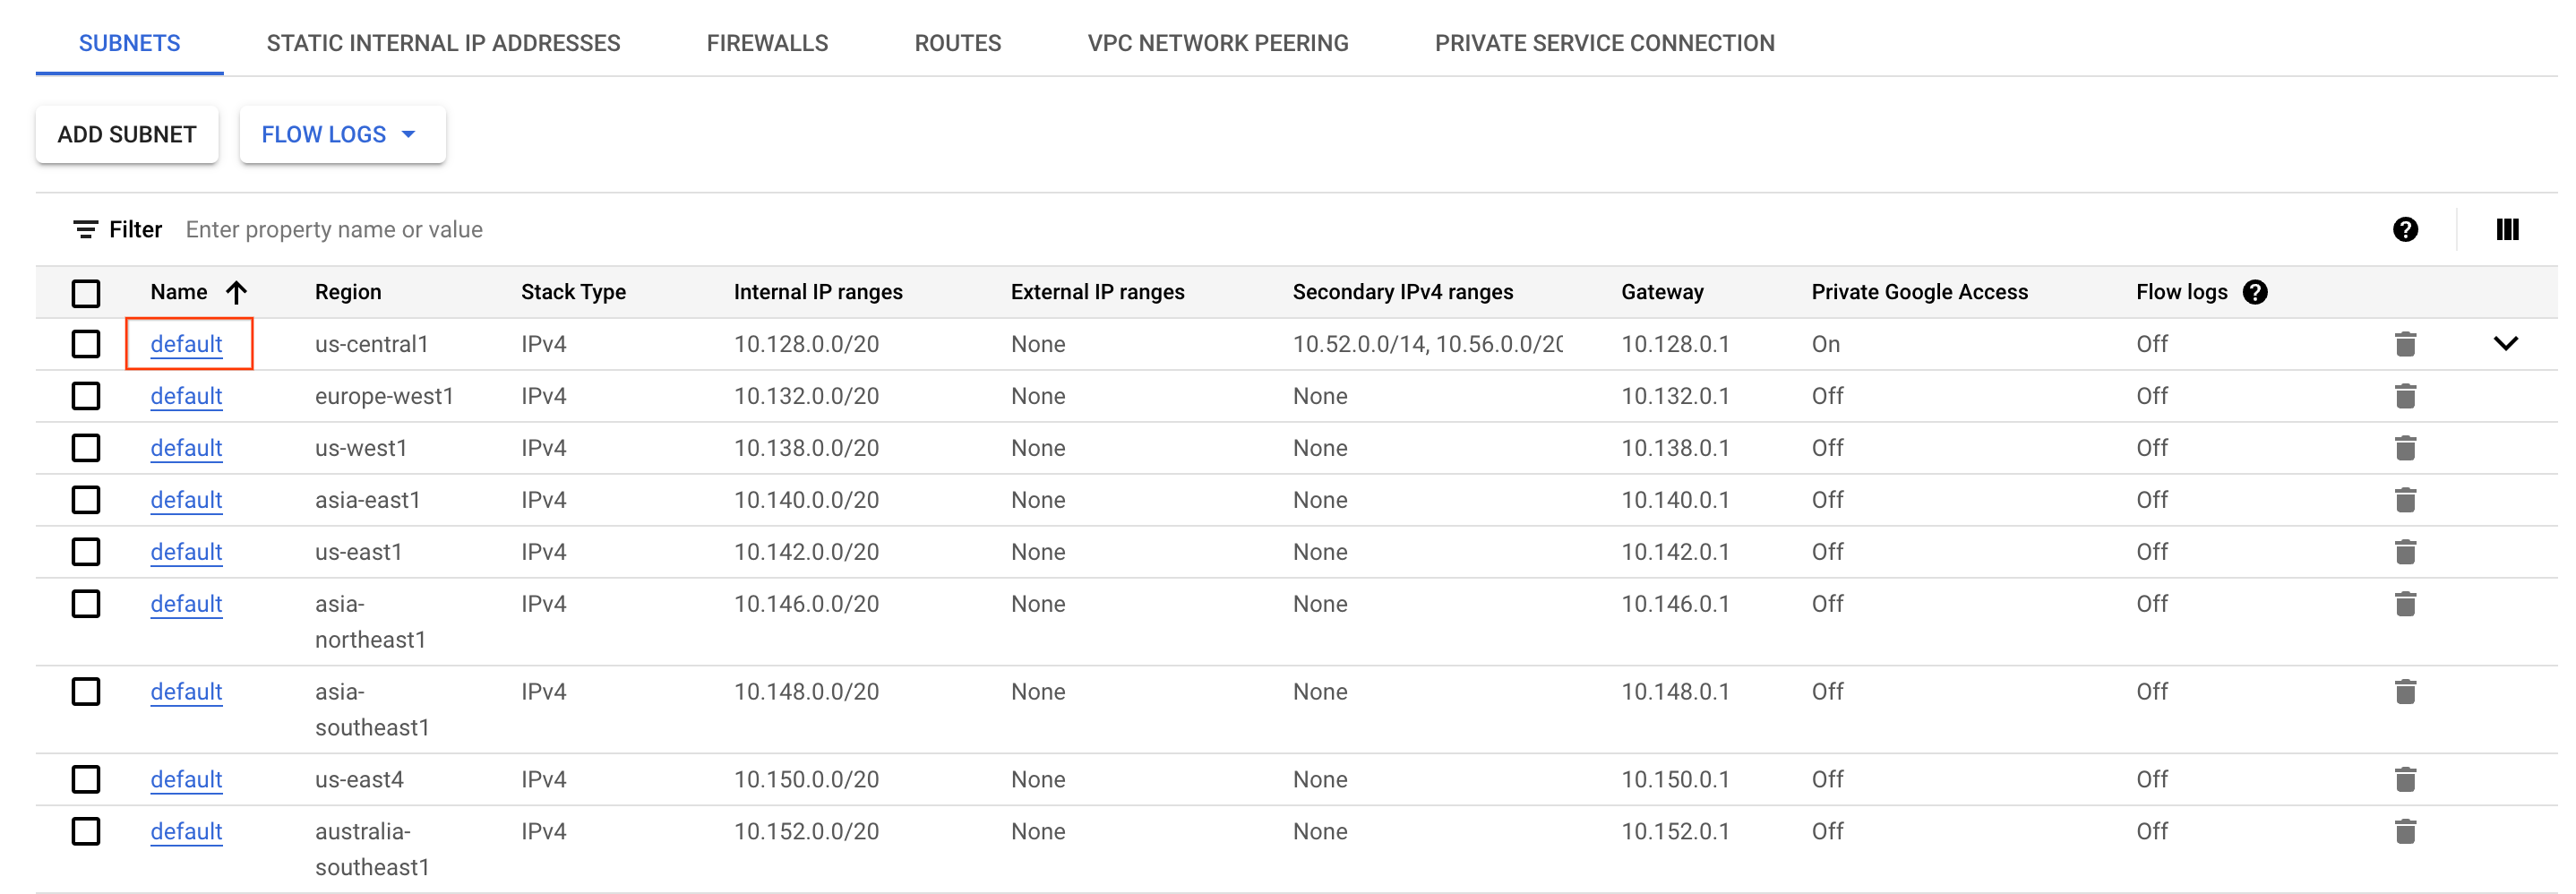
-
Click Edit at the top of the screen.
-
Select Flow Logs to be On.
-
Then, click Save.
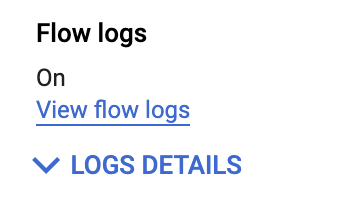
-
Next, click View Flow Logs.
You'll now see a list of logs that display a large amount of information any time something was sent or received from one of your instances.
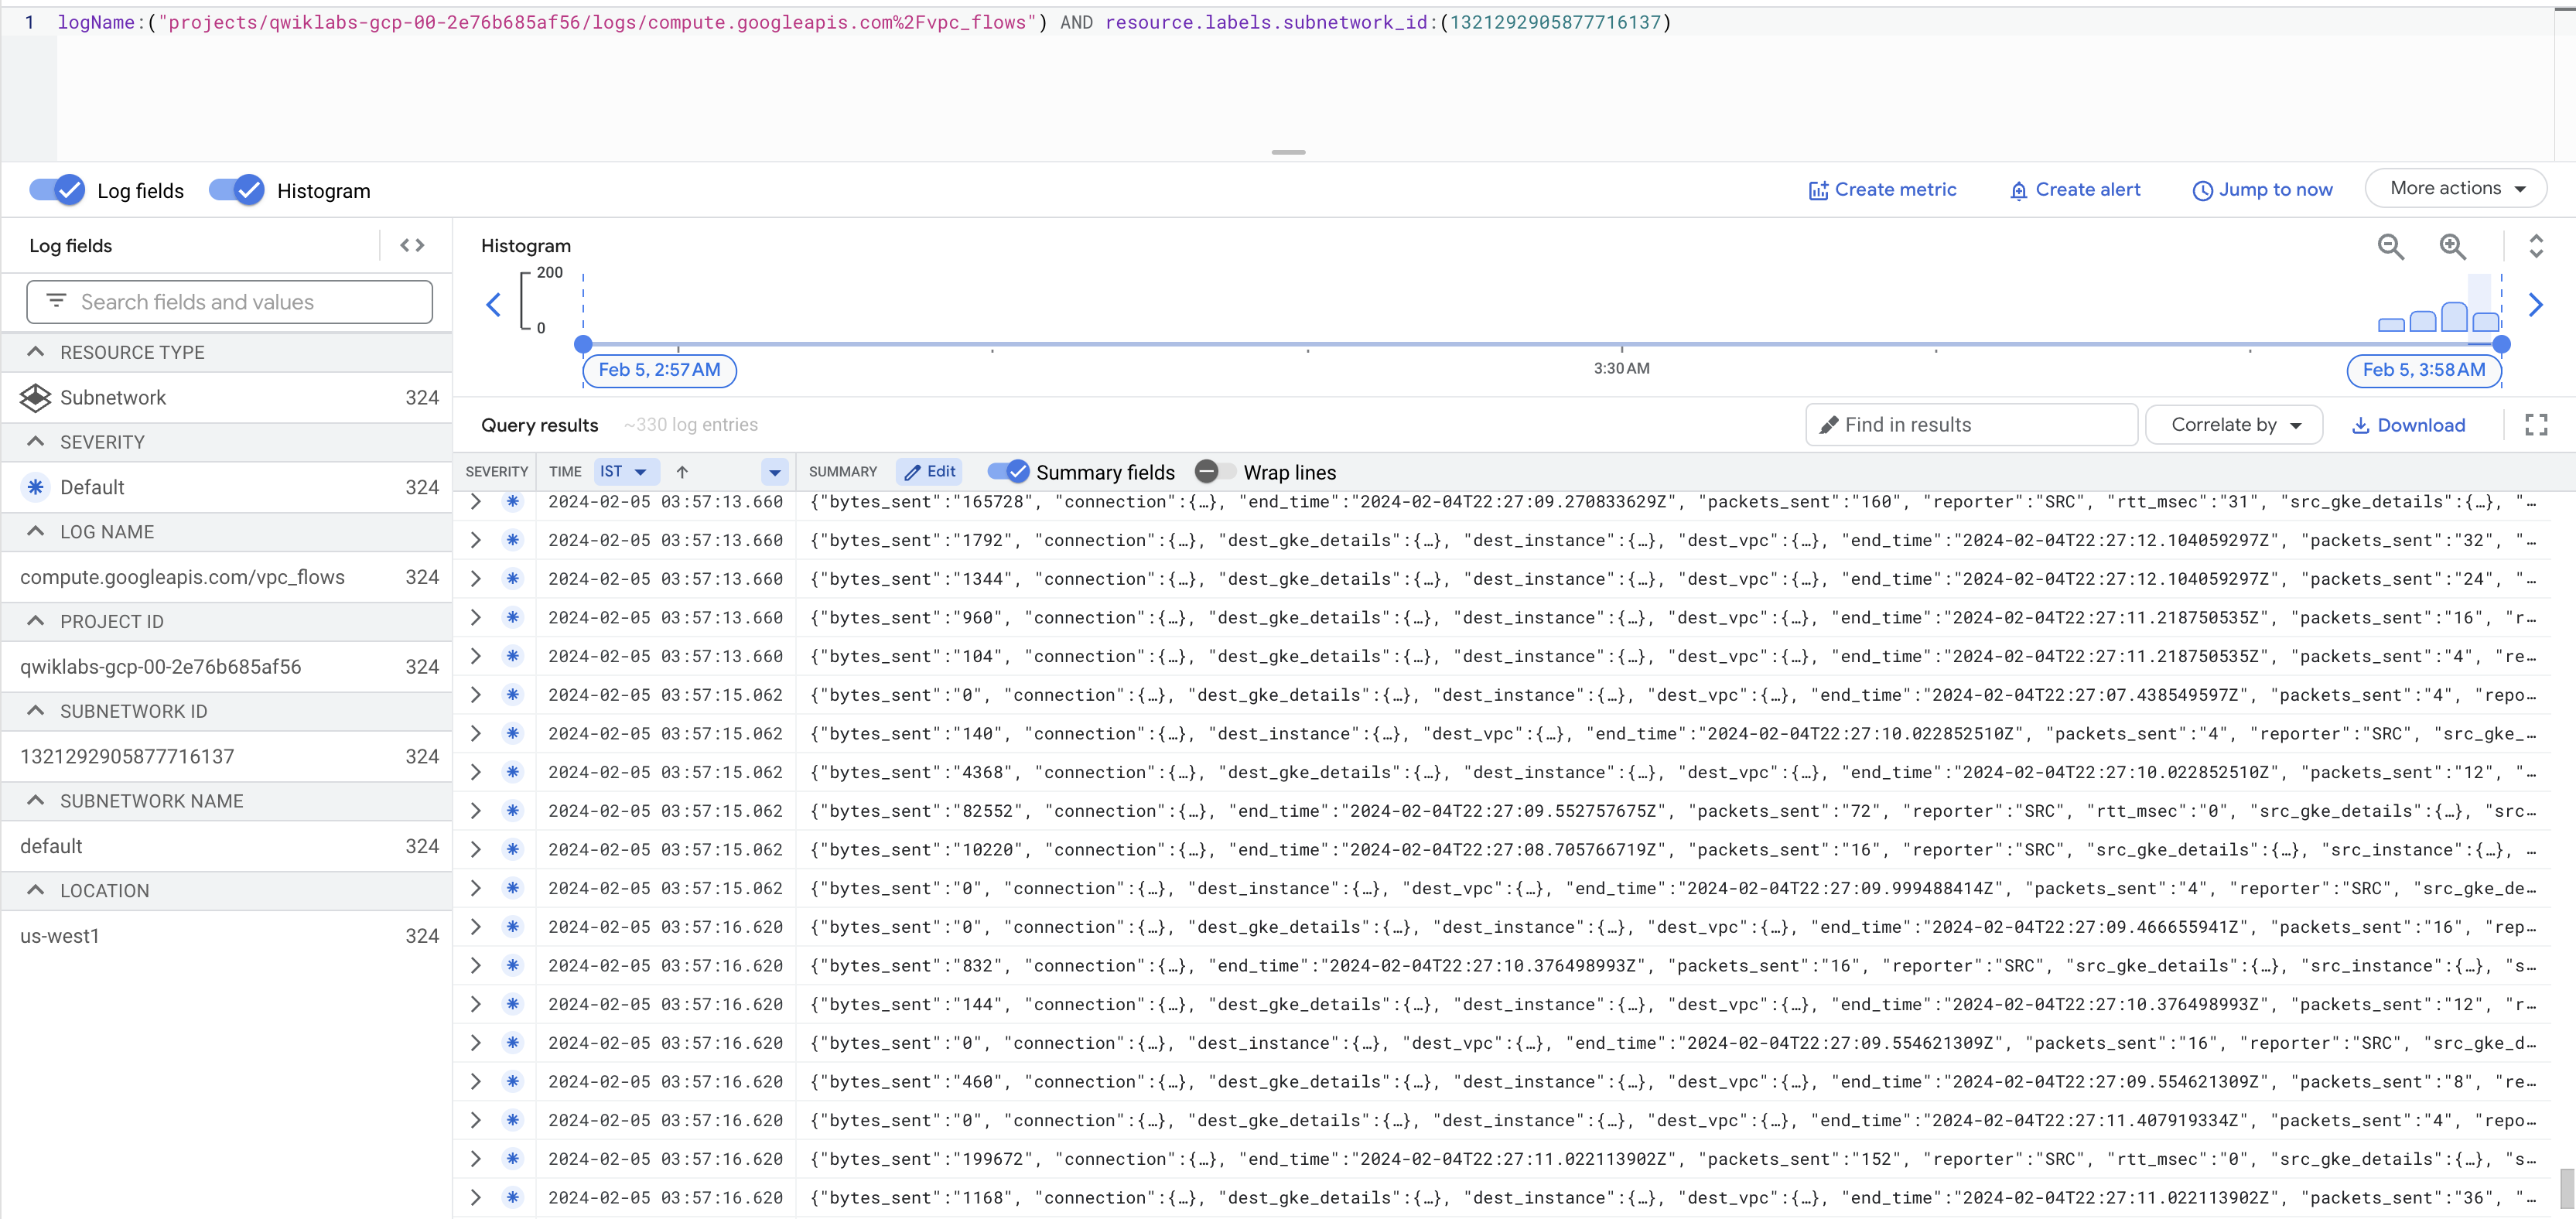
If the logs are not generated then replace / before vpc_flows with %2F as given in the above screenshot.
This can be a little difficult to read. Next, export it to a BigQuery table so you can query the relevant information.
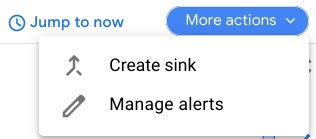
- Click on More actions > Create Sink.
-
Name your sink
FlowLogsSample. -
Click Next.
Sink destination
- For your Sink Service, select BigQuery Dataset.
- For your BigQuery Dataset, select Create new BigQuery dataset.
- Name your dataset as 'us_flow_logs', and click CREATE DATASET.
Everything else can be left as-is.
-
Click Create Sink.
-
Now, inspect your newly created dataset. In the Cloud Console, from the Navigation Menu in the Analytics section, click BigQuery.
-
Click Done.
-
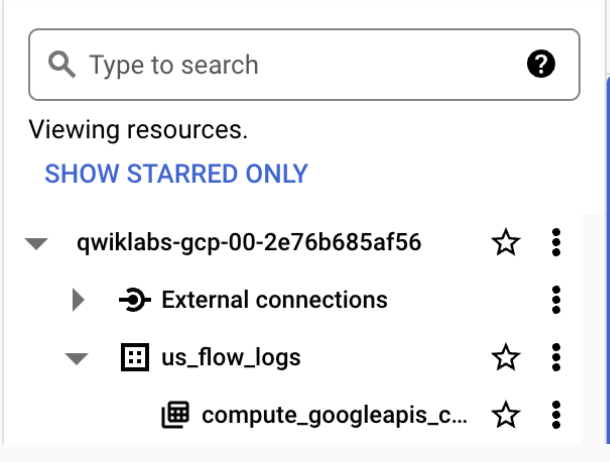
Select your project name, and then select the us_flow_logs to see the newly created table. If no table is there, you may need to refresh until it has been created.
-
Click on the
compute_googleapis_com_vpc_flows_xxxtable under yourus_flow_logsdataset.
-
Click on Query > In new tab.
-
In the BigQuery Editor, paste this in between
SELECTandFROM:
- Click Run.
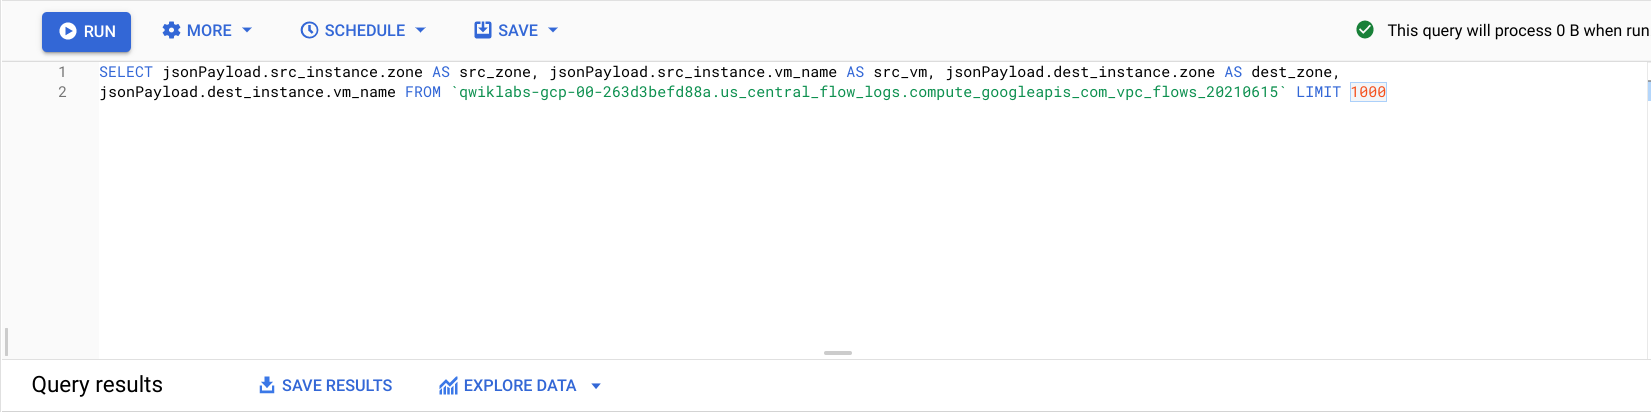
You'll see the flow logs from before but filtered by source zone, source vm, destination zone, and destination vm.
Locate a few rows where there are calls being made between two different zones in your regional-demo cluster.

Observing the flow logs, you can see that there is frequent traffic between different zones.
Next, you will move the pods into the same zone and observe the benefits.
Move a chatty pod to minimize cross-zonal traffic costs
-
Back in Cloud Shell, press Ctrl + C to cancel the
pingcommand. -
Type the
exitcommand to exitpod-1's shell:
- Run this command to edit the
pod-2manifest:
This changes your Pod Anti Affinity rule into a Pod Affinity rule while still using the same logic. Now pod-2 will be scheduled on the same node as pod-1.
- Delete the current running
pod-2:
- With
pod-2deleted, recreate it using the newly edited manifest:
Click Check my progress to verify that you've performed the above task.
- View the pods you created and ensure they are both
Running:
From the output, you can see that Pod-1 and Pod-2 are now running on the same node.
Take note of the IP address of pod-2. You will use it in the following command.
- Get a shell to your
pod-1container:
- In your shell, send a request to
pod-2replacing [POD-2-IP] with the internal IP forpod-2from the earlier command:
You'll notice the average ping time between these pods is much faster now.
At this point, you can go back to your flow logs BigQuery dataset and check recent logs to verify there are no more undesired inter-zonal communications.
Cost analysis
Take a look at the VM-VM egress pricing within Google Cloud:
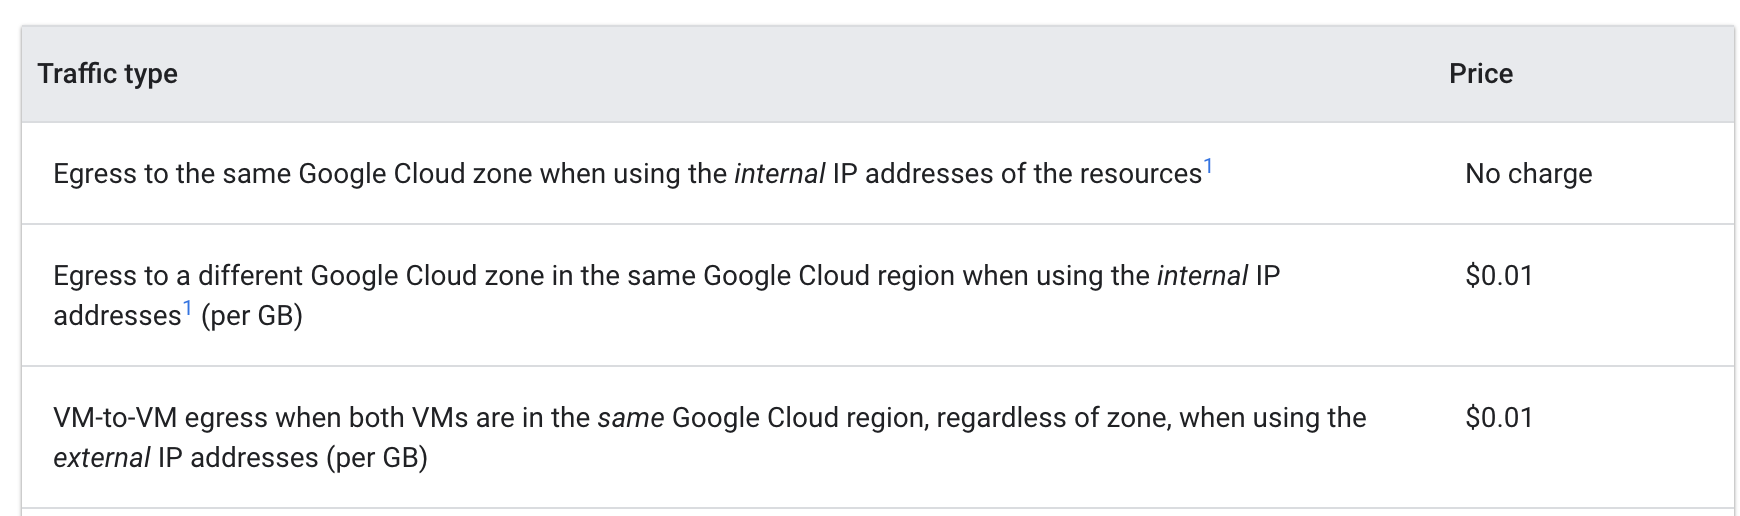
When the pods were pinging each other from different zones, it was costing $0.01 per GB. While that may seem small, it could add up very quickly in a large scale cluster with multiple services making frequent calls between zones.
When you moved the pods into the same zone, the pinging became free of charge.
Congratulations!
You explored cost-optimization for Virtual Machines that are part of a GKE cluster. First, by migrating a workload to a node pool with a better fitted machine type. Then by building an understanding of the pros and cons of different regions And Finally by moving a chatty pod within a regional cluster to always be in the same zone as the pod it was communicating with.
This lab has shown you cost effective tools and strategies for GKE VMs, but optimizing your virtual machines means first understanding your application and its needs. Knowing what kinds of workloads you will be running and estimating your application's demands will almost always influence the decision as to which location and machine type will be most effective for the virtual machines underlying your GKE cluster.
Efficient utilization of your cluster's infrastructure will go a long way toward optimizing your costs.
Next steps / Learn more
- Machine Types Docs
- Best practices for running cost-optimized Kubernetes applications on GKE: Choose the right machine type
- Best practices for running cost-optimized Kubernetes applications on GKE: Select the appropriate region
Google Cloud training and certification
...helps you make the most of Google Cloud technologies. Our classes include technical skills and best practices to help you get up to speed quickly and continue your learning journey. We offer fundamental to advanced level training, with on-demand, live, and virtual options to suit your busy schedule. Certifications help you validate and prove your skill and expertise in Google Cloud technologies.
Manual Last Updated February 05, 2024
Lab Last Tested February 05, 2024
Copyright 2024 Google LLC All rights reserved. Google and the Google logo are trademarks of Google LLC. All other company and product names may be trademarks of the respective companies with which they are associated.