Checkpoints
Enable Service Account.
/ 20
Create a Cloud Run sink.
/ 20
Create a Cloud Pub/Sub event trigger.
/ 30
Create a bucket.
/ 10
Create a Audit Logs event trigger.
/ 20
Eventarc for Cloud Run
GSP773

Overview
In this lab, you will learn how to utilize events for Cloud Run to manage communication between producer and consumers. Producers (i.e. Event Sources) provide the originating data. The data produced is sent to a Consumer (i.e. Event Sinks) that use the information passed. The diagram below provides a high level overview of this approach on Google Cloud:

The unifying delivery mechanism between producers and consumers is Eventarc for Cloud Run. In the above example, Cloud Pub/Sub facilitates event delivery for their project events generated.
At the end of this lab, you will be able to deliver events from various sources to Google Cloud sinks and Custom sinks.
What you'll learn:
- Eventarc for Cloud Run
- Create a Cloud Run sink
- Create an Event trigger for Cloud Pub/Sub
- Create an Event trigger for Audit Logs
Prerequisites
Based on the content, it is recommended to have some familiarity with:
- Cloud Run
- Cloud Pub/Sub
- Logging
It is recommended to run this lab in an Incognito browser window.
Setup and requirements
Before you click the Start Lab button
Read these instructions. Labs are timed and you cannot pause them. The timer, which starts when you click Start Lab, shows how long Google Cloud resources will be made available to you.
This hands-on lab lets you do the lab activities yourself in a real cloud environment, not in a simulation or demo environment. It does so by giving you new, temporary credentials that you use to sign in and access Google Cloud for the duration of the lab.
To complete this lab, you need:
- Access to a standard internet browser (Chrome browser recommended).
- Time to complete the lab---remember, once you start, you cannot pause a lab.
How to start your lab and sign in to the Google Cloud console
-
Click the Start Lab button. If you need to pay for the lab, a pop-up opens for you to select your payment method. On the left is the Lab Details panel with the following:
- The Open Google Cloud console button
- Time remaining
- The temporary credentials that you must use for this lab
- Other information, if needed, to step through this lab
-
Click Open Google Cloud console (or right-click and select Open Link in Incognito Window if you are running the Chrome browser).
The lab spins up resources, and then opens another tab that shows the Sign in page.
Tip: Arrange the tabs in separate windows, side-by-side.
Note: If you see the Choose an account dialog, click Use Another Account. -
If necessary, copy the Username below and paste it into the Sign in dialog.
{{{user_0.username | "Username"}}} You can also find the Username in the Lab Details panel.
-
Click Next.
-
Copy the Password below and paste it into the Welcome dialog.
{{{user_0.password | "Password"}}} You can also find the Password in the Lab Details panel.
-
Click Next.
Important: You must use the credentials the lab provides you. Do not use your Google Cloud account credentials. Note: Using your own Google Cloud account for this lab may incur extra charges. -
Click through the subsequent pages:
- Accept the terms and conditions.
- Do not add recovery options or two-factor authentication (because this is a temporary account).
- Do not sign up for free trials.
After a few moments, the Google Cloud console opens in this tab.

Activate Cloud Shell
Cloud Shell is a virtual machine that is loaded with development tools. It offers a persistent 5GB home directory and runs on the Google Cloud. Cloud Shell provides command-line access to your Google Cloud resources.
- Click Activate Cloud Shell
at the top of the Google Cloud console.
When you are connected, you are already authenticated, and the project is set to your Project_ID,
gcloud is the command-line tool for Google Cloud. It comes pre-installed on Cloud Shell and supports tab-completion.
- (Optional) You can list the active account name with this command:
- Click Authorize.
Output:
- (Optional) You can list the project ID with this command:
Output:
gcloud, in Google Cloud, refer to the gcloud CLI overview guide.
Task 1. Set up your environment
- Set your project:
- Set the Cloud Run region to a supported region:
- Set the Cloud Run platform default to
managed:
- Set the location default of Eventarc for Cloud Run:
Task 2. Enable service account
Next, configure a couple of service accounts needed for the Audit Log trigger.
- Store the Project Number in an environment variable:
- Grant the
eventarc.adminrole to the default Compute Engine service account:
Click Check my progress to verify that you've performed the above task.
Task 3. Event discovery
Registered sources and the types of events can be discovered using the command line.
- To see the list of different types of events, run the following:
Output:
- To get more information about each event, run:
Output:
Task 4. Create a Cloud Run sink
- Set up an environment variable for the service:
- Set up an environment variable for the image:
- Deploy your containerized application to Cloud Run:
On successful deployment, the command line displays the service URL. At this point the service is up and running.
You can now visit your deployed container by opening the service URL in any browser window.
Click Check my progress to verify that you've performed the above task.
Task 5. Create a Cloud Pub/Sub event trigger
One way of receiving events is through Cloud Pub/Sub. Custom applications can publish messages to Cloud Pub/Sub and these messages can be delivered to Google Cloud Run sinks via Eventarc for Cloud Run.
Create a trigger
- First, get more details on the parameters you'll need to construct a trigger for events from Cloud Pub/Sub:
- Create a trigger to filter events published to the Cloud Pub/Sub topic to your deployed Cloud Run service:
Find the topic
-
The Pub/Sub trigger creates a Pub/Sub topic behind the scenes. Find it, and assign it to an environment variable:
export TOPIC_ID=$(gcloud eventarc triggers describe trigger-pubsub \ --format='value(transport.pubsub.topic)')
Test the trigger
- You can check that the trigger is created by listing all triggers:
- In order to simulate a custom application sending message, you can use a
gcloudcommand to to fire an event:
-
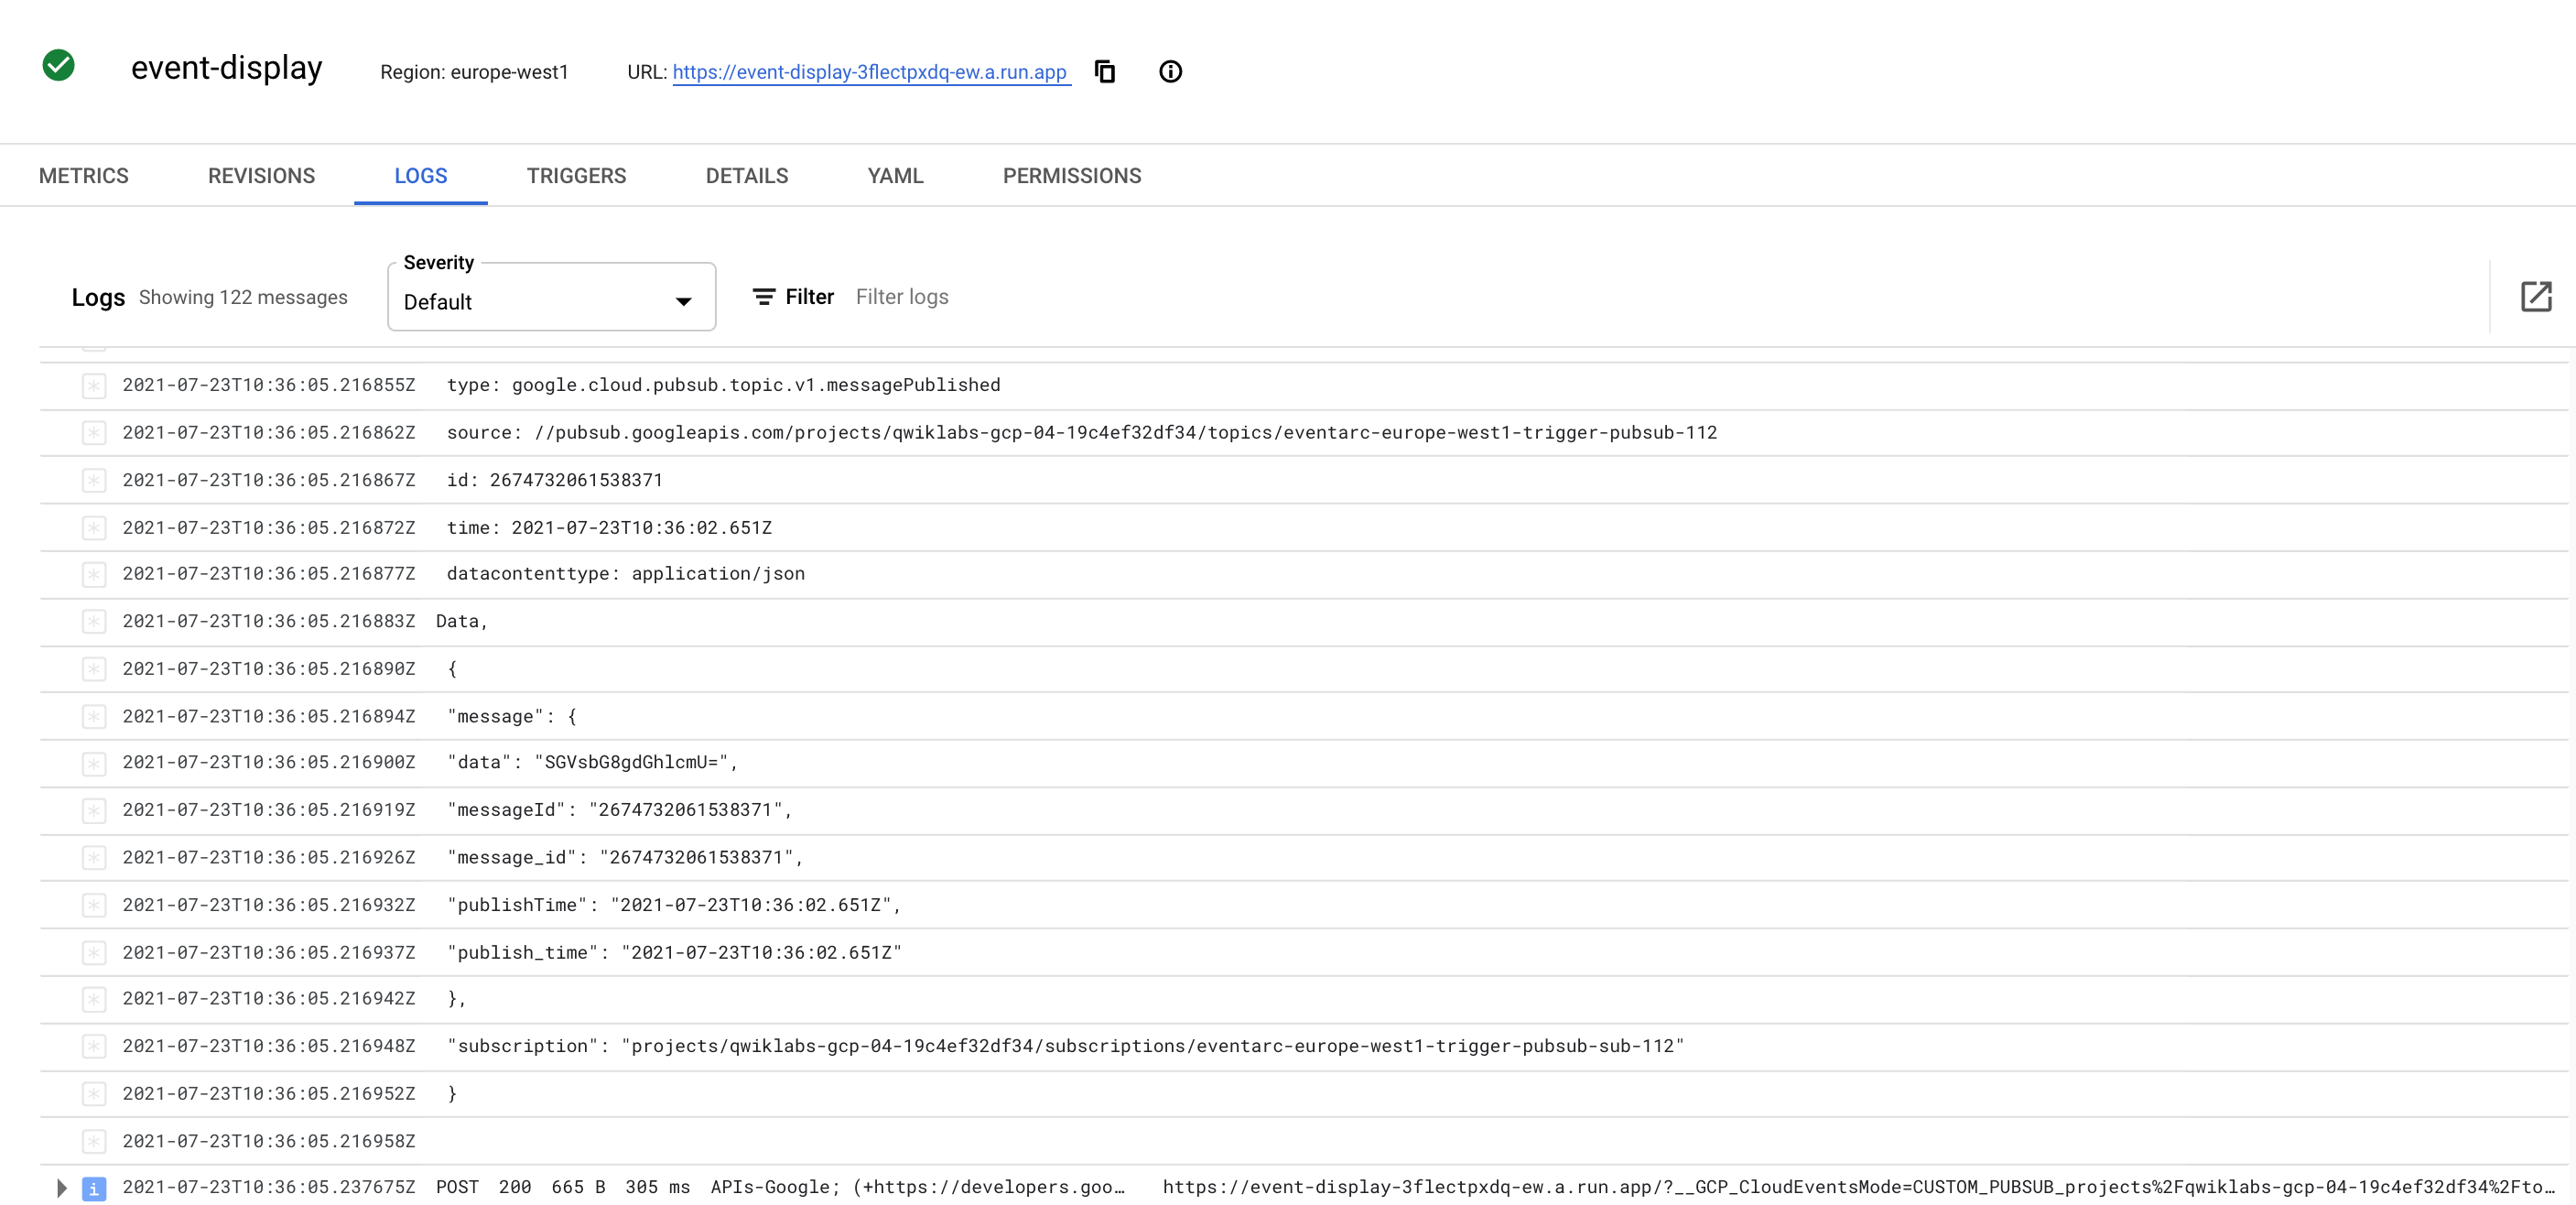
In the Navigation menu > Serverless > Cloud Run, click on event display.
-
Click on Logs.
The Cloud Run sink you created logs the body of the incoming message. You can view this in the Logs section of your Cloud Run instance:
Click Check my progress to verify that you've performed the above task.
Delete the trigger
-
You can delete the trigger once you're done testing:
gcloud eventarc triggers delete trigger-pubsub
Task 6. Create a Audit Logs event trigger
Next, set up a trigger to listen for events from Audit Logs. You will listen for Cloud Storage events in Audit Logs.
Create a bucket
- Create an environment variable for your bucket:
- Create a Cloud Storage bucket in the same region as the deployed Cloud Run service:
Click Check my progress to verify that you've performed the above task.
Enable Audit Logs
In order to receive events from a service, you need to enable audit logs.
-
From the Navigation menu, select IAM & Admin > Audit Logs.
-
In the list of services, check the box for
Google Cloud Storage. -
On the right hand side, click the LOG TYPE tab. Admin Write is selected by default, make sure you also select Admin Read, Data Read, Data Write and then click Save.
Test audit logs
To learn how to identify the parameters you'll need to set up an actual trigger, and perform an actual operation.
- Run the following to create a text file named
random.txt:
- Upload the file
random.txtto the bucket:
Now, see what kind of audit log this update generated.
-
In the Cloud Console, go to Navigation menu > Logging > Logs Explorer.
-
Under Resource, choose GCS Bucket > [Bucket Name] > Location then choose your bucket and its location. Click Apply.
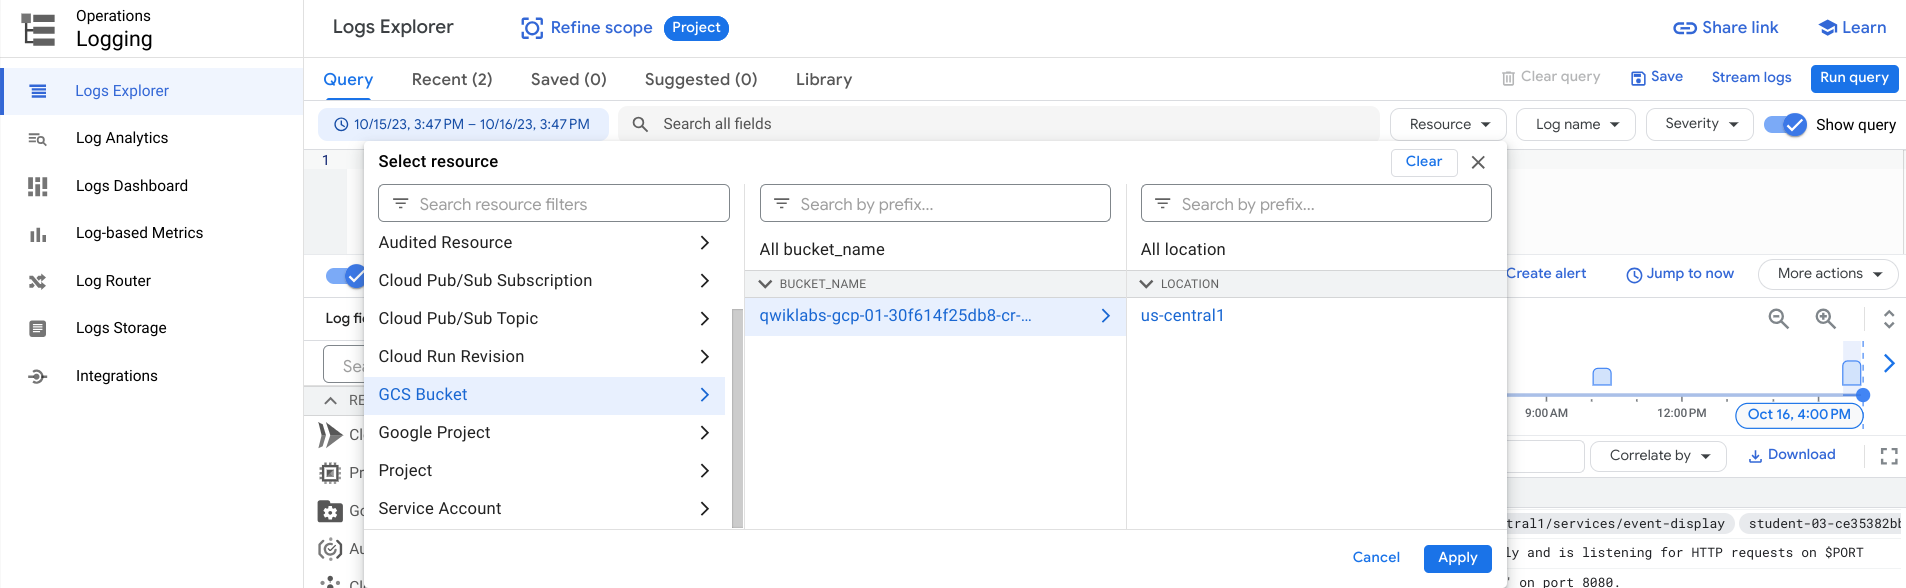
- Click on Run Query.
Once you run the query, you'll see logs for the storage bucket. One of those should be storage.buckets.create.
- Note the
serviceName,methodNameandresourceName. You will use these in creating the trigger.
Create a trigger
You are now ready to create an event trigger for Audit Logs.
- Get more details on the parameters you'll need to construct the trigger:
- Create the trigger with the right filters:
- There is an optional resourceName field. Providing a complete resource path (eg. projects/_/buckets/test123) will filter for events pertaining to the specific resource. Providing no resource path at all will filter for events for any resource corresponding to the provided serviceName and methodName. Partial resource names (eg. projects/project-id) are not accepted and will malfunction.
- For methodsNames that are of a ‘create' variety (eg. storage.buckets.create for creating a Cloud Storage bucket) resourceNames are best left blank as resourceName may be dynamically generated for some serviceNames and cannot be predicted beforehand.
- For methodNames that are of a ‘read', ‘update' or ‘delete' variety (eg. storage.buckets.update for updating a specific Cloud Storage bucket), you may specify the complete resource path.
Test the trigger
- List all triggers to confirm that the trigger was successfully created:
- Wait for up to 10 minutes for the trigger creation to be propagated and for it to begin filtering events.
Once ready, it will filter create events and send them to the service. You're now ready to fire an event.
- Upload the same file to the Cloud Storage bucket as you did earlier:
- Navigate to Navigation menu > Cloud Run to check the logs of the Cloud Run service, you should see the received event.
Click Check my progress to verify that you've performed the above task.
Delete the trigger
- You can delete the trigger once done testing:
Congratulations!
You have successfully learned about Events for Cloud Run on Google Cloud infrastructure. Over the course of this lab, you have performed the following tasks:
- Events for Cloud Run
- Create a Cloud Run sink
- Create an Event trigger for Cloud Pub/Sub
- Create an Event trigger for Audit Logs
Learn more / Next steps
Google Cloud training and certification
...helps you make the most of Google Cloud technologies. Our classes include technical skills and best practices to help you get up to speed quickly and continue your learning journey. We offer fundamental to advanced level training, with on-demand, live, and virtual options to suit your busy schedule. Certifications help you validate and prove your skill and expertise in Google Cloud technologies.
Manual Last Updated October 16, 2023
Lab Last Tested October 16, 2023
Copyright 2024 Google LLC All rights reserved. Google and the Google logo are trademarks of Google LLC. All other company and product names may be trademarks of the respective companies with which they are associated.