Prüfpunkte
Configure Cluster Objects in SmartConsole
/ 50
Deploy two Linux instances
/ 50
Check Point: Next-Gen Data Center Security CloudGuard for Google Cloud
This lab was developed with our partner, Check Point. Your personal information may be shared with Check Point, the lab sponsor, if you have opted-in to receive product updates, announcements, and offers in your Account Profile.
GSP818

Overview
Organizations are starting to adopt public cloud environments as an extension of their internal Data Centers (DC) to gain operational flexibility and lower operational costs. The increasing number of applications in DC has led to a dramatic increase in network traffic between the different servers/application inside DC (east-west traffic).
However, when it comes to security, the focus has been on protecting the entrance to the DC, and the perimeter, but there are few controls to secure east-west traffic inside the data center. This represents a critical security risk where threats can traverse unimpeded once inside the data center. Furthermore, traditional security approaches to this problem are unable to keep pace with the dynamic network changes and rapid provisioning of applications in a cloud environment.
Check Point CloudGuard for Google Cloud with its advanced threat prevention capabilities will allow you to deal with that security risk and minimize it. This lab will provide you with some getting started steps required to get familiar with the Google Cloud environment & how to deploy a basic day to day scenario with CloudGuard in place. You will understand and simulate a real-life use case to grasp the ease of deploying automated advanced security protections within the Google Cloud. You will walk through a few simple exercises to illustrate the benefits of having security integrated into a virtual networking platform. These exercises are incremental; they start from basic setup and progress into more advanced scenarios.
RDP requirements
In this lab, you will need to use RDP to log into a Windows VM. You can either use the Chrome RDP for Google Cloud extension or Microsoft Remote Desktop. If you are on a Windows machine, it is highly recommended to use Microsoft Remote Desktop as it will be a much better user experience.
What you'll learn
In this lab, you will:
- Prepare your public cloud environment for deployment
- Deploy a Check Point CloudGuard cluster on Google Cloud
- Create and configure the Cluster object on SmartConsole
- Create an access policy and publish/install it on the Cluster
- Create hosts in two different departments/locations and test the connectivity between them.
Setup and requirements
Before you click the Start Lab button
Read these instructions. Labs are timed and you cannot pause them. The timer, which starts when you click Start Lab, shows how long Google Cloud resources will be made available to you.
This hands-on lab lets you do the lab activities yourself in a real cloud environment, not in a simulation or demo environment. It does so by giving you new, temporary credentials that you use to sign in and access Google Cloud for the duration of the lab.
To complete this lab, you need:
- Access to a standard internet browser (Chrome browser recommended).
- Time to complete the lab---remember, once you start, you cannot pause a lab.
How to start your lab and sign in to the Google Cloud console
-
Click the Start Lab button. If you need to pay for the lab, a pop-up opens for you to select your payment method. On the left is the Lab Details panel with the following:
- The Open Google Cloud console button
- Time remaining
- The temporary credentials that you must use for this lab
- Other information, if needed, to step through this lab
-
Click Open Google Cloud console (or right-click and select Open Link in Incognito Window if you are running the Chrome browser).
The lab spins up resources, and then opens another tab that shows the Sign in page.
Tip: Arrange the tabs in separate windows, side-by-side.
Note: If you see the Choose an account dialog, click Use Another Account. -
If necessary, copy the Username below and paste it into the Sign in dialog.
{{{user_0.username | "Username"}}} You can also find the Username in the Lab Details panel.
-
Click Next.
-
Copy the Password below and paste it into the Welcome dialog.
{{{user_0.password | "Password"}}} You can also find the Password in the Lab Details panel.
-
Click Next.
Important: You must use the credentials the lab provides you. Do not use your Google Cloud account credentials. Note: Using your own Google Cloud account for this lab may incur extra charges. -
Click through the subsequent pages:
- Accept the terms and conditions.
- Do not add recovery options or two-factor authentication (because this is a temporary account).
- Do not sign up for free trials.
After a few moments, the Google Cloud console opens in this tab.

Activate Cloud Shell
Cloud Shell is a virtual machine that is loaded with development tools. It offers a persistent 5GB home directory and runs on the Google Cloud. Cloud Shell provides command-line access to your Google Cloud resources.
- Click Activate Cloud Shell
at the top of the Google Cloud console.
When you are connected, you are already authenticated, and the project is set to your Project_ID,
gcloud is the command-line tool for Google Cloud. It comes pre-installed on Cloud Shell and supports tab-completion.
- (Optional) You can list the active account name with this command:
- Click Authorize.
Output:
- (Optional) You can list the project ID with this command:
Output:
gcloud, in Google Cloud, refer to the gcloud CLI overview guide.
Task 1. Set up your working environment
Deploy CloudGuard Network Security NGFW Threat Prevention (Optional)
- Run the following commands in Cloud Shell to create the VPCs and firewall rules:
- Go to the Google Cloud Marketplace. Search for "Check Point CloudGuard" and click on CloudGuard Network Security NGFW Threat Prevention. Click Launch.
- Use these general configuration settings:
| Deployment Name | Leave as default |
| Zone | |
| Machine type | Leave as default |
- Under the Networking section, use the following configurations:
| (Under Network interfaces) Network | vpc-management |
| Subnetwork | management |
| Allow TCP traffic | Check, 0.0.0.0/0 |
| Allow Gateway network | Check, 0.0.0.0/0 |
| Allow ICMP traffic | Check, 0.0.0.0/0 |
| Allow UDP traffic | Check, 0.0.0.0/0 |
| External IP address | Static |
| Installation Type | R80.40 Management only |
- Click on More. Enter the following settings:
| Automatically generate admin password | Check the box |
| Admin shell | /bin/bash |
| Public SSH key for the user | Leave blank |
| SIC key | cpgcpmig |
| Allow GUI clients | 0.0.0.0/0 |
- Accept the Google Cloud Marketplace Terms of Service and click Deploy.
Deploy CloudGuard Network Security High Availability (Optional)
-
Next, navigate to Compute Engine > Metadata > SSH Keys. Copy the SSH key for your lab account. You will use this in the next steps.
-
Go to the Google Cloud Marketplace, search for: Check Point CloudGuard Network Security High Availability (BYOL). Click Launch.
- Use these general configuration settings:
| Deployment Name | Leave as default |
| High Availability Version | R80.40 Cluster |
| Zone A | |
| Zone B | Select for each cluster member a different zone, make sure the selected zones are in the same region in which you created your subnets. Here, use a different zone other than Zone A mentioned above from the same region. |
| Machine type | Leave as default |
- Click More. Fill in the following settings:
| Disk Type | Leave as default |
| Disk size in GB | Leave as default |
| Public SSH key | Use the SSH Key as per instructions (step 1) and paste it in the field |
- Under the Check Point section, fill in the following settings:
| Security Management Server address |
192.168.120.0/24 (Your management VPC IP Address) |
| SIC Key | qwe123qwe123 |
| Automatically generate an administrator password | Check the box |
| Admin shell | /bin/bash |
- Under the Networking section, use the following configurations:
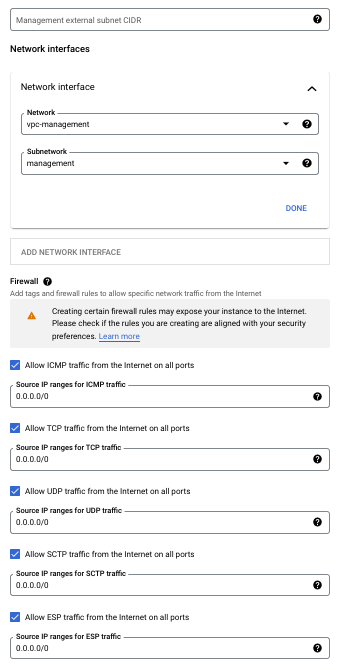
| Cluster external subnet CIDR | Remove the predefined subnet |
| (Under Network interfaces) Network | vpc-cluster |
| Subnetwork | Leave as default (cluster) |
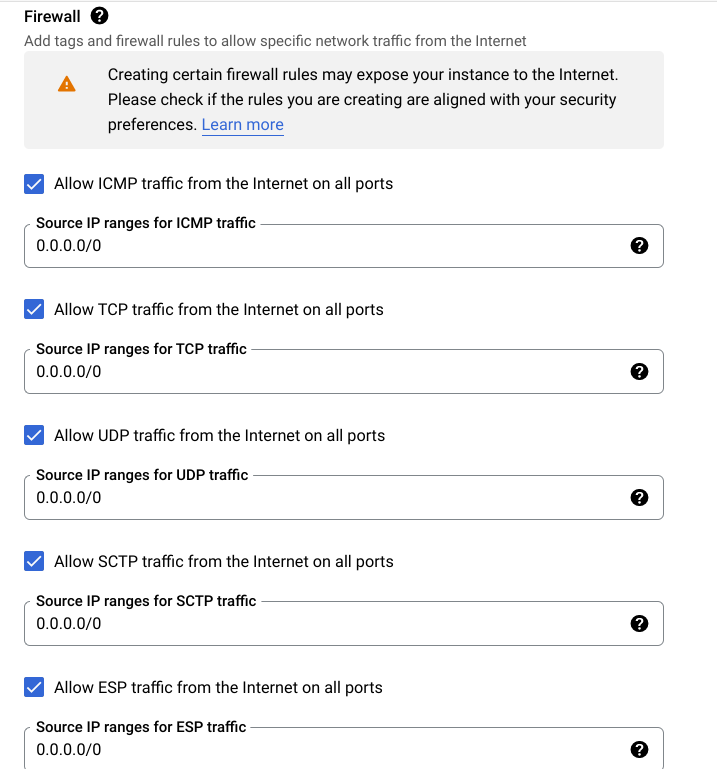
- Under the Firewall section, select Allow and use
0.0.0.0/0for each one of the firewall rules. (Repeat this for each one of the VPCs).
Your deployment should resemble the following:
- Remove the predefined subnet from the Management external subnet CIDR and choose
vpc-managementfor the Network under Network interfaces.
Your deployment should resemble the following:
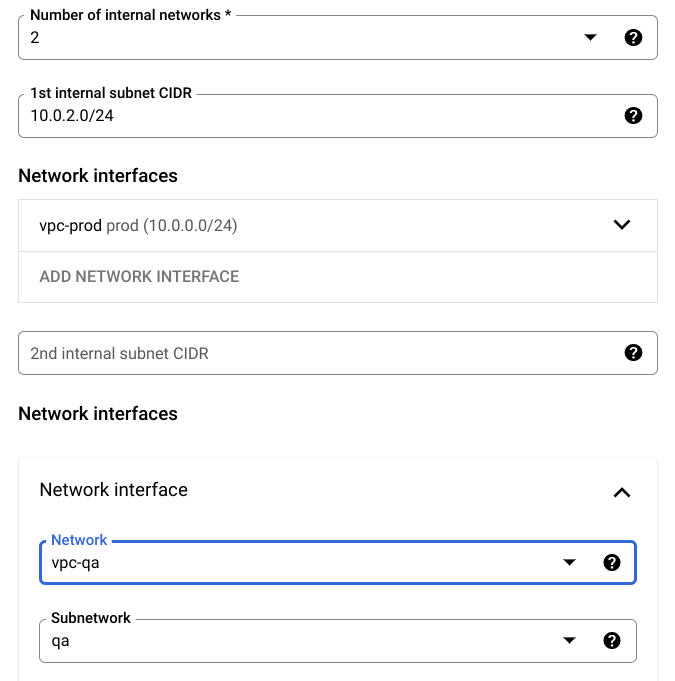
- Next, for the number of internal networks, change to 2. For the 1st internal subnet CIDR, remove the default.Under Network interfaces for Network, choose
vpc-prod. Click More to do the same with the 2nd internal subnet CIDR, and for Network, choosevpc-qa.
Your deployment should resemble the following:
- Accept the Google Cloud Marketplace Terms of Service and click Deploy.
Task 2. Configure cluster objects in SmartConsole
Enable HTTP/HTTPS traffic
-
Once your two deployments have completed, navigate to the Compute Engine > VM instances page.
-
Click on the
check-point-cloudguard-payg-1-vminstance. -
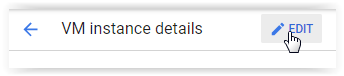
In the details menu, click Edit. Scroll down to the Firewalls section, and check both Allow HTTP traffic and Allow HTTPS traffic. Click Save.
Create a Windows virtual machine
In this section, you will need to use an RDP client to log in to a Windows VM that is used to access the Check Point SmartConsole. If you want to RDP directly from the browser, you can use the Chrome RDP for Google Cloud extension, but if you are using a Windows machine, it is highly recommended to use Microsoft Remote Desktop.
- Start a Windows VM by executing the following in Cloud Shell:
Click Check my progress to verify the objective.
-
Once it is deployed, click the arrow next to RDP and select
Set Windows Password. Click Set. -
Copy the password, and click RDP to connect with either the Chrome extension or Microsoft Remote Desktop.
-
Once you are logged in, click Yes in the Networks dialog box, and close the "Server Manager" application that is automatically started.
Download the Gaia Console
-
Once you're connected to this Windows Instance via RDP, open Google Chrome.
-
When you're in Chrome, navigate to the External IP of the
check-point-cloudguard-payg-1-vm. You can retrieve this on the VM instances page. Note, you must use the formathttps://[EXTERNAL-IP], as using http will not work.
-
Log into the Gaia Console with the generated Admin username and Password from the first deployment. You can retrieve these by going back to the Cloud Console and navigating to Deployment Manager > Deployments.
-
On the deployments page, click on
check-point-cloudguard-payg-1. On the deployment details on the right hand side, copy theAdmin userandAdmin passwordcredentials and use them to log in to the Gaia Console. -
Once logged on, you will be presented with a Download link to the Smart Console. Click to download it, and run the installer once it finishes downloading to your Windows Machine.
-
Once the Smart Console is downloaded, open it and log in using the same
Admin userandAdmin passwordas before. For the Server Name, use the External IP of thecheck-point-cloudguard-payg-1-vminstance. (You can also find this in the deployment details.)
Now that you're logged into the SmartConsole, you are now ready to complete the next part of the lab.
Task 3. Configure Cluster objects (Optional)
When you open SmartConsole for the first time, you can already see the Management server check-point-cloudguard-payg-1-vm object. To create the Cluster object, follow the next steps:
-
Click the New (star) icon on the top middle of SmartConsole.
-
Select Cluster and a Check Point Security Gateway Cluster creation window opens. Select Wizard Mode
-
Enter a Cluster Name.
-
Enter
192.168.110.4as the Cluster IPv4 address. Leave Check Point ClusterXL and High Availability selected. -
Click Next. On the Cluster Member Properties page click Add > New Cluster Member.
-
Enter
Cluster-member1as the first Cluster Member name, and192.168.120.3as the cluster member’s IPv4 address. -
Enter the activation key from the Check Point CloudGuard Network Security High Availability configuration page (e.g.
qwe123qwe123). -
Click on Initialize, and confirm that Trust State is: Trust Established.
-
Click Ok, and add the second Cluster member (repeat steps 5-8). For the second member's name use
Cluster-member2, and the IPv4:192.168.120.4. Click Next. -
For the IPv4 Network Address
10.0.1.0/255.255.255.0, leave the check box: Private use of each member. Click Next. -
For the IPv4 Network Address
10.0.0.0/255.255.255.0, leave the check box: Private use of each member. Click Next. -
For the IPv4 Network Address
192.168.120.0/255.255.255.0, check the Cluster Synchronization check box and click Next. -
For the IPv4 Network Address
192.168.110.0/255.255.255.0, leave the check box: Private use of each member. Click Next. -
Click Finish, the Cluster object is created.
-
Click Publish on the top SmartConsole's taskbar.
-
Double click the Cluster object to open the Gateway Cluster properties page.
-
Un-check the IPSec VPN blade. Click the Network management tab on the properties window left panel.
-
Double click the first interface, under Topology click on Modify, and un-check the Perform Anti-Spoofing based on interface topology check box. Click Ok twice.
-
Repeat this step for all the interfaces.
-
To enable outbound traffic, click the NAT tab on the left, and check the Hide internal networks behind the Gateway's external IP checkbox.
-
Click Ok on the Cluster Gateway Properties page.
Configure access control policy rule base
-
On SmartConsole, click the SECURITY POLICIES on the left panel.
-
On the Access Control policy, click the Add rule above icon on the top ruler.
-
Double click the Name field and enter name:
Prod to QA. -
In the Source field click the + icon. In the window which opens click on New > Network, name it:
Prod_network, network address:10.0.0.0, Net Mask:255.255.255.0and click Ok. -
In the Destination field click the + icon. In the window which opens click on New > Network, name it:
Qa_network, network address:10.0.1.0, Net Mask:255.255.255.0and click Ok. -
In the Action field change the action to: Accept.
-
In the Trac field change to: Log
-
Click the Install Policy on the top left, then click Publish & Install.
Task 4. Deploy two Linux instances
Deploy two Linux instances, one in the qa-vpc and one in the prod-vpc.
- Navigate back to the Cloud Console. In Cloud Shell, create the
linux-qaVM by executing the following command:
- Create the
linux-prodVM by executing the following command:
Click Check my progress to verify the objective.
Test connectivity
- Click the
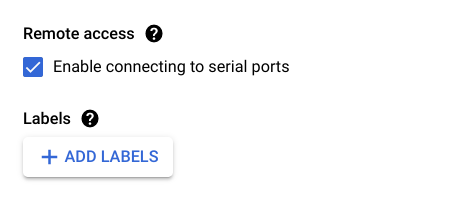
linux-prodVM, then click Edit.
- Enable the connection to serial ports.
-
Click on the Save button on the bottom of the screen and click Connect to the serial console. Use the user:
cp/ password:vpn123!to login. -
From the
linux-prodVM, ping thelinux-qaIP:10.0.1.4
Success!
- On the SmartConsole machine, go to LOGS & MONITOR, Logs, and find the echo-request (ICMP) logs.
Congratulations!
In this lab, you learned how to create a public cloud environment in Google Cloud and deploy the Check Point Security Management and High Availability Cluster in the environment. You then learned how to create and configure the Cluster object on SmartConsole, create an access policy that you published and installed on the cluster, create hosts in two different departments/locations, and test the connectivity between them.
Next steps / Learn more
Be sure to check out the following for more practice with Check Point:
- Check Point on the Google Cloud Marketplace!
- Sk114577 - Check Point CloudGuard IaaS reference architecture for Google Cloud
- CloudGuard IaaS High Availability R80.30 and above for Google Cloud Administration Guide
- sk147032 - CloudGuard for Google Cloud Latest Updates
Google Cloud training and certification
...helps you make the most of Google Cloud technologies. Our classes include technical skills and best practices to help you get up to speed quickly and continue your learning journey. We offer fundamental to advanced level training, with on-demand, live, and virtual options to suit your busy schedule. Certifications help you validate and prove your skill and expertise in Google Cloud technologies.
Last Updated Date July 19, 2023
Last Tested Date July 19, 2023
Copyright 2024 Google LLC All rights reserved. Google and the Google logo are trademarks of Google LLC. All other company and product names may be trademarks of the respective companies with which they are associated.