Checkpoints
Open Google Cloud Dataprep
/ 25
Create plan with flow task
/ 25
Add policy-binding and storage admin role to service account
/ 25
Create a plan with flow task and HTTP task
/ 25
Self Service ML Pipelines Using Dataprep and AutoML Tables
- GSP912
- Overview
- Setup and requirements
- Task 1. Open Google Cloud Dataprep
- Task 2. Add target schema
- Task 3. Add parameterized input datasets
- Task 4. Define target schema
- Task 5. Target mapping in the recipe
- Task 6. Data quality rules
- Task 7. Output
- Task 8. Plans
- Task 9. Inference
- Task 10. Retrieve your Bearer token
- Task 11. Run job
- Congratulations!
This lab was developed with our partner, Alteryx. Your personal information may be shared with Alteryx, the lab sponsor, if you have opted-in to receive product updates, announcements, and offers in your Account Profile.
GSP912

Overview
Cloud Dataprep is Google's self-service data preparation tool built in collaboration with Alteryx. In this lab you will learn how to use Dataprep in conjunction with AutoML Tables to build and operate your ML pipelines.
Use case scenario
The scenario involves a popular dataset used in machine learning - the data from a direct marketing campaign conducted by a Portuguese banking institution. It builds upon the AutoML Tables Quickstart by adding the data prep element. You will create a Dataprep flow to clean and transform the dataset into the schema expected by AutoML tables. You will then parameterize this flow and use it for model training as well as batch prediction.
What you'll learn
In this lab, you will learn how to:
- Declare a target schema in Dataprep
- Define data quality rules to declare what "clean data" looks like
- Build a recipe to clean and transform data
- Create parameterized datasets for sources and targets
- Invoke the data pipeline (flow) from plans for training and inference
- Use webhooks to call the AutoML Tables API and execute batch predictions
Setup and requirements
As this is an advanced lab, it is recommended you complete or be familiar with topics covered in the Transform and Clean your Data with Dataprep by Alteryx on Google Cloud quest before you take this lab.
Before you click the Start Lab button
Read these instructions. Labs are timed and you cannot pause them. The timer, which starts when you click Start Lab, shows how long Google Cloud resources will be made available to you.
This hands-on lab lets you do the lab activities yourself in a real cloud environment, not in a simulation or demo environment. It does so by giving you new, temporary credentials that you use to sign in and access Google Cloud for the duration of the lab.
To complete this lab, you need:
- Access to a standard internet browser (Chrome browser recommended).
- Time to complete the lab---remember, once you start, you cannot pause a lab.
How to start your lab and sign in to the Google Cloud console
-
Click the Start Lab button. If you need to pay for the lab, a pop-up opens for you to select your payment method. On the left is the Lab Details panel with the following:
- The Open Google Cloud console button
- Time remaining
- The temporary credentials that you must use for this lab
- Other information, if needed, to step through this lab
-
Click Open Google Cloud console (or right-click and select Open Link in Incognito Window if you are running the Chrome browser).
The lab spins up resources, and then opens another tab that shows the Sign in page.
Tip: Arrange the tabs in separate windows, side-by-side.
Note: If you see the Choose an account dialog, click Use Another Account. -
If necessary, copy the Username below and paste it into the Sign in dialog.
{{{user_0.username | "Username"}}} You can also find the Username in the Lab Details panel.
-
Click Next.
-
Copy the Password below and paste it into the Welcome dialog.
{{{user_0.password | "Password"}}} You can also find the Password in the Lab Details panel.
-
Click Next.
Important: You must use the credentials the lab provides you. Do not use your Google Cloud account credentials. Note: Using your own Google Cloud account for this lab may incur extra charges. -
Click through the subsequent pages:
- Accept the terms and conditions.
- Do not add recovery options or two-factor authentication (because this is a temporary account).
- Do not sign up for free trials.
After a few moments, the Google Cloud console opens in this tab.

Task 1. Open Google Cloud Dataprep
-
Launch Cloud Shell by clicking the Activate Cloud Shell icon (
) in the top right of the console. It will take a few moments to provision your Cloud Shell instance.
-
On Cloud Shell, run the following command:
You should see a message saying the service identity was created.
-
In the Cloud Console go to the Navigation menu, and under ANALYTICS select Dataprep.
-
To get into Cloud Dataprep, check that you agree to Google Dataprep Terms of Service, and then click Accept.
-
Click the checkbox and then click Agree and Continue when prompted to share account information with Alteryx.
-
Click Allow to give Alteryx access to your project.
-
Use your lab credentials to sign in and click Allow.
-
Check the box and click Accept to agree to Alteryx Terms of Service.
-
If prompted to use the default location for the storage bucket, click Continue.
Click Check my progress to verify the objective.
Task 2. Add target schema
A target schema is a file that is used to create a template for how you expect the outputs to look like. Any datasets associated with a target are expected to conform to the requirements of the target schema.
-
Click the Flows icon on the left navigation bar.
-
On the Flows page, click Create > Blank Flow.
-
Click Untitled Flow and rename your flow to
Bank Marketing. Click OK. -
Click on Plus icon (
+) in the Dataset node. Click Import Datasets. -
On the left pane, choose Cloud Storage.
-
Click on the pencil icon at the top and enter the path:
gs://cloud-ml-tables-data/bank-marketing.csv.
Click Go. This automatically stages the CSV file in the right-hand panel.
- Click Import & Add to Flow. Several icons will appear, representing the dataset, recipe, and output.
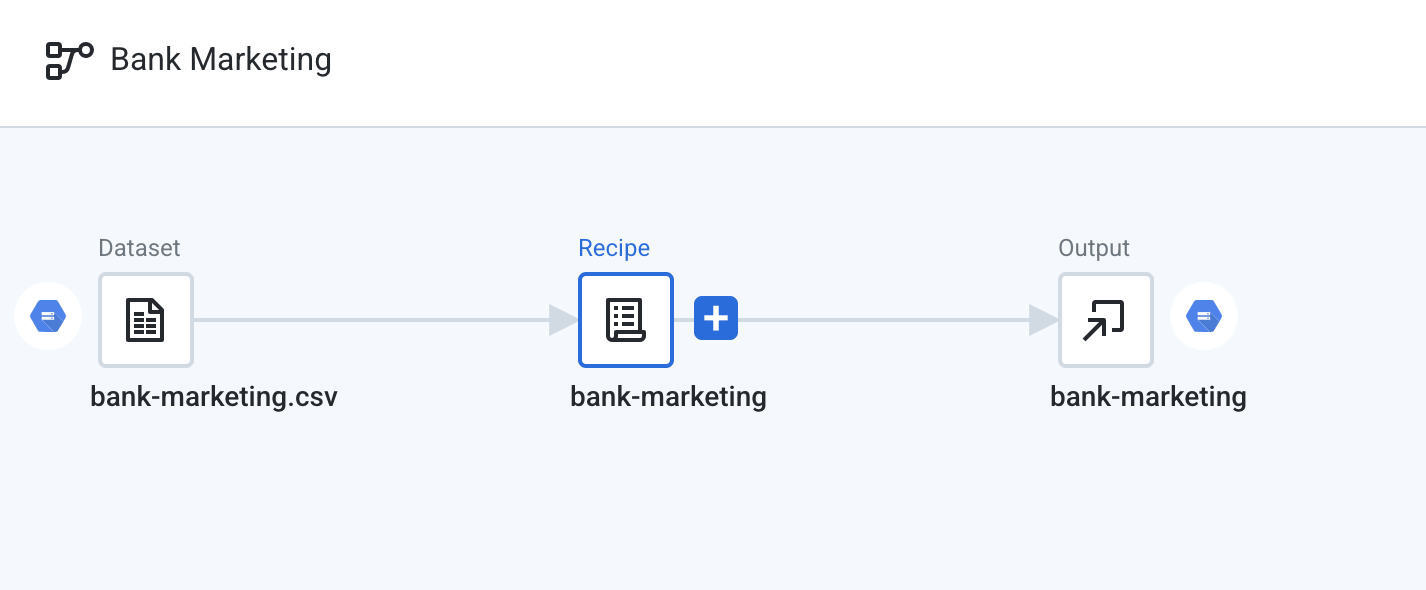
- Right click the Recipe node and choose Delete. Confirm Delete. Deleting the recipe will also result in the output being deleted.
Your flow should look like this.

Task 3. Add parameterized input datasets
Dataset parameterization allows you to use patterns or variables to match multiple files when importing or publishing data.
- On the top of the page, click Add Datasets and choose Import Datasets and Cloud Storage.
A storage bucket named with your Project ID has been pre-created for you. You can retrieve your Project ID from the Qwiklabs lab panel.
-
Click on the pencil icon at the top and enter the path:
gs://{{YOUR PROJECT ID}}, then click Go. -
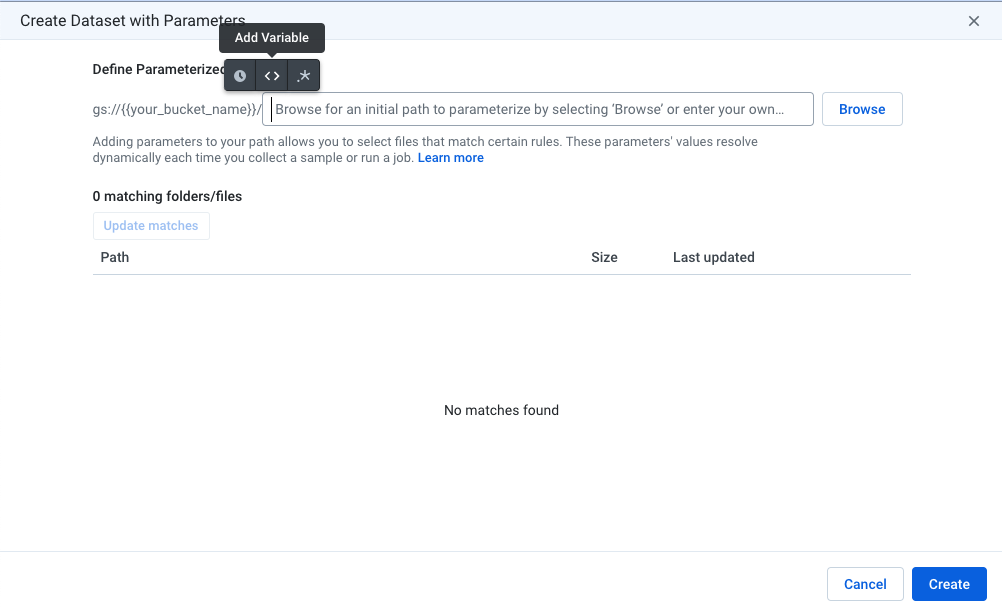
Choose Create Dataset with Parameters.
-
Add a variable parameter.
- Name the variable
sourceand give it a default value oftraining. Click Save.
-
After the
<>sourceplaceholder, type/input/. -
Add another parameter and choose Add Pattern Parameter to create a pattern parameter.
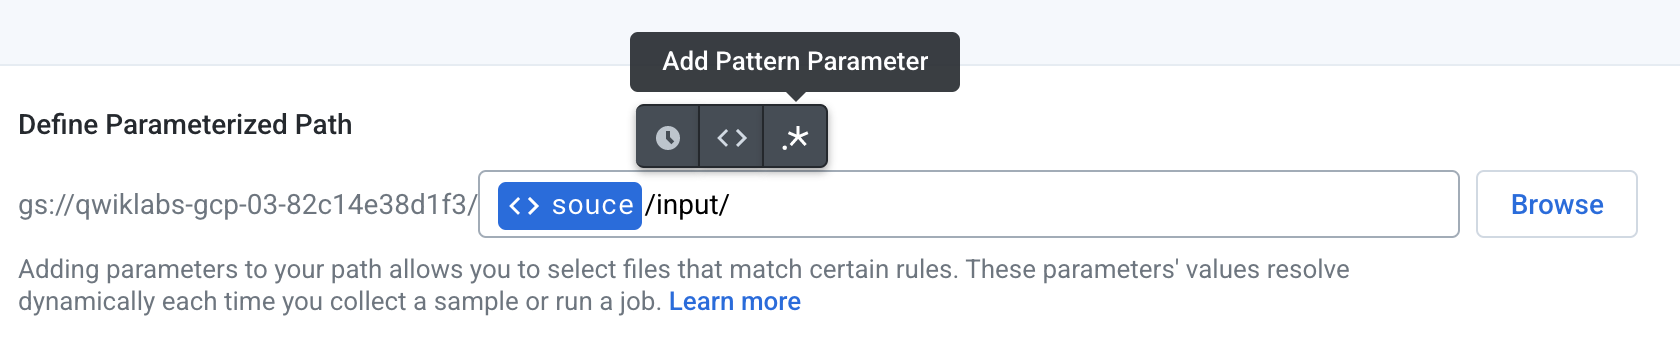
- Choose Wildcard .* as the pattern parameter and click Save. This will match all files within this folder.
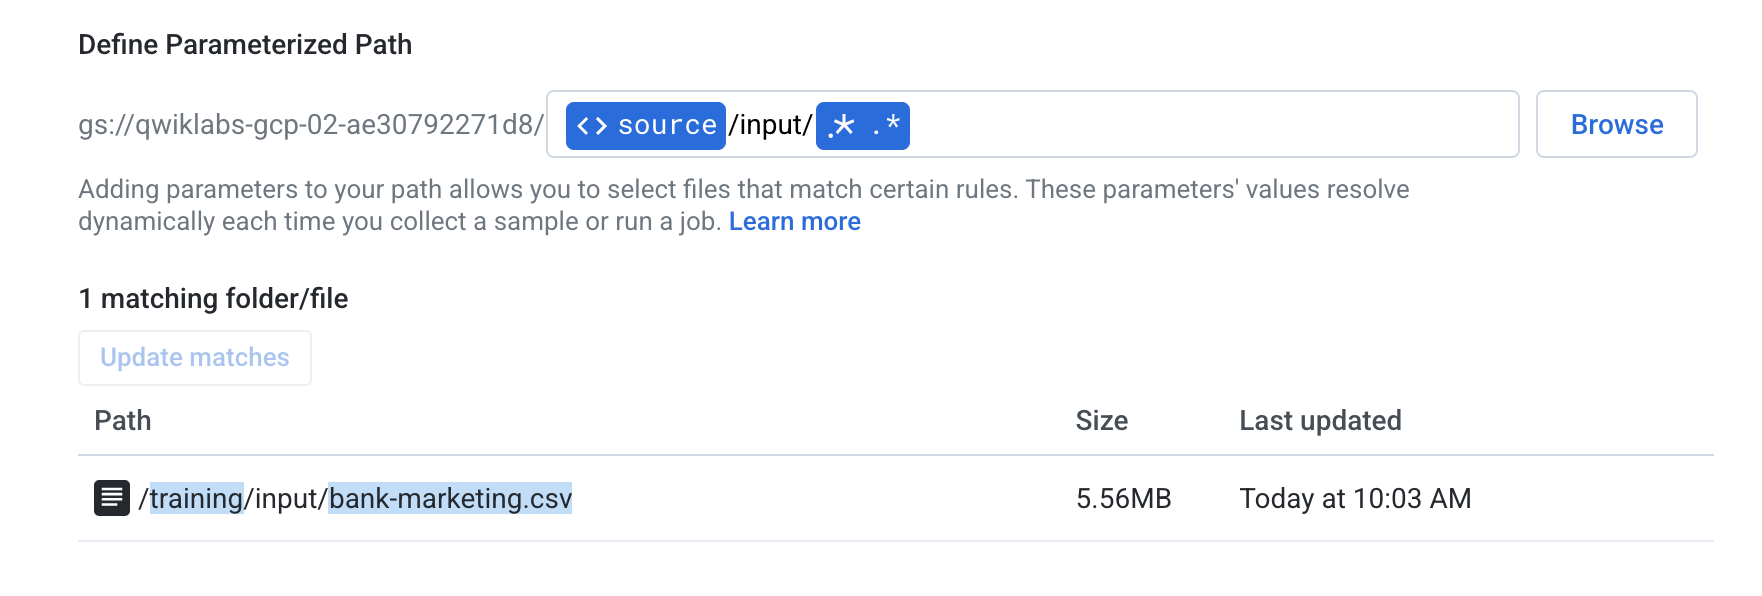
- Your full path should look something like this (with your bucket at the beginning of the path).
-
If not already found, click Update matches to confirm that the file
/training/input/bank-marketing.csv(5.56MB) appears as a matched file. If the file has already been found, click on Create at the bottom of the screen. -
For the staged file, change the name of the dataset from "Dataset with Parameters" to traininginput in the panel on the top right.
- Click Import & Add to Flow to add the new dataset to the flow.
Task 4. Define target schema
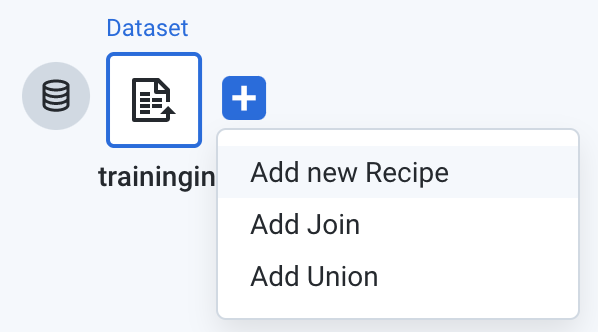
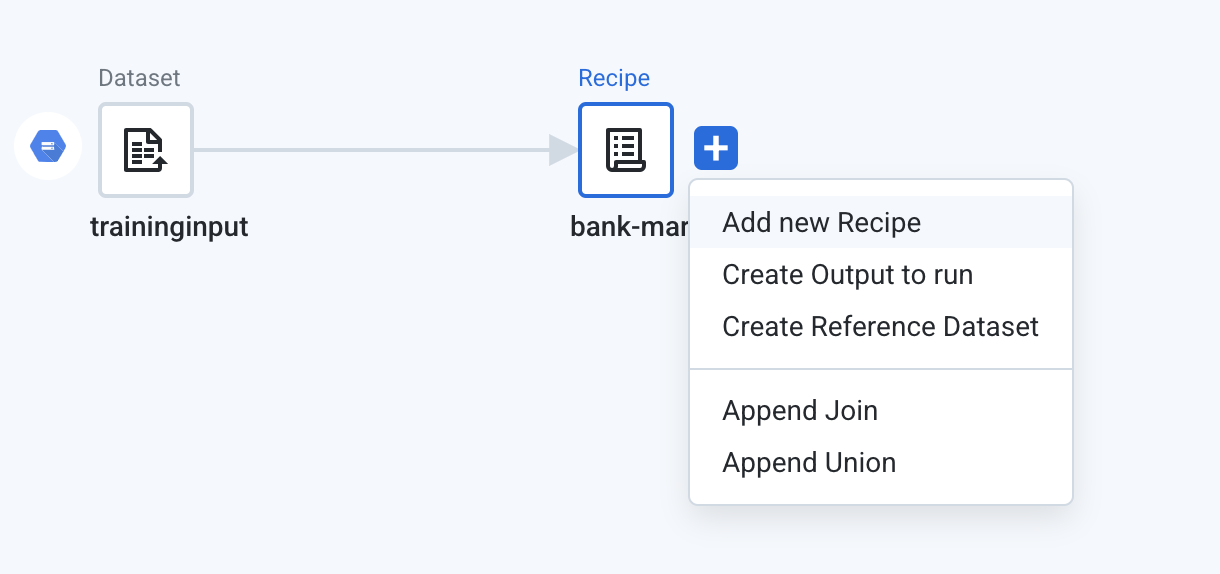
- Mouse over the traininginput dataset, click the plus (
+) icon to right, and choose Add new Recipe.
-
Click the Untitled Recipe text under the recipe icon. Change the name of the recipe to
bank-marketing. -
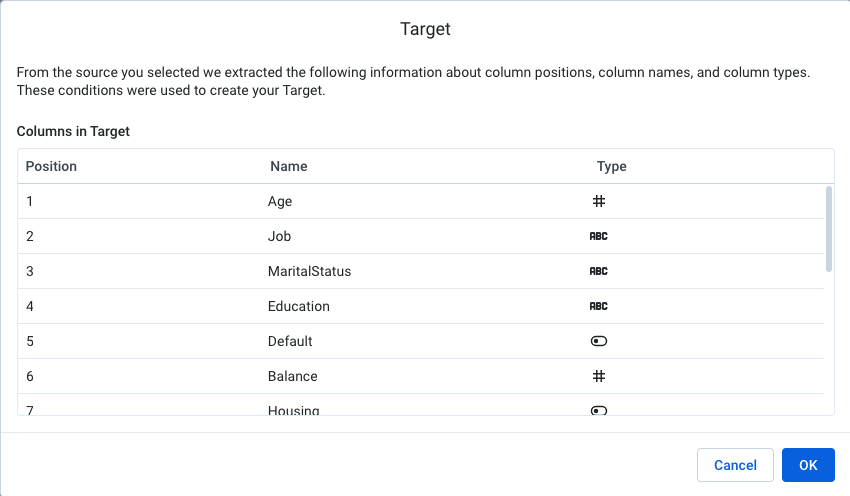
Right-click on the recipe icon, and choose Assign Target to Recipe.
- In the dialog box that follows, choose bank-marketing.csv (the dataset that you first added) as the data to use as a target. Click Add and review the target columns and select OK to accept. When you open this recipe, Dataprep will now guide you to achieve the target schema.
Task 5. Target mapping in the recipe
-
Double click the
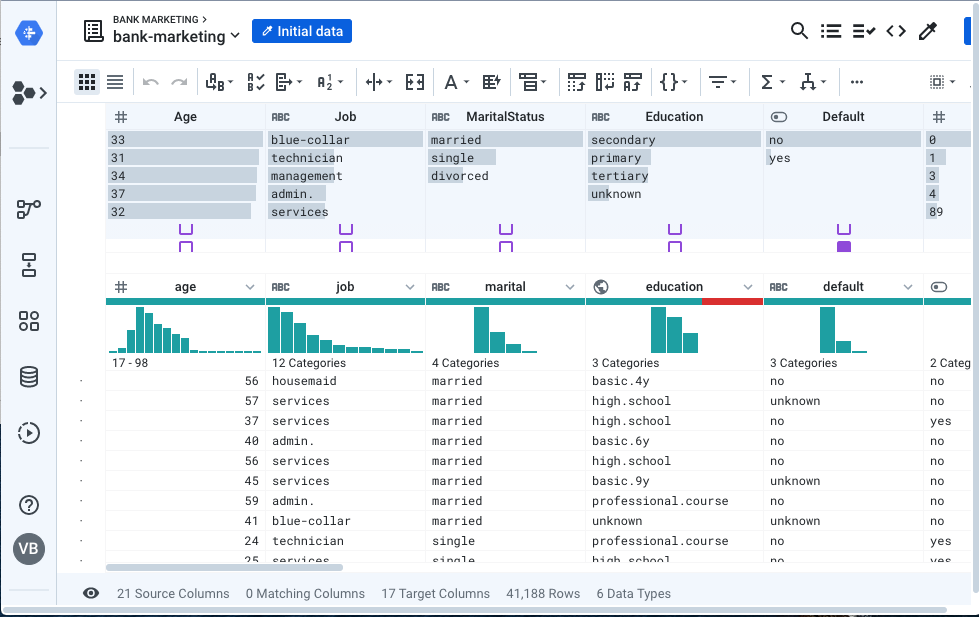
bank-marketingrecipe node to open the Transformer view. -
When the grid is loaded, notice that Dataprep shows the target schema on the top half of the screen, and the current dataset in the bottom half. Note that the column names are slightly different (eg. MaritalStatus Vs marital).
This view provides easy validation of mismatches between columns, with the column level indicators indicating how closely the current source matches the Target.
Matches are determined by column name, position and type resulting in the GREEN, BLUE and RED indicators. Green indicators represent a complete match; blue indicators, represent a partial match where the column names are identical but the data types are different; and red indicators represent data where no match was found between the source and target.
In advanced cases, the column indicators show PURPLE when Alteryx's ML-based pattern matching algorithm identifies that the data in two columns have a high degree of similarity, but the column names are different.
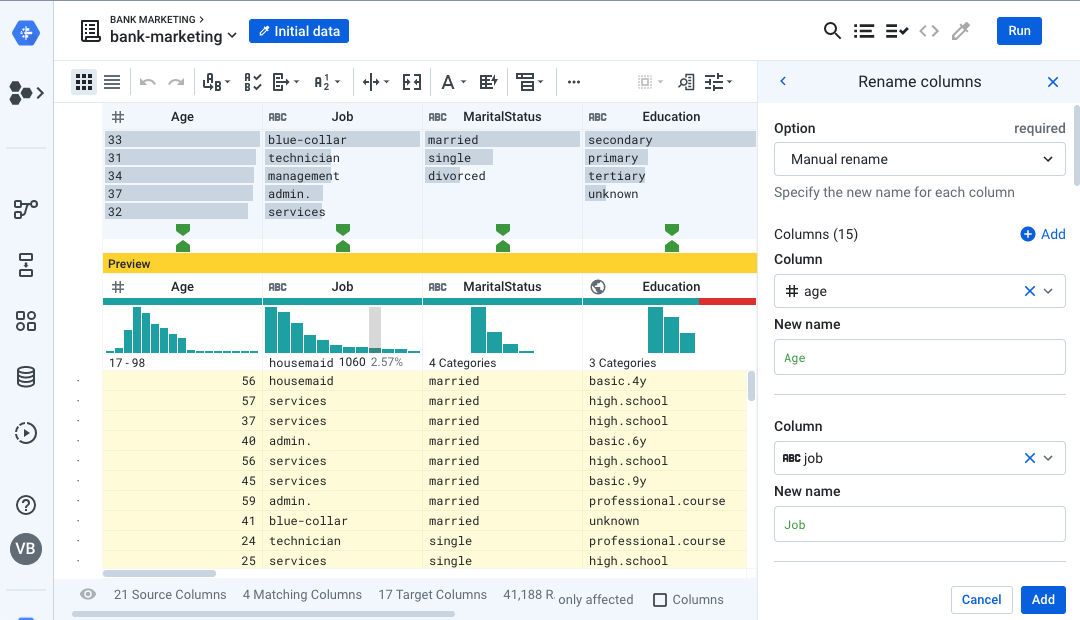
- Click the Search transformation icon on the top right and search for Rename Columns.

- Choose the Rename columns transformation. Rename each column as follows:
- age: Age
- job: Job
- marital: MaritalStatus
- education: Education
- default: Default
- housing: Housing
- loan: Loan
- contact: Contact
- month: Month
- duration: Duration
- campaign: Campaign
- pdays: PDays
- previous: Previous
- outcome: POutcome
- y: Deposit
rename type: manual mapping: [age,'Age'], [job,'Job'], [marital,'MaritalStatus'], [education,'Education'], [default,'Default'], [housing,'Housing'], [loan,'Loan'], [contact,'Contact'], [month,'Month'], [duration,'Duration'], [campaign,'Campaign'], [pdays,'PDays'], [previous,'Previous'], [poutcome,'POutcome'], [y,'Deposit']- As you rename each column, notice that Dataprep will update and show different icons indicating if the column now matches the target. Click Add.
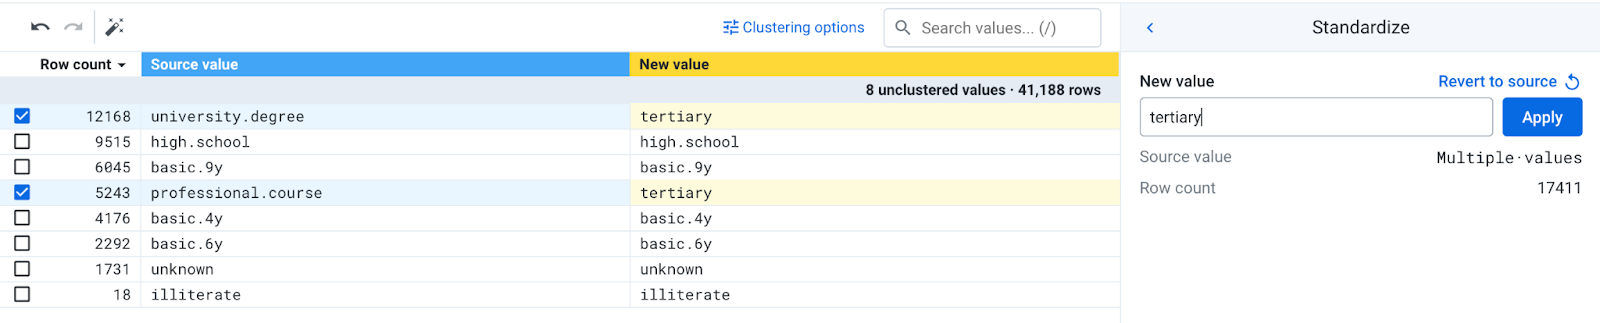
- Note that the values in the Education column look different in your dataset compared with the target. We need to standardize the names into the expected categories (i.e. primary, secondary, etc.). Open the column dropdown menu of the Education column and choose Standardize.
- In the Standardization tool, create a mapping by checking the boxes next to
- university.degree
- professional.course
- On the right side of the screen, enter
tertiaryin the New value field and hit Apply.
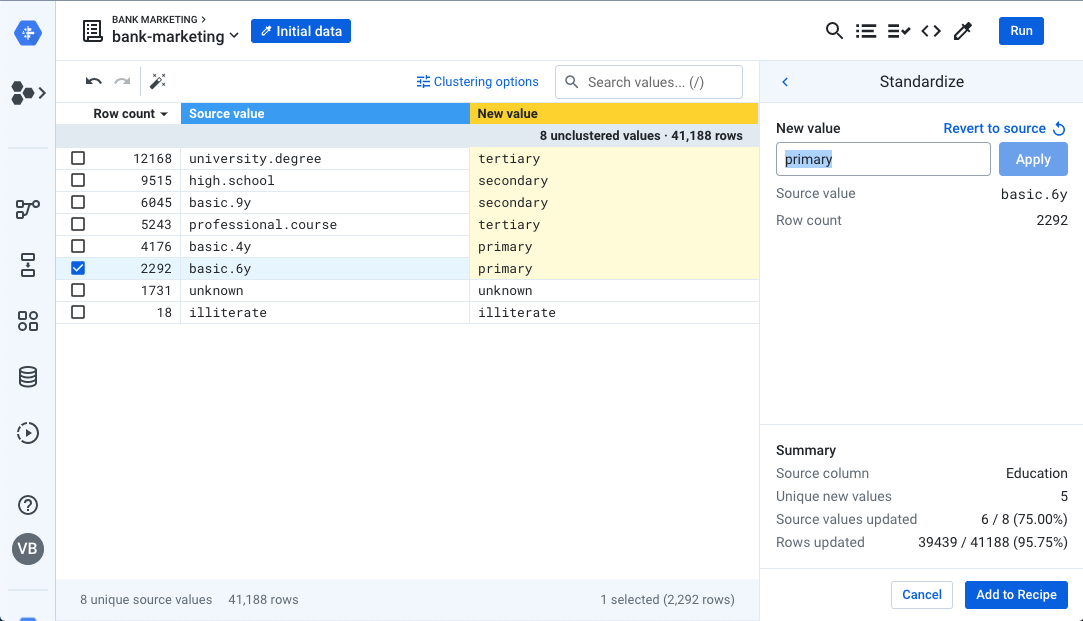
- Create new mappings for the following:
- high.school: secondary
- basic.9y: secondary
- basic.4y: primary
- basic.6y: primary
- Click Add to Recipe to finish your standardization. Your final screen should look like this:
-
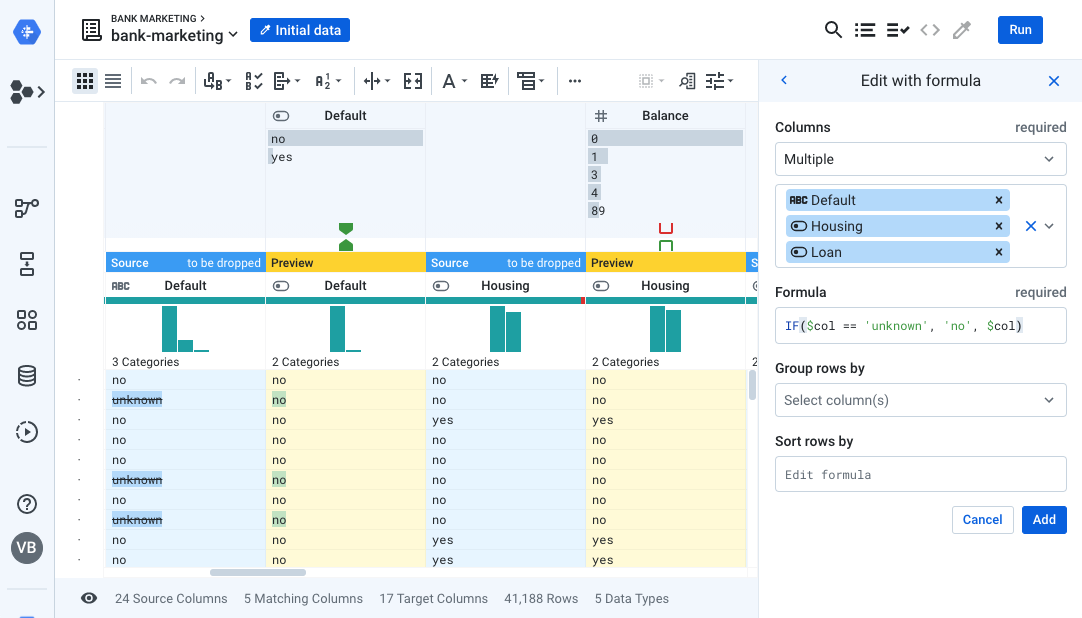
Look at the Default, Housing, and Loan columns in your dataset. The data quality bar for Housing and Loan indicates that there are some mismatched values (i.e. "unknown") present in the data.
-
For this lab, we will treat the unknowns as a "no". Choose the Edit with Formula transformation and enter the following formula:
IF($col == 'unknown', 'no', $col). Apply this transformation to multiple columns: Default, Housing and Loan as shown below. Click Add.
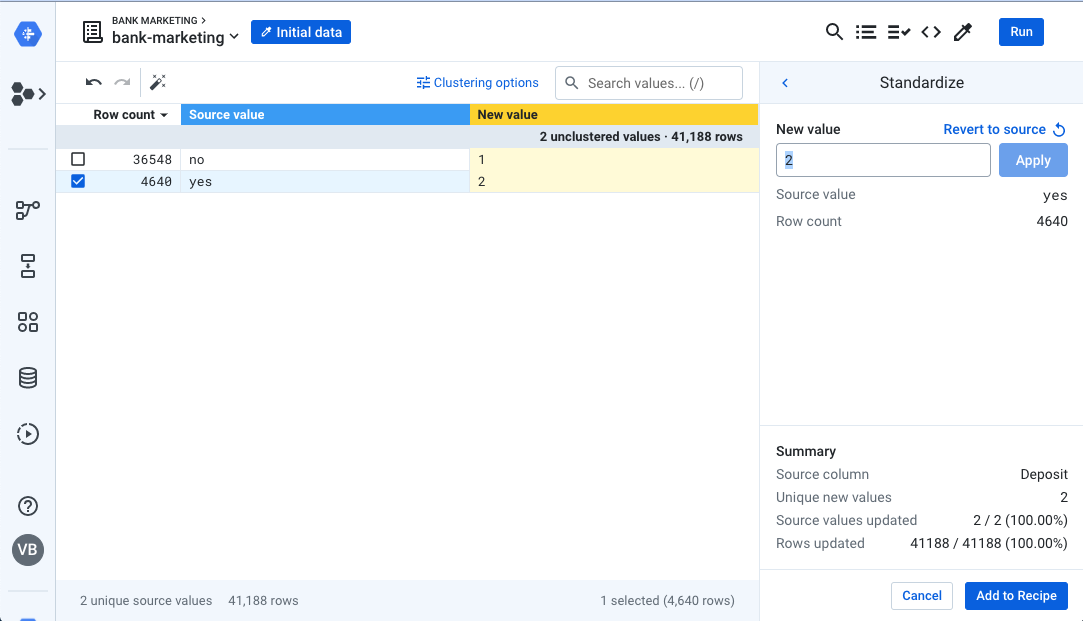
- Similarly, the Deposit column is expected to be numeric, but it contains boolean values instead. Choose Standardize and apply the mapping as follows: no: 1, yes: 2. Click Add to Recipe.
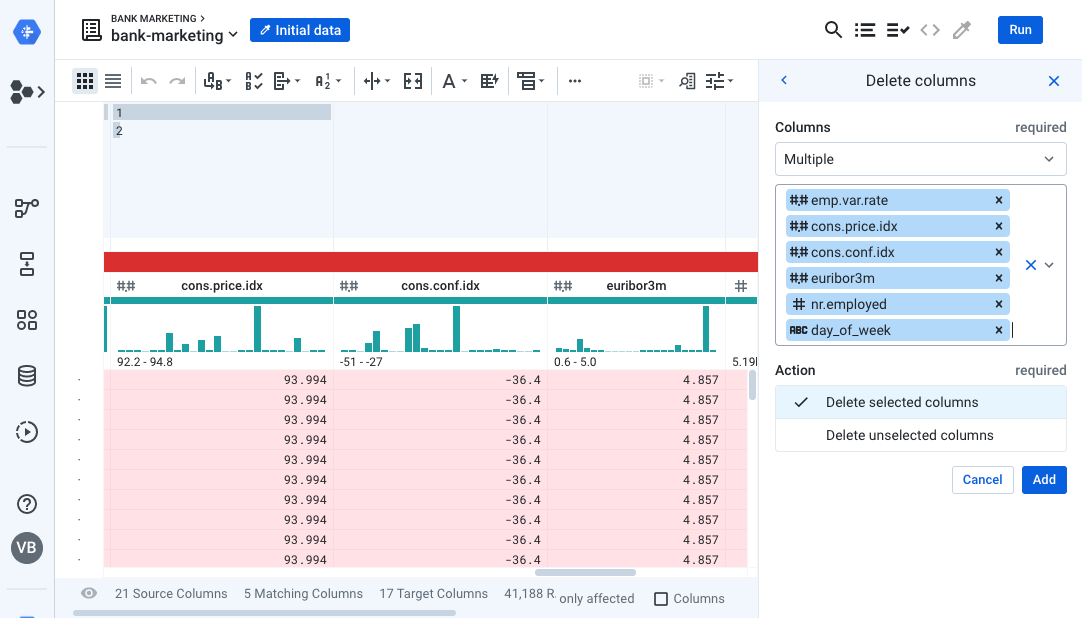
- Good! Now most of the columns match, but we have a few extra columns in our dataset. Select the following columns:
- emp.var.rate
- cons.price.idx
- cons.conf.idx
- euribor3m
- nr.employed
- day_of_week
- Choose the suggestion to Delete 6 Columns.
- Now you have the right set of columns, but some are in the wrong order and some columns are missing! Notice that columns that are an exact match show a solid green, another color/shape where a mismatch exists. Luckily Dataprep can fix it automatically. From the toolbar, choose Target > Align on column name match.
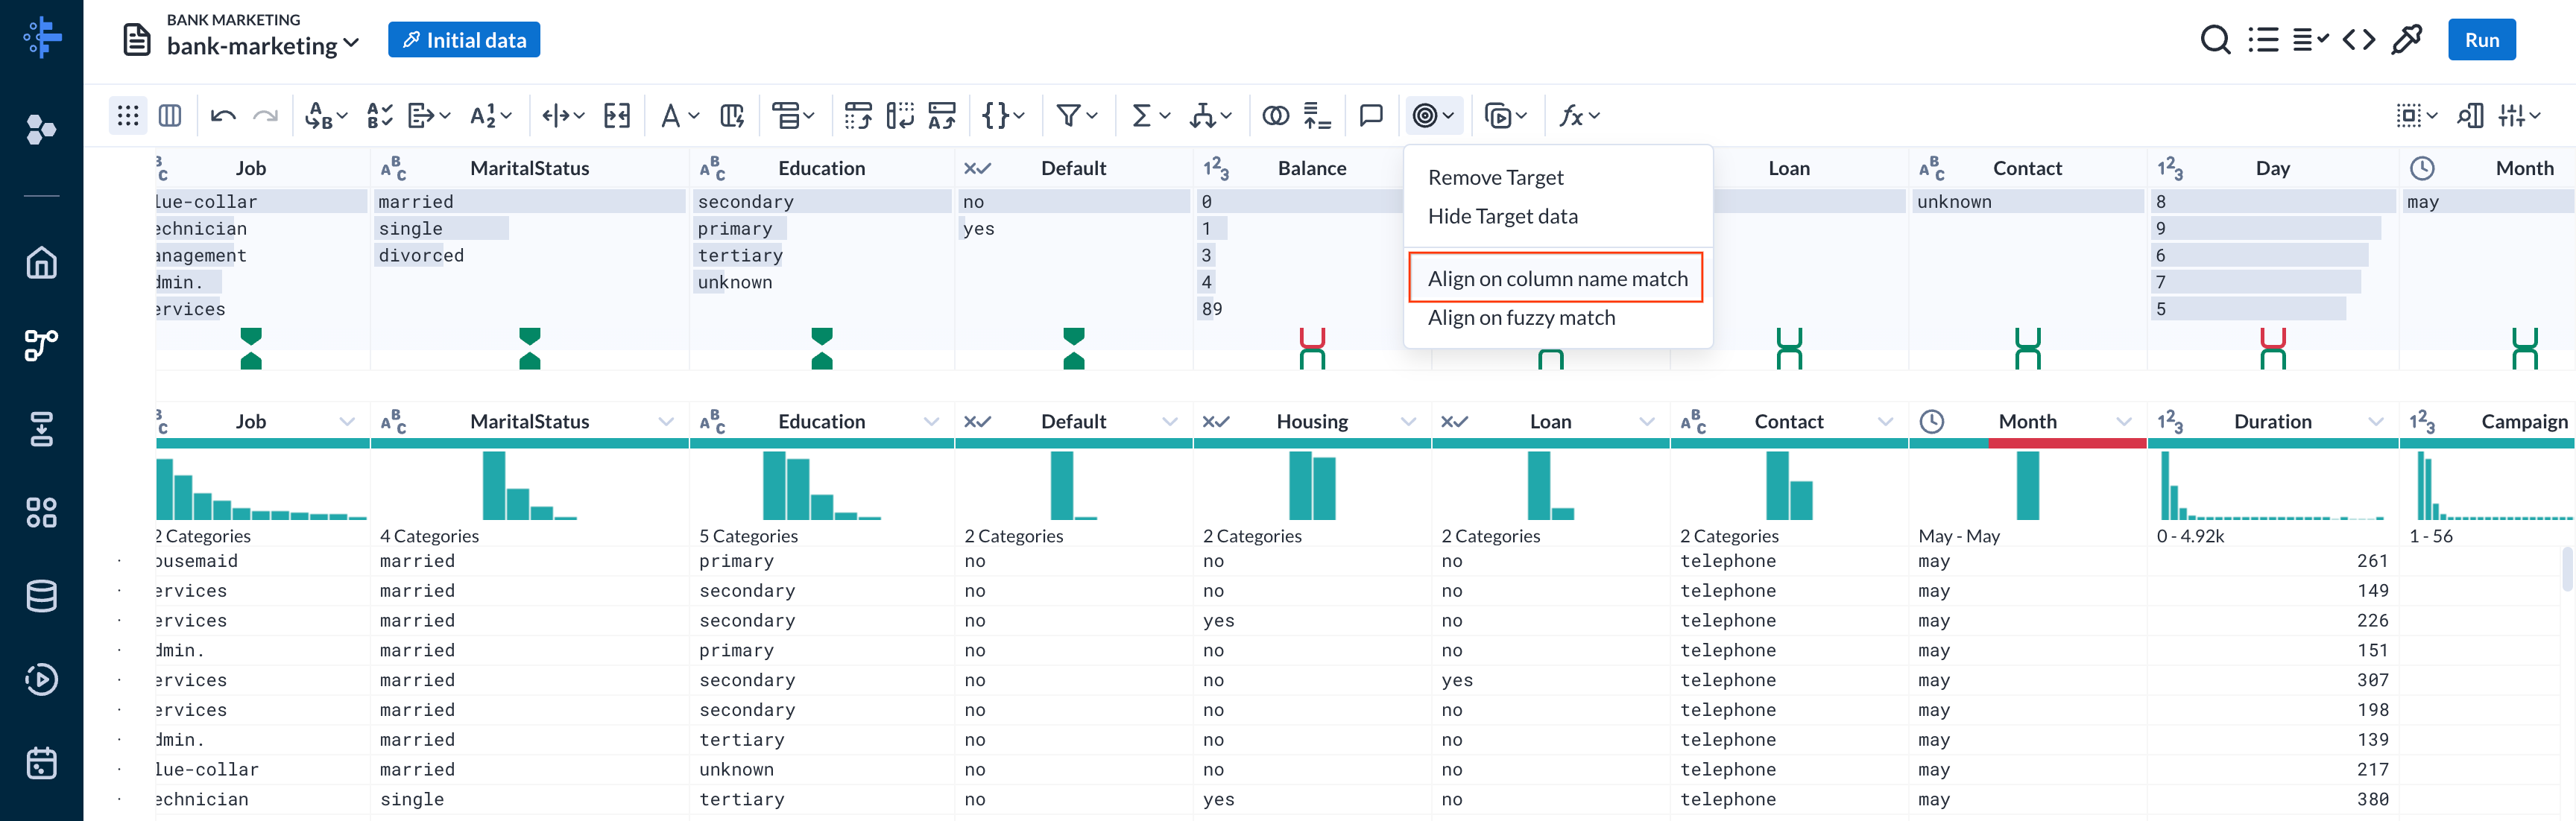
Note that this action adds several recipe steps automatically (steps 6, 7 and 8), as shown below.
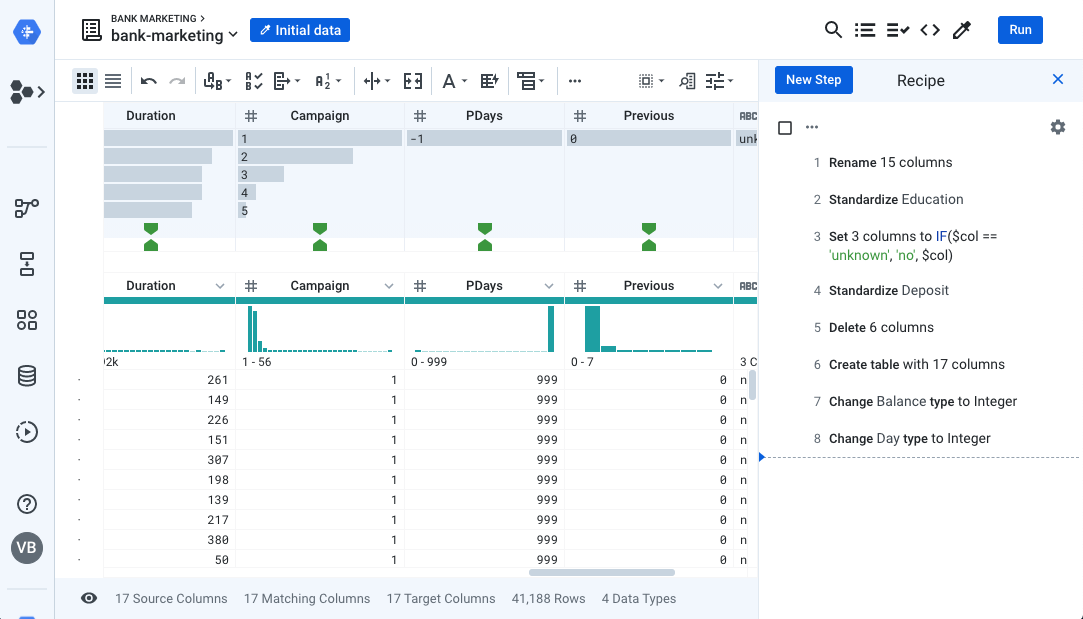
Perfect! Your data now matches the target schema.
Task 6. Data quality rules
You have cleaned the data, now make sure that it stays that way. Often there is a "data drift" problem, where over time, the incoming dataset falls short of the expected quality.
Dataprep allows you to define data quality rules that declare what clean data looks like. You define a set of constraints that the data must fulfill, and Dataprep will alert you when the data drifts from your specification. If you are familiar with Test-driven development (TDD), the concept is similar to writing assert statements in code.
-
Return to the flow view by clicking on the flow name Bank Marketing at the top left of the grid.
-
It is good practice to keep standardization and target mapping steps in a separate recipe for ease of modification later on. Create a new recipe off of the bank-marketing recipe.
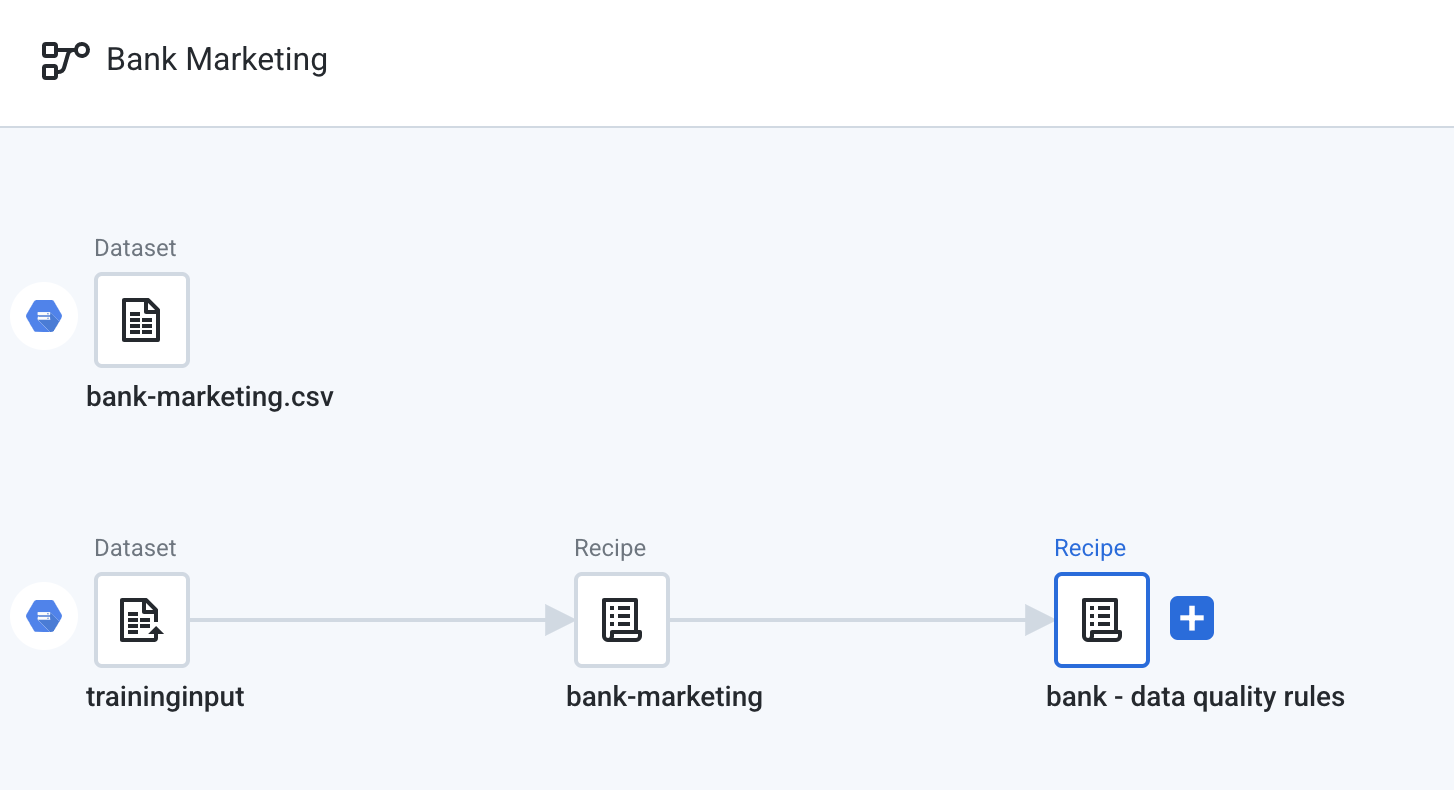
- Rename this recipe to
bank - data quality rules. Your flow should resemble the following:
- Edit the new recipe.
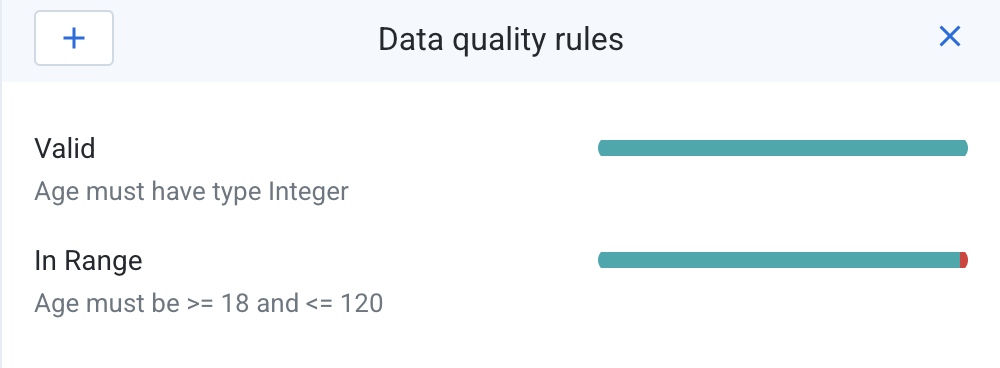
You need to implement the following 2 data quality rules on the Age field:
- Age must be an integer value
- Age must be between 18 and 120
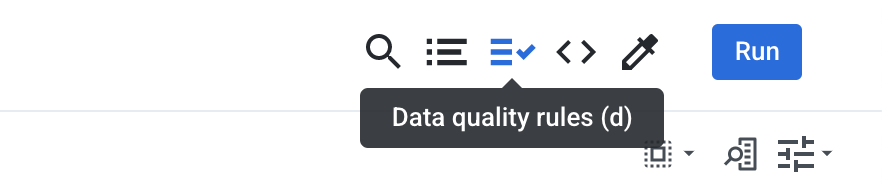
- Choose the icon for Data Quality Rules on the top right to create new rules.
-
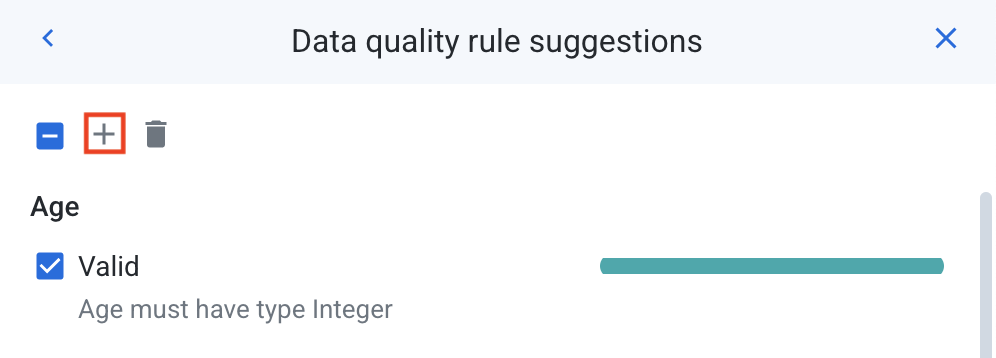
Click View Suggestions. Dataprep offers several suggestions based on your dataset. You can accept them or create your own custom constraints.
-
For the first data quality rule, check the box next to the suggested rule that states "Age must have type Integer". Click on the plus sign (
+) near the top to add this rule to your rule set.
-
The second rule is a Range rule that constrains the minimum and maximum values allowed. You will define this manually. Click the back (
<) button to leave the suggestions. -
Click the Plus symbol to Add rule. Scroll down to the rule that says In Range.
- Define a new rule as shown below. Click Add.
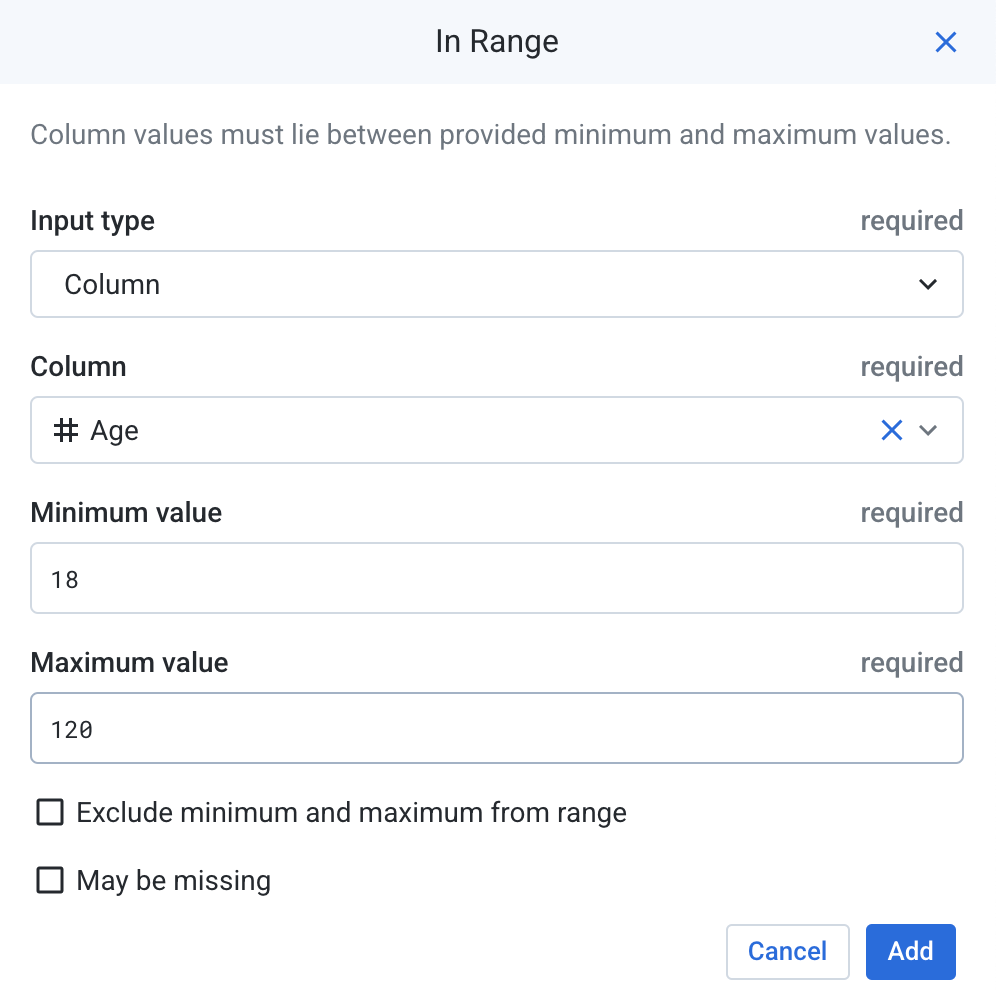
This enforces the range of values in the Age column: between 18 and 120.
- Once the rules are added, you should see something similar to this.
If you click on one of the rules, the preview will highlight any rows that do not match the rules. You can also right click on the rule and choose Show failing values only to display only rows that do not fulfill the criteria.
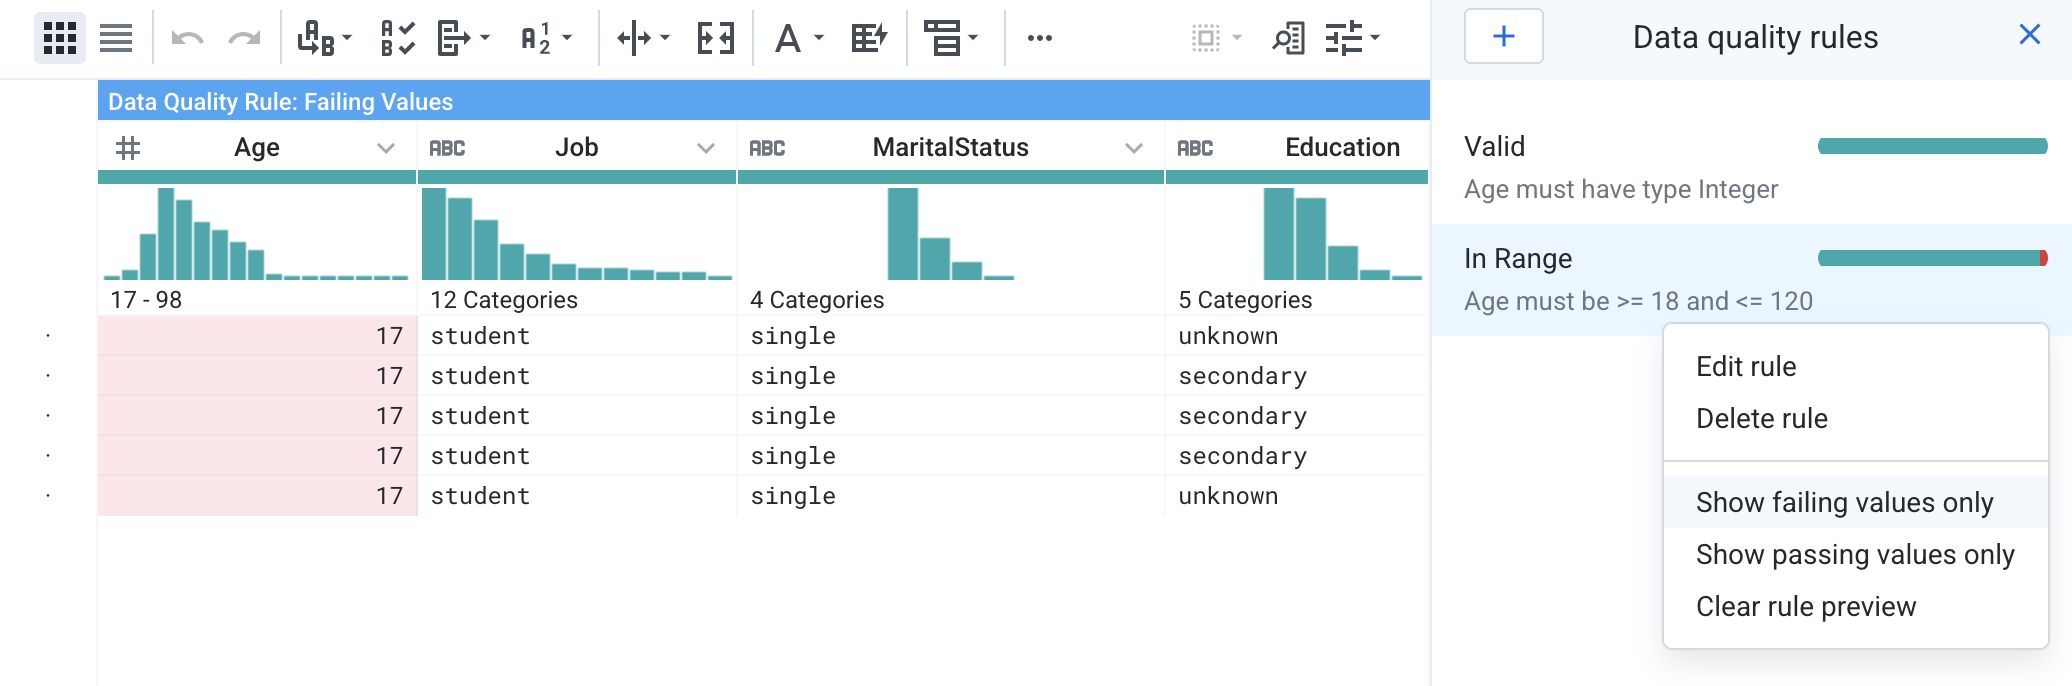
- There are a couple of rows where the Age does not fulfill the data quality rules. You can delete these rows to prevent them from skewing the model.
First, right click on the In Range rule, then select Clear rule preview.
-
Next, create a new Filter transform to delete rows where
Age < 18. Select the dropdown menu on the Age column and select Filter Rows > On column values > Less than (or equal to). -
Define the new filter:
- Condition: less than (or equal to)
- Column: Age
- Value: 18
- Action: Delete matching rows
Click Add.
Task 7. Output
Now that you have the recipes for standardizing and data quality checks, you can create an output from it. Similar to the input, the output will also be parameterized so that it can be re-used for training and inference.
-
Return to the flow view by clicking on the flow name Bank Marketing at the top left of the grid.
-
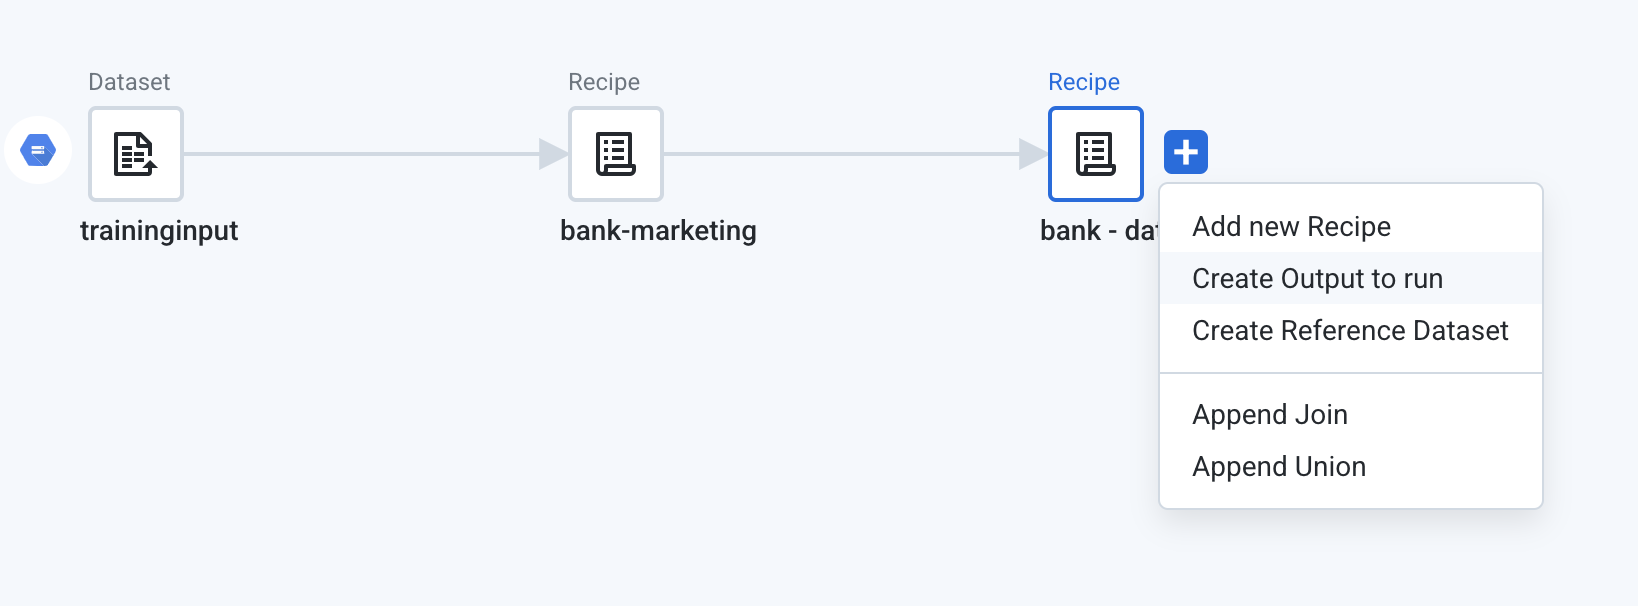
Click on the plus sign next to the second recipe icon (
bank - data quality rules), and choose Create Output to run.
- Double click on the Output node.
-
Edit the default publishing action by clicking on the Edit button in the Create-CSV Actions section.
-
Ensure that Cloud Storage is selected, and edit the path on the top of the screen to set it to
gs://<<YOUR PROJECT ID>>/. Be sure to replace<<YOUR PROJECT ID>>with your actual bucket name, and click on Go. -
On the right panel, next to the field for Create a new file, click on Parameterize destination.
- In the box that pops up, delete "bank - data quality rules" (or any other values that appear after your bucket name). Enter
//output/bank-marketing.csv. Then place your cursor in between the two slashes and insert a variable. Give the variable a namesourceand a default value of "training", just like you created for the input parameters. Click Save, then Submit.

-
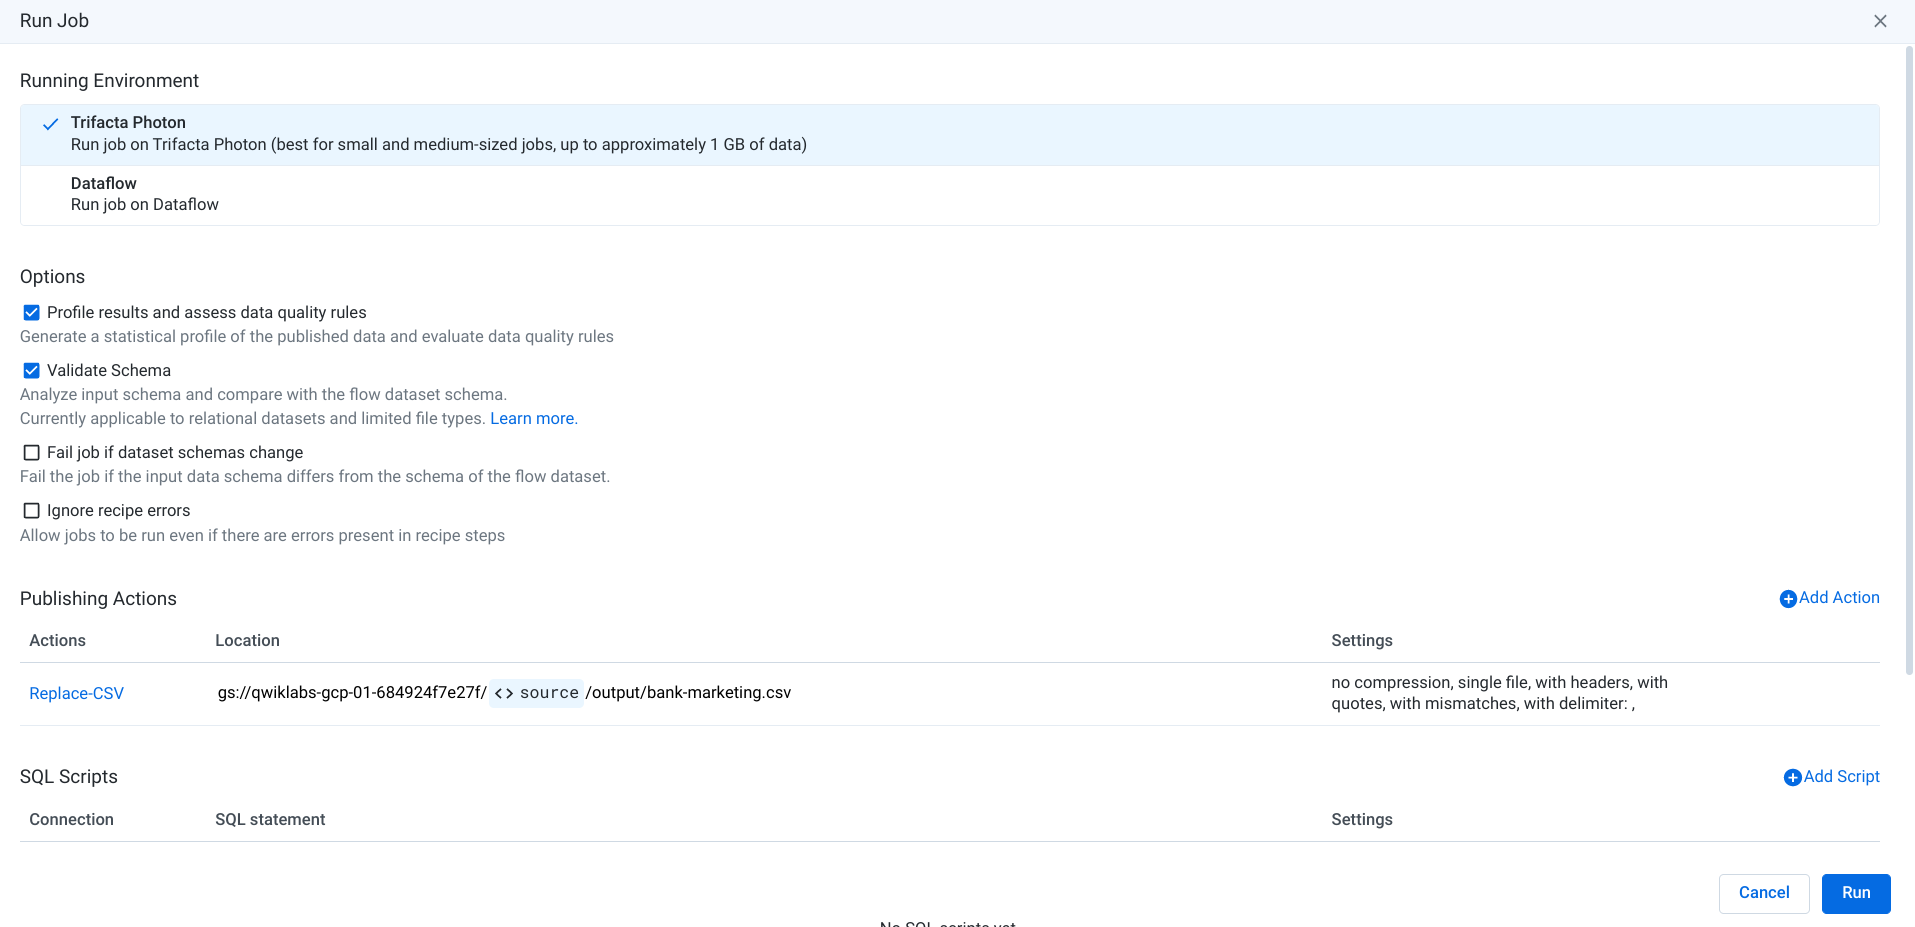
You can accept the default data storage format (CSV). Choose Replace this file every run.
-
Click More Options to see additional publishing options. Check the box that says “Include headers as first row on creation” and choose Single File. This will ensure you generate a single file with the correct headers. Leave the remaining settings at the default settings.
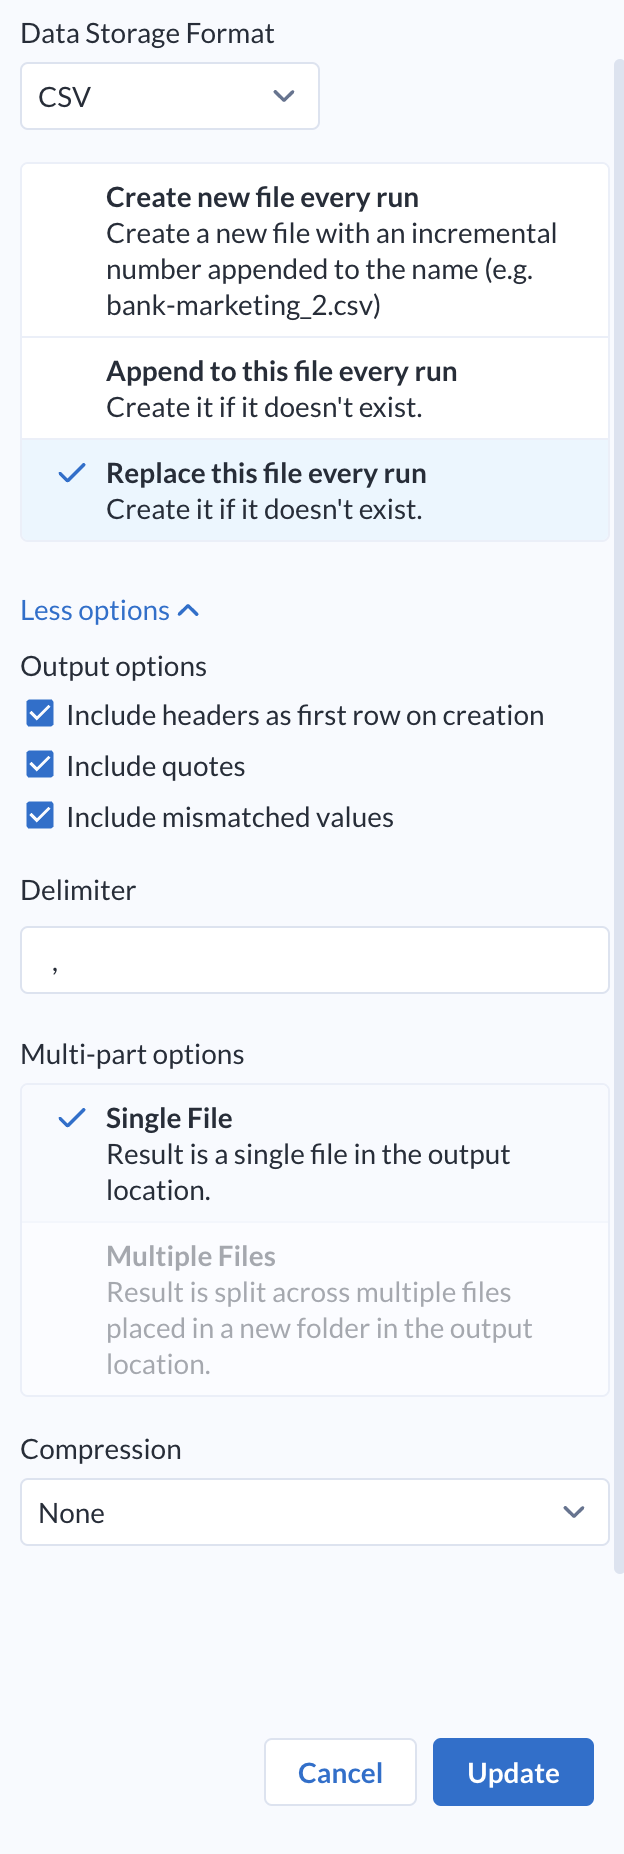
-
Click on Update.
-
Choose Trifacta Photon as the running environment and click Run. Your Run Job should resemble the screen below.
Task 8. Plans
Now that you have a recipe and flow, you can define a Plan for executing this pipeline in an automated fashion for training and inference.
- From the left navigation bar, choose Plans.
-
Create a new Plan. Click on the Plan name (by default, this is "Untitled plan") and rename it to
Bank Marketing - Training. -
Choose Create first task > Flow task. Pick the Bank Marketing flow that you created in the previous section.
-
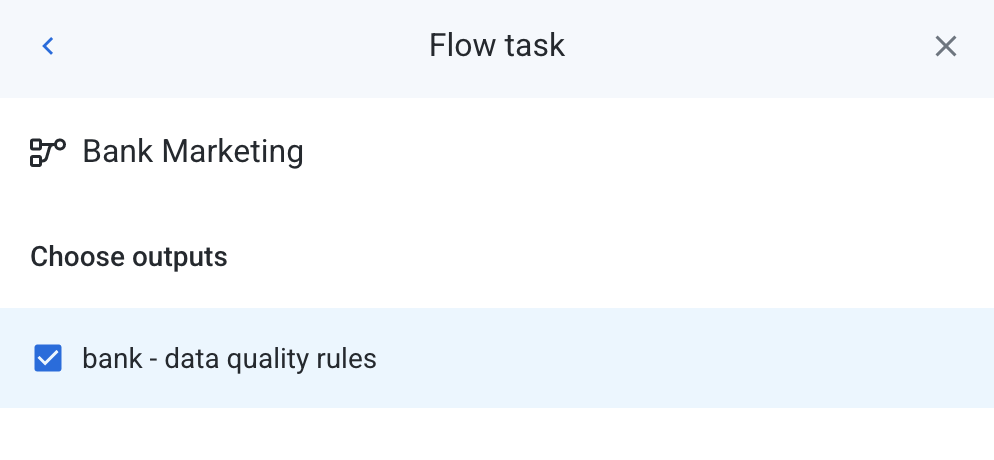
In the "Choose outputs" prompt that follows, ensure that the checkbox next to bank-data quality rules is selected and click on Create Task.
- Switch to the Parameters tab in the Flow task panel on the right. Notice that the wildcard parameter and dataset parameter appears, and the value for the dataset is set to training. You can leave this as-is. Your plan configuration for the Training Plan should now look like the following:
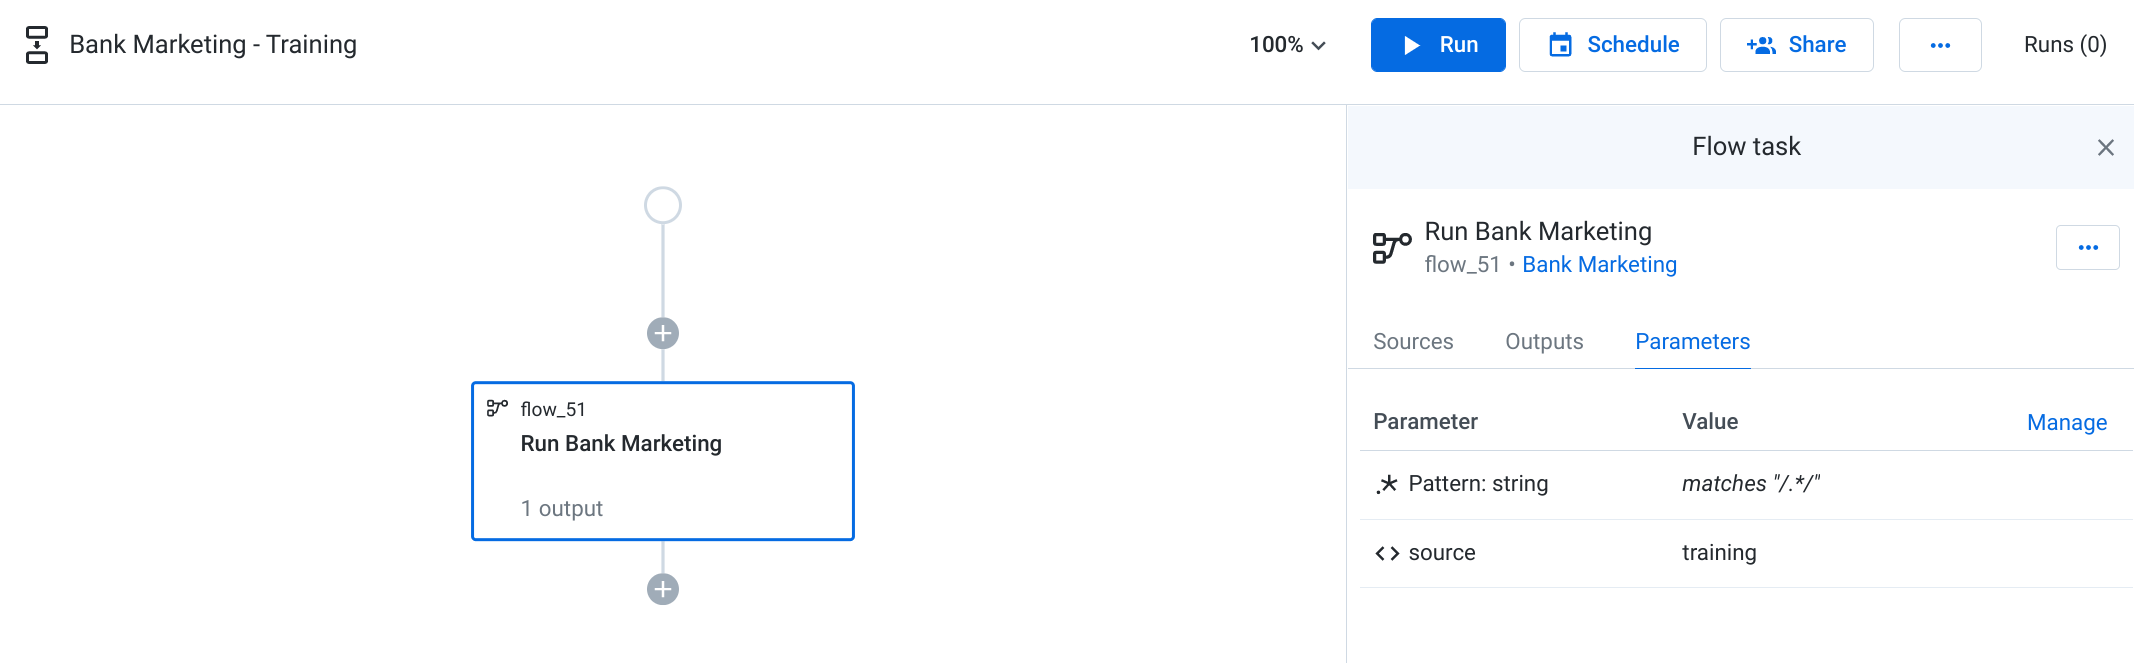
- Click Run at the top of the screen. This will execute the plan against the training dataset. To monitor the execution of this job, click Plan runs on the left Job history panel.
- Once the job execution is complete, the output will be available at the following location on Cloud Storage:
gs://{{YOUR PROJECT ID}}/training/output/bank-marketing.csv. This dataset can be used to train the AutoML model. Training the AutoML model is out of scope for this lab.
Click Check my progress to verify the objective.
Task 9. Inference
-
You can re-use the same flow in a different plan that generates the data for inference. To do this, go back to the Plans pane and choose Create. This time, set the plan name to
Bank Marketing - Inference. -
Choose Create first task, and as before, choose Flow task and select the Bank Marketing and bank-data quality rules output. Click Create Task.
-
Choose the Parameters tab. This time, change the source parameter by clicking on Manage. In the dialog box, click on the pencil icon to set the value for the source to inference, then click on Save and Close.
-
The inference pipeline requires a second task for AutoML. Click on the plus sign below the first task, and choose HTTP task.
-
You are prompted to enter various settings for the HTTP request, including URL, headers, body, etc. Keep this window open, and create a new tab in your browser, and navigate back to the Google Cloud Console.
-
Launch Cloud Shell by clicking the Activate Cloud Shell icon (
-
In Cloud Shell, run the following command to set your Project ID environment variable and add policy-binding to a pre-created service account:
Task 10. Retrieve your Bearer token
To allow the pipeline to authenticate, and be authorized to call the endpoint to get the predictions, you will need to provide your Bearer Token.
Follow the instructions below to get your token. If you have issues getting the Bearer Token, this can be due to cookies in the incognito window. If this is happening to you, try this step in a non-incognito window.
-
Log in to Qwiklabs
-
When logging in, use your student email address and password.
-
Click the Copy button. This will copy a very long token to your clipboard.
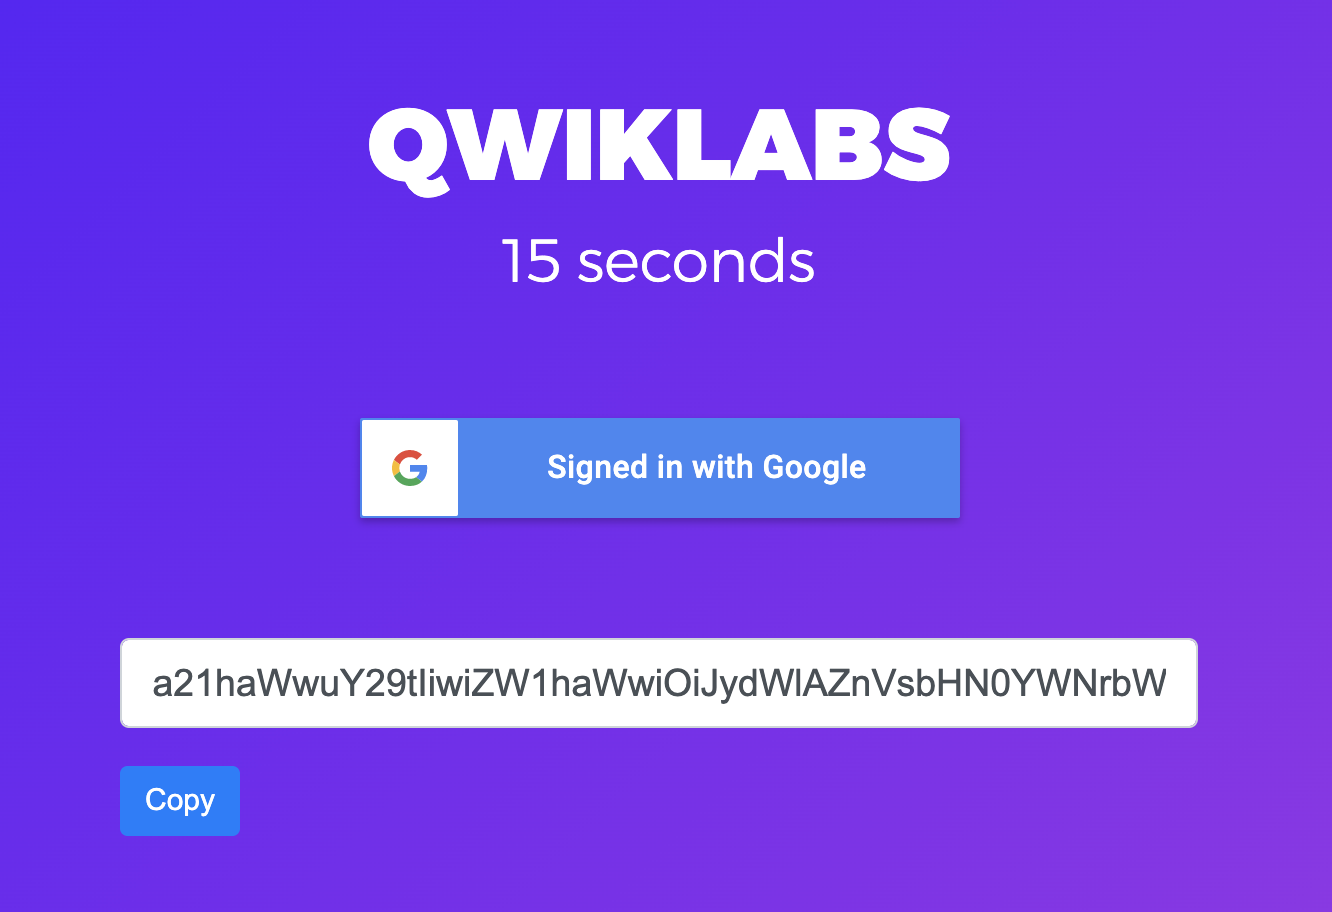
This token will only be available for about 60 seconds, so copy and and move on to the next steps.
Click Check my progress to verify the objective.
Task 11. Run job
- Switch back to the Dataprep window. Set the HTTP parameters as shown below:
- URL:
-
Headers:
- Key: Authorization
- Value: Bearer {{access token from previous section}}
Click on Add another.
- Key: Content-Type
- Value: application/json; charset=utf-8
-
Body:
Note: Make sure to replace {{your_bucket_name}} with the name of your bucket (Project ID).
- Set the Retry parameter to
0and keep the rest of the fields default.
Your HTTP Task definition should look like the following:

-
Click Save to save the HTTP request.
-
Click on the Run button at the top of the screen. This will execute the plan against the inference dataset. You can monitor the execution of this job from the Job history pane, under Plan runs.
-
Upon running the Dataprep job, the HTTP task will execute a Batch Inference job in AutoML. Once the job execution is complete, the batch inference output will be available at the following location on Cloud Storage:
gs://{{your_bucket_name}}/inference/output/bank-marketing-inference/.
Click Check my progress to verify the objective.
Optional - export your flow
In your own Dataprep project, all of the flows are saved and can be reused. Dataprep allows you to export your flows to use with version control systems, or import them into another environment or share them with colleagues. For this lab, the projects are temporary and deleted after you finish. To save your flow to reuse or review, export the flow you created now.
- Return to the Bank Marketing Flow View.
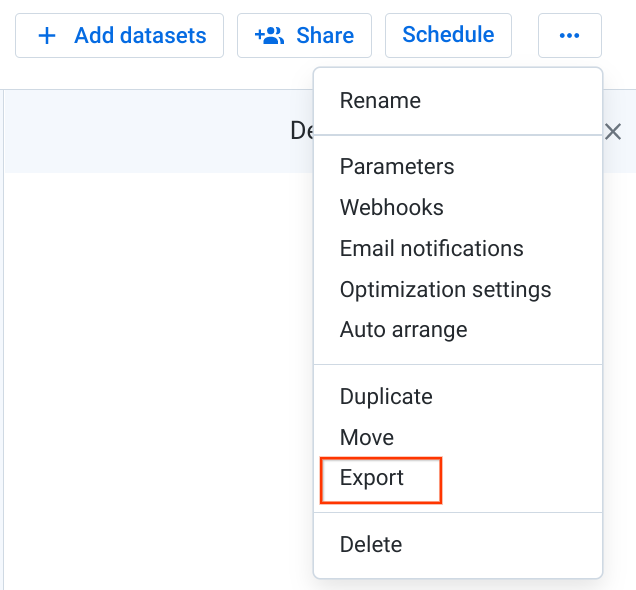
- On the top right, open the More Menu (...) and select Export.
- Save the zip file to your local desktop as
flow_Bank_Marketing.zip.
Congratulations!
In this lab, you got hands-on experience with Cloud Dataprep by declaring a target schema, defining data quality rules, and building recipes to clean and transform data. You then created parameterized datasets for sources and targets, invoked the data pipeline (flow) from plans, and used a webhook call to the AutoML Tables API to execute batch predictions.
Finish your quest
This self-paced lab is part of the Transform and Clean your Data with Dataprep by Alteryx on Google Cloud quest. A quest is a series of related labs that form a learning path. Completing this quest earns you the badge to recognize your achievement. You can make your badge (or badges) public and link to them in your online resume or social media account. Enroll in this quest and get immediate completion credit if you've taken this lab. See other available quests.
Next steps / Learn more
You can continue exploring Dataprep Professional Edition with a free 30-day trial available here. Please make sure to sign out from your temporary lab account and re-sign with your Google Cloud valid email. Advanced features, such as additional connectivity, pipeline orchestration, and adaptive data quality are also available in the Premium edition that you can explore in the Google Cloud Marketplace.
-
Advanced features, such as additional connectivity, pipeline orchestration, and adaptive data quality are available in the Premium edition. Learn more about the Premium edition.
-
Learn how to discover, cleanse, and enhance data with Google Dataprep by reading the how-to guides.
Google Cloud training and certification
...helps you make the most of Google Cloud technologies. Our classes include technical skills and best practices to help you get up to speed quickly and continue your learning journey. We offer fundamental to advanced level training, with on-demand, live, and virtual options to suit your busy schedule. Certifications help you validate and prove your skill and expertise in Google Cloud technologies.
Manual Last Updated January 16, 2024
Lab Last Tested January 16, 2024
Copyright 2024 Google LLC All rights reserved. Google and the Google logo are trademarks of Google LLC. All other company and product names may be trademarks of the respective companies with which they are associated.