检查点
Authenticate API Requests
/ 25
Create an App Engine instance and Storage Bucket
/ 25
Run the Application
/ 25
Deploy the App
/ 25
Deploying a Python Flask Web Application to App Engine Flexible
GSP023

Overview
In this lab you will learn how to deploy a Python Flask web application to the App Engine Flexible environment. The example application allows a user to upload a photo of a person's face and learn how likely it is that the person is happy. The application uses Google Cloud APIs for Vision, Storage, and Datastore.
About App Engine
Google App Engine applications are easy to create, easy to maintain, and easy to scale as your traffic and data storage needs change. With App Engine, there are no servers to maintain. You simply upload your application and it's ready to go.
App Engine applications automatically scale based on incoming traffic. Load balancing, microservices, authorization, SQL and NoSQL databases, traffic splitting, logging, search, versioning, roll out and roll backs, and security scanning are all supported natively and are highly customizable.
App Engine's Flexible Environment supports a host of programming languages, including Java, Python, PHP, NodeJS, Ruby, and Go. App Engine's Standard Environment is an additional option for certain languages including Python. The two environments give users maximum flexibility in how their application behaves since each environment has certain strengths. Read Choosing an App Engine Environment for more information.
What you'll learn
- How to deploy a simple web application to the App Engine Flexible Environment
- How to access the Google Cloud client libraries for Vision, Storage, and Datastore
- How to use Cloud Shell
Prerequisites
- Familiarity with Python
- Familiarity with standard Linux text editors such as vim, emacs, or nano
- Access to an image with a face
Setup and requirements
Before you click the Start Lab button
Read these instructions. Labs are timed and you cannot pause them. The timer, which starts when you click Start Lab, shows how long Google Cloud resources will be made available to you.
This hands-on lab lets you do the lab activities yourself in a real cloud environment, not in a simulation or demo environment. It does so by giving you new, temporary credentials that you use to sign in and access Google Cloud for the duration of the lab.
To complete this lab, you need:
- Access to a standard internet browser (Chrome browser recommended).
- Time to complete the lab---remember, once you start, you cannot pause a lab.
How to start your lab and sign in to the Google Cloud console
-
Click the Start Lab button. If you need to pay for the lab, a pop-up opens for you to select your payment method. On the left is the Lab Details panel with the following:
- The Open Google Cloud console button
- Time remaining
- The temporary credentials that you must use for this lab
- Other information, if needed, to step through this lab
-
Click Open Google Cloud console (or right-click and select Open Link in Incognito Window if you are running the Chrome browser).
The lab spins up resources, and then opens another tab that shows the Sign in page.
Tip: Arrange the tabs in separate windows, side-by-side.
Note: If you see the Choose an account dialog, click Use Another Account. -
If necessary, copy the Username below and paste it into the Sign in dialog.
{{{user_0.username | "Username"}}} You can also find the Username in the Lab Details panel.
-
Click Next.
-
Copy the Password below and paste it into the Welcome dialog.
{{{user_0.password | "Password"}}} You can also find the Password in the Lab Details panel.
-
Click Next.
Important: You must use the credentials the lab provides you. Do not use your Google Cloud account credentials. Note: Using your own Google Cloud account for this lab may incur extra charges. -
Click through the subsequent pages:
- Accept the terms and conditions.
- Do not add recovery options or two-factor authentication (because this is a temporary account).
- Do not sign up for free trials.
After a few moments, the Google Cloud console opens in this tab.

Activate Cloud Shell
Cloud Shell is a virtual machine that is loaded with development tools. It offers a persistent 5GB home directory and runs on the Google Cloud. Cloud Shell provides command-line access to your Google Cloud resources.
- Click Activate Cloud Shell
at the top of the Google Cloud console.
When you are connected, you are already authenticated, and the project is set to your Project_ID,
gcloud is the command-line tool for Google Cloud. It comes pre-installed on Cloud Shell and supports tab-completion.
- (Optional) You can list the active account name with this command:
- Click Authorize.
Output:
- (Optional) You can list the project ID with this command:
Output:
gcloud, in Google Cloud, refer to the gcloud CLI overview guide.
Task 1. Get the sample code
- In Cloud Shell, run the following command to clone the Github repository:
- Change directory into
flex_and_vision:
Task 2. Authenticate API requests
The Datastore, Storage, and Vision APIs are automatically enabled for you in this lab. In order to make requests to the APIs, you will need service account credentials. You can generate credentials from your project using gcloud in Cloud Shell. Your Project ID can be found on the tab where you started the lab.
- Set an environment variable for your Project ID:
- Create a Service Account to access the Google Cloud APIs when testing locally:
- Give your newly created Service Account appropriate permissions:
- After creating your Service Account, create a Service Account key:
This command generates a service account key stored in a JSON file named key.json in your home directory.
- Using the absolute path of the generated key, set an environment variable for your service account key:
Learn more about authenticating the Vision API from Quickstart: Setup the Vision API Guide.
Click Check my progress below to check your lab progress.
Task 3. Testing the application locally
Starting your virtual environment and installing dependencies
- Create an isolated Python 3 environment named
envwith virtualenv:
- Enter your newly created virtualenv named
env:
- Use
pipto install dependencies for your project from therequirements.txtfile:
The requirements.txt file is a list of package dependencies you need for your project. The above command downloaded all of these listed package dependencies to the virtualenv.
Creating an App Engine app
- First, create an environment variable with your assigned region:
- Next, create an App Engine instance by using:
Creating a storage bucket
- First, set the environment variable CLOUD_STORAGE_BUCKET equal to the name of your PROJECT_ID. (It is generally recommended to name your bucket the same as your PROJECT_ID for convenience purposes):
- Now run the following command to create a bucket with the same name as your PROJECT_ID:
Click Check my progress below to check your lab progress.
Running the Application
- Execute the following command to start your application:
- Once the application starts, click on the Web Preview icon
in the Cloud Shell toolbar and choose Preview on port 8080.
A tab in your browser opens and connects to the server you just started. You should see something like this:
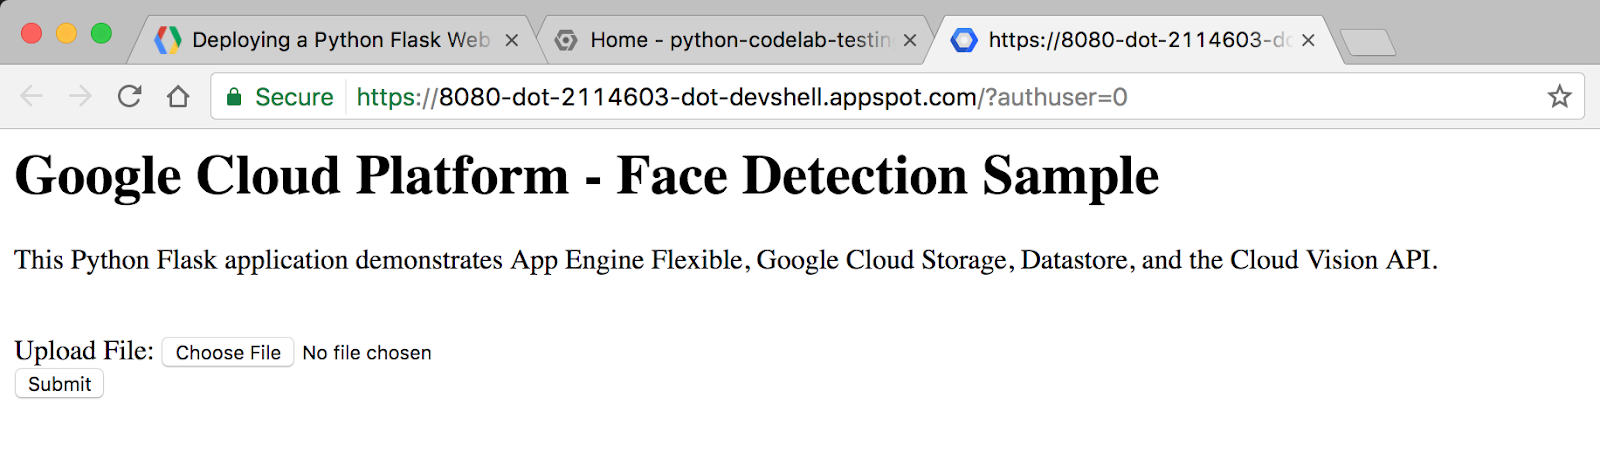
Now things will get interesting!
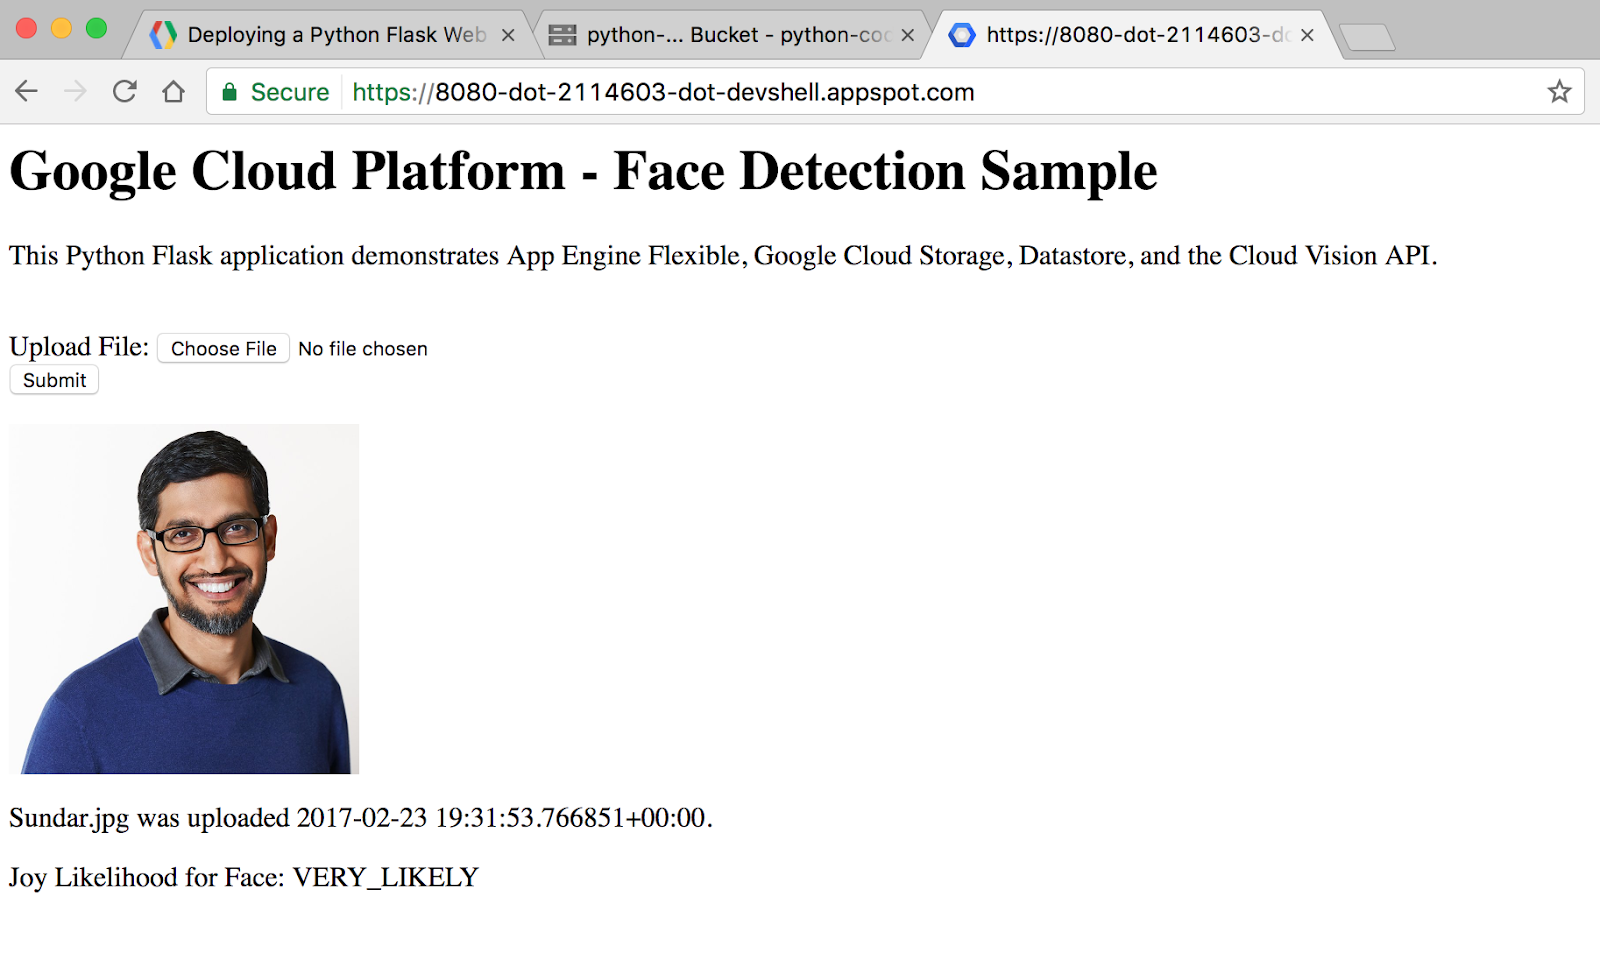
- Click the Choose File button, find an image from your computer that has a human face, and then click Submit.
After uploading a photo, you should see something like this:
Click Check my progress below to check your lab progress.
Task 4. Exploring the code
Sample code layout
The sample has the following layout:
main.py
This Python file is a Flask web application. The application allows users to submit photos (preferably of faces), which are stored in Cloud Storage and analyzed using the face detection feature of the Cloud Vision API. Key information about each photo is stored in Datastore, Google Cloud's NoSQL database, where it is accessed each time a user visits the website.
This application uses the Google Cloud client libraries for Storage, Datastore, and Vision. These client libraries make it easy to access Cloud APIs from your favorite programming languages.
Let's take a look at some key snippets of the code.
The imports section at the top is where we import the various packages we need for our code. This is how we import our Google Cloud client libraries for Datastore, Storage, and Vision:
Code that directs what happens when a user visits the root URL of the website
Here is the code for what happens when a user visits the root URL of the website. A Datastore client object is created, which is used to access the Datastore client library. A query on Datastore is run for entities of kind Faces. Finally, the HTML template is rendered, passing in the image_entities we extract from Datastore as a variable.
Let's take a look at how entities are saved to Datastore. Datastore is Google Cloud's NoSQL database solution. Data is stored in objects called entities. Each entity is assigned a unique identifying key, which can be created using a kind and a key name string. A kind is an organizational bucket for what type of entity it is. For example, we might want to set up kinds for Photos, People, and Animals.
Each entity can have multiple developer-defined properties, which can have values of a number of types, including integers, floats, strings, dates, or binary data:
The Storage and Vision client libraries can be accessed programmatically in a similar manner to Datastore. You can open the main.py file yourself using vim, emacs, or nano to explore all of the sample code.
homepage.html
The Flask web framework leverages Jinja2 as a template engine. This allows us to pass in variables and expressions from main.py into homepage.html that get replaced with values once the page is rendered.
Learn more about Jinja2 at Template Designer Documentation.
This Jinja2 HTML template displays a form for users to submit photos to the database. It also displays each previously submitted image along with its file name, upload date/time, and the likelihood that the face detected by the Vision API is happy.
Task 5. Deploying the App to App Engine Flexible
App Engine Flexible uses a file called app.yaml to describe an application's deployment configuration. If this file is not present, App Engine will try to guess the deployment configuration. However, it is a good idea to provide this file.
- Next, you will modify
app.yamlusing an editor of your choice vim, nano, or emacs. We will use thenanoeditor:
- Once you have
app.yamlopen, replace<your-cloud-storage-bucket>with the name of your Cloud Storage bucket. (If you forgot the name of your Cloud Storage bucket, copy the Project ID from the lab details panel).
The env_variables section sets up environment variables that will be used in main.py once the application is deployed.
- Next, set your app to use manual scaling by adding this at the end of the file:
- Lastly, change the
python_versionfrom 3 to 3.7 to deploy your App Engine successfully.
Your file should look like this:
This is the basic configuration needed to deploy a Python 3 App Engine Flex application. You can learn more about configuring App Engine at Configuring your App with app.yaml Guide.
- Save and close the file in
nano:
- Press CTRL+X.
- At the prompt, type Y and then press ENTER.
- Update your Cloud Build timeout:
- Deploy your app on App Engine by using
gcloud:
If prompted Do you want to continue (Y/n), type Y and then press ENTER.
Watch in Cloud Shell as the application gets built. This will take up to 10 minutes. The App Engine Flexible environment is automatically provisioning a Compute Engine virtual machine for you behind the scenes, and then installing the application, then starting it.
- After the application is deployed, open the app in your web browser with the following URL:
gcloud config list project from Cloud Shell.Click Check my progress below to check your lab progress.
Congratulations!
Congratulations! In this lab, you learned how to write and deploy a Python web application to the App Engine Flexible environment!
Next steps / Learn more
- Python on Google Cloud
- App Engine Flexible Documentation for Python
- Documentation for Python Client Libraries: Datastore, Storage, and Vision
- Learn more about Client Libraries.
- More Python code samples
- Learn more about Flask.
Google Cloud training and certification
...helps you make the most of Google Cloud technologies. Our classes include technical skills and best practices to help you get up to speed quickly and continue your learning journey. We offer fundamental to advanced level training, with on-demand, live, and virtual options to suit your busy schedule. Certifications help you validate and prove your skill and expertise in Google Cloud technologies.
Manual Last Updated October 13, 2023
Lab Last Tested October 13, 2023
Copyright 2024 Google LLC All rights reserved. Google and the Google logo are trademarks of Google LLC. All other company and product names may be trademarks of the respective companies with which they are associated.