Checkpoints
Set up your environment
/ 10
Deploy the Spinnaker chart using Kubernetes Helm
/ 20
Building the Docker image
/ 20
Create service load balancers
/ 20
Deploy an image to production
/ 10
Triggering pipeline from code changes
/ 20
Continuous Delivery Pipelines with Spinnaker and Kubernetes Engine
- GSP114
- Overview
- Pipeline architecture
- Setup and requirements
- Task 1. Set up your environment
- Task 2. Set up Cloud Pub/Sub to trigger Spinnaker pipelines
- Task 3. Deploying Spinnaker using Helm
- Task 4. Building the Docker image
- Task 5. Configuring your deployment pipelines
- Task 6. Triggering your pipeline from code changes
- Task 7. Observe the canary deployments
- Congratulations!
GSP114

Overview
This hands-on lab shows you how to create a continuous delivery pipeline using Google Kubernetes Engine, Google Cloud Source Repositories, Google Cloud Container Builder, and Spinnaker. After you create a sample application, you configure these services to automatically build, test, and deploy it. When you modify the application code, the changes trigger the continuous delivery pipeline to automatically rebuild, retest, and redeploy the new version.
Objectives
- Set up your environment by launching Google Cloud Shell, creating a Kubernetes Engine cluster, and configuring your identity and user management scheme.
- Download a sample application, create a Git repository then upload it to a Google Cloud Source Repository.
- Deploy Spinnaker to Kubernetes Engine using Helm.
- Build your Docker image.
- Create triggers to create Docker images when your application changes.
- Configure a Spinnaker pipeline to reliably and continuously deploy your application to Kubernetes Engine.
- Deploy a code change, triggering the pipeline, and watch it roll out to production.
Pipeline architecture
To continuously deliver application updates to your users, you need an automated process that reliably builds, tests, and updates your software. Code changes should automatically flow through a pipeline that includes artifact creation, unit testing, functional testing, and production rollout. In some cases, you want a code update to apply to only a subset of your users, so that it is exercised realistically before you push it to your entire user base. If one of these canary releases proves unsatisfactory, your automated procedure must be able to quickly roll back the software changes.
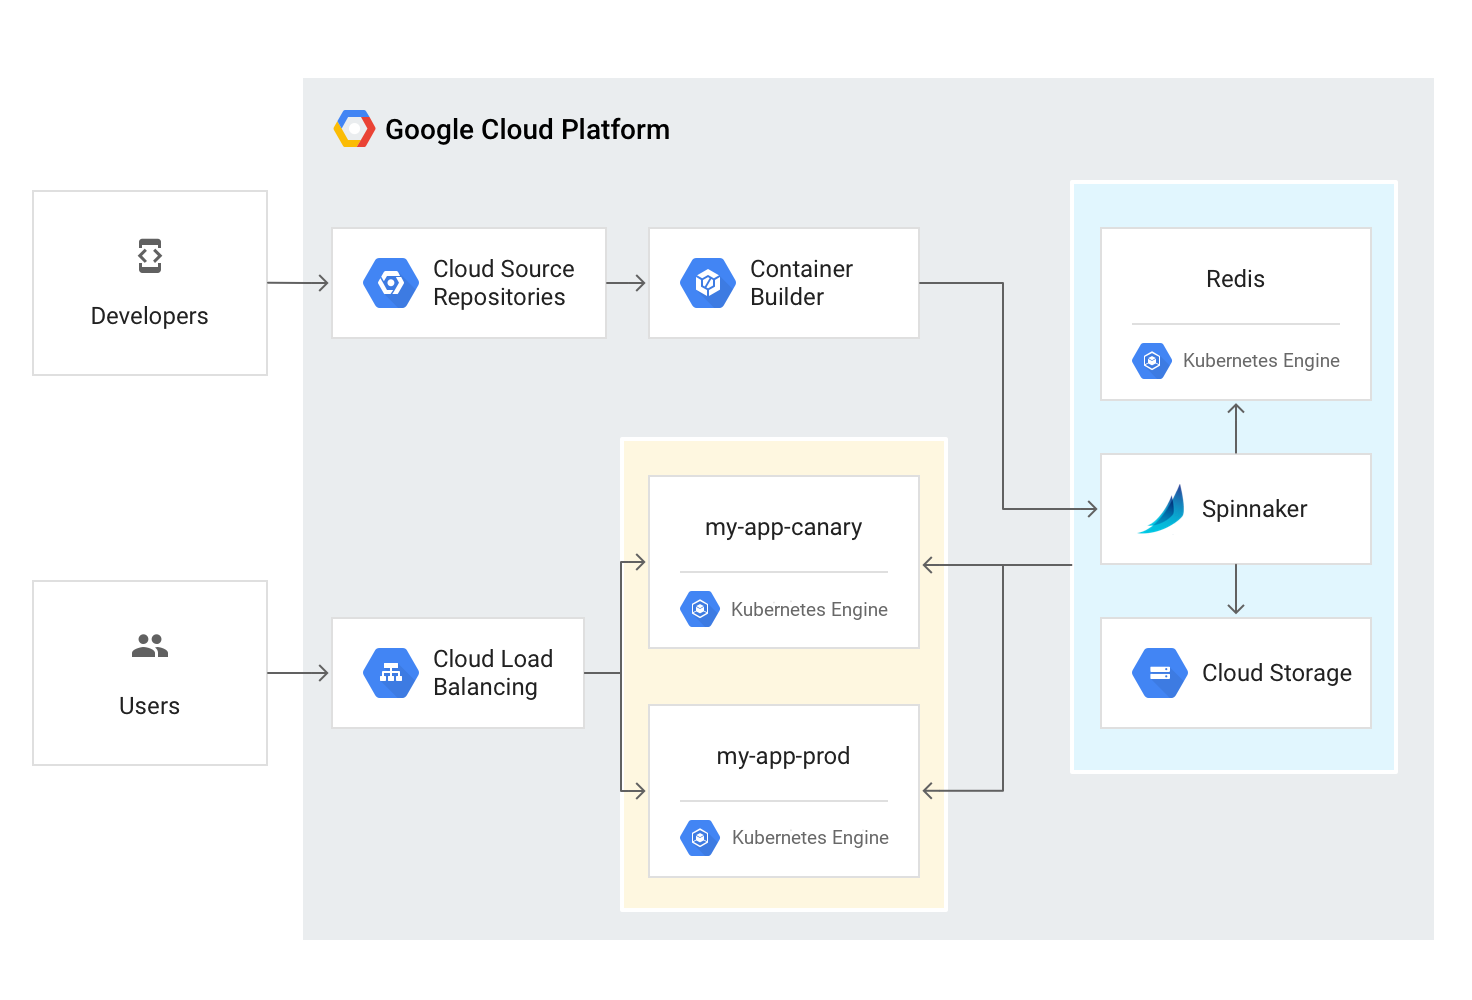
With Kubernetes Engine and Spinnaker you can create a robust continuous delivery flow that helps to ensure your software is shipped as quickly as it is developed and validated. Although rapid iteration is your end goal, you must first ensure that each application revision passes through a gamut of automated validations before becoming a candidate for production rollout. When a given change has been vetted through automation, you can also validate the application manually and conduct further pre-release testing.
After your team decides the application is ready for production, one of your team members can approve it for production deployment.
Application delivery pipeline
In this lab you build the continuous delivery pipeline shown in the following diagram.
Setup and requirements
Before you click the Start Lab button
Read these instructions. Labs are timed and you cannot pause them. The timer, which starts when you click Start Lab, shows how long Google Cloud resources will be made available to you.
This hands-on lab lets you do the lab activities yourself in a real cloud environment, not in a simulation or demo environment. It does so by giving you new, temporary credentials that you use to sign in and access Google Cloud for the duration of the lab.
To complete this lab, you need:
- Access to a standard internet browser (Chrome browser recommended).
- Time to complete the lab---remember, once you start, you cannot pause a lab.
How to start your lab and sign in to the Google Cloud console
-
Click the Start Lab button. If you need to pay for the lab, a pop-up opens for you to select your payment method. On the left is the Lab Details panel with the following:
- The Open Google Cloud console button
- Time remaining
- The temporary credentials that you must use for this lab
- Other information, if needed, to step through this lab
-
Click Open Google Cloud console (or right-click and select Open Link in Incognito Window if you are running the Chrome browser).
The lab spins up resources, and then opens another tab that shows the Sign in page.
Tip: Arrange the tabs in separate windows, side-by-side.
Note: If you see the Choose an account dialog, click Use Another Account. -
If necessary, copy the Username below and paste it into the Sign in dialog.
{{{user_0.username | "Username"}}} You can also find the Username in the Lab Details panel.
-
Click Next.
-
Copy the Password below and paste it into the Welcome dialog.
{{{user_0.password | "Password"}}} You can also find the Password in the Lab Details panel.
-
Click Next.
Important: You must use the credentials the lab provides you. Do not use your Google Cloud account credentials. Note: Using your own Google Cloud account for this lab may incur extra charges. -
Click through the subsequent pages:
- Accept the terms and conditions.
- Do not add recovery options or two-factor authentication (because this is a temporary account).
- Do not sign up for free trials.
After a few moments, the Google Cloud console opens in this tab.

Activate Cloud Shell
Cloud Shell is a virtual machine that is loaded with development tools. It offers a persistent 5GB home directory and runs on the Google Cloud. Cloud Shell provides command-line access to your Google Cloud resources.
- Click Activate Cloud Shell
at the top of the Google Cloud console.
When you are connected, you are already authenticated, and the project is set to your Project_ID,
gcloud is the command-line tool for Google Cloud. It comes pre-installed on Cloud Shell and supports tab-completion.
- (Optional) You can list the active account name with this command:
- Click Authorize.
Output:
- (Optional) You can list the project ID with this command:
Output:
gcloud, in Google Cloud, refer to the gcloud CLI overview guide.
Task 1. Set up your environment
Configure the infrastructure and identities required for this lab. First you'll create a Kubernetes Engine cluster to deploy Spinnaker and the sample application.
- Set the default compute zone:
- Create a Kubernetes Engine cluster using the Spinnaker tutorial sample application:
Cluster creation takes between 5 to 10 minutes to complete. Wait for your cluster to finish provisioning before proceeding.
When completed you see a report detailing the name, location, version, ip-address, machine-type, node version, number of nodes and status of the cluster that indicates the cluster is running.
Configure identity and access management
Create a Cloud Identity Access Management (Cloud IAM) service account to delegate permissions to Spinnaker, allowing it to store data in Cloud Storage. Spinnaker stores its pipeline data in Cloud Storage to ensure reliability and resiliency. If your Spinnaker deployment unexpectedly fails, you can create an identical deployment in minutes with access to the same pipeline data as the original.
Upload your startup script to a Cloud Storage bucket by following these steps:
- Create the service account:
- Store the service account email address and your current project ID in environment variables for use in later commands:
- Bind the
storage.adminrole to your service account:
- Download the service account key. In a later step, you will install Spinnaker and upload this key to Kubernetes Engine:
Output:
Task 2. Set up Cloud Pub/Sub to trigger Spinnaker pipelines
- Create the Cloud Pub/Sub topic for notifications from Container Registry:
- Create a subscription that Spinnaker can read from to receive notifications of images being pushed:
- Give Spinnaker's service account permissions to read from the gcr-triggers subscription:
Test completed task
Click Check my progress to verify your performed task. If you have successfully set up the environment, you will see an assessment score.
Task 3. Deploying Spinnaker using Helm
In this section you use Helm to deploy Spinnaker from the Charts repository. Helm is a package manager you can use to configure and deploy Kubernetes applications.
Helm is already installed in your Cloud Shell.
Configure Helm
- Grant Helm the cluster-admin role in your cluster:
- Grant Spinnaker the
cluster-adminrole so it can deploy resources across all namespaces:
- Add the stable charts deployments to Helm's usable repositories (includes Spinnaker):
Configure Spinnaker
- Still in Cloud Shell, create a bucket for Spinnaker to store its pipeline configuration:
- Run the following command to create a
spinnaker-config.yamlfile, which describes how Helm should install Spinnaker:
Deploy the Spinnaker chart
- Use the Helm command-line interface to deploy the chart with your configuration set:
- After the command completes, run the following command to set up port forwarding to Spinnaker from Cloud Shell:
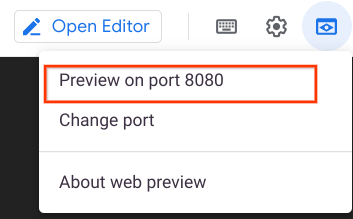
- To open the Spinnaker user interface, click the Web Preview icon at the top of the Cloud Shell window and select Preview on port 8080.
The welcome screen opens, followed by the Spinnaker user interface.
Leave this tab open, this is where you'll access the Spinnaker UI.
Test completed task
Click Check my progress to verify your performed task. If you have successfully deployed the Spinnaker chart using Kubernetes Helm, you will see an assessment score.
Task 4. Building the Docker image
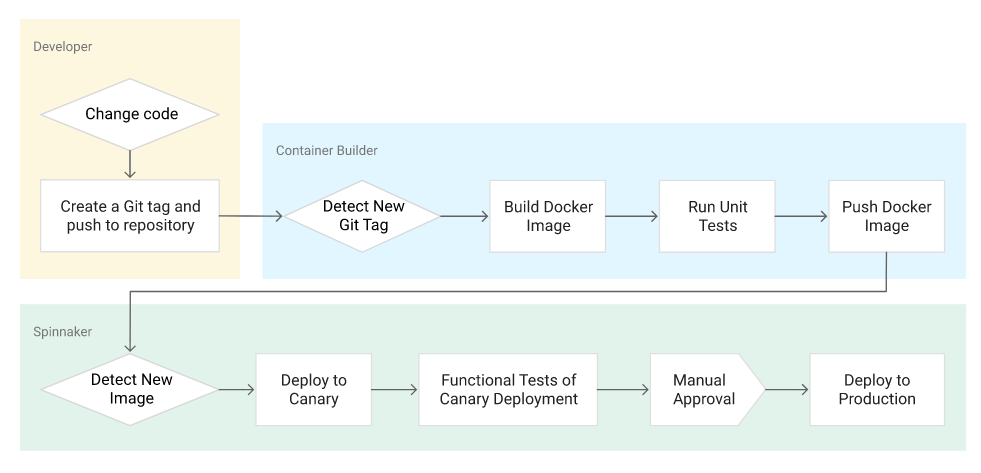
In this section, you configure Cloud Build to detect changes to your app source code, build a Docker image, and then push it to Container Registry.
Create your source code repository
- In Cloud Shell tab, download the sample application source code:
- Unpack the source code:
- Change directories to the source code:
- Set the username and email address for your Git commits in this repository. Replace
[USERNAME]with a username you create:
- Make the initial commit to your source code repository:
- Create a repository to host your code:
- Add your newly created repository as remote:
- Push your code to the new repository's master branch:
-
Check that you can see your source code in the Console by clicking Navigation Menu > Source Repositories.
-
Click sample-app.
Configure your build triggers
Configure Container Builder to build and push your Docker images every time you push Git tags to your source repository. Container Builder automatically checks out your source code, builds the Docker image from the Dockerfile in your repository, and pushes that image to Google Cloud Container Registry.

-
In the Cloud Platform Console, click Navigation menu > Cloud Build > Triggers.
-
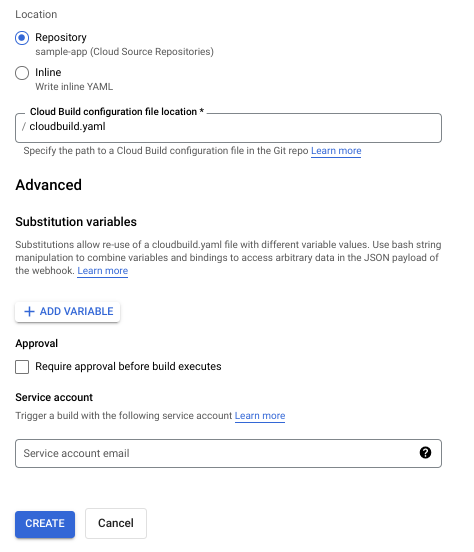
Click Create trigger.
-
Set the following trigger settings:
-
Name:
sample-app-tags - Event: Push new tag
- Select your newly created
sample-apprepository. -
Tag:
.*(any tag) -
Configuration:
Cloud Build configuration file (yaml or json) -
Cloud Build configuration file location:
/cloudbuild.yaml
- Click CREATE.
From now on, whenever you push a Git tag (.*) to your source code repository, Container Builder automatically builds and pushes your application as a Docker image to Container Registry.
Prepare your Kubernetes Manifests for use in Spinnaker
Spinnaker needs access to your Kubernetes manifests in order to deploy them to your clusters. This section creates a Cloud Storage bucket that will be populated with your manifests during the CI process in Cloud Build. After your manifests are in Cloud Storage, Spinnaker can download and apply them during your pipeline's execution.
- Create the bucket:
- Enable versioning on the bucket so that you have a history of your manifests:
- Set the correct project ID in your kubernetes deployment manifests:
- Commit the changes to the repository:
Build your image
Push your first image using the following steps:
- In Cloud Shell, still in the
sample-appdirectory, create a Git tag:
- Push the tag:
Output:
- Go to the Cloud Console. Still in Cloud Build, click History in the left pane to check that the build has been triggered. If not, verify that the trigger was configured properly in the previous section.
Stay on this page and wait for the build to complete before going on to the next section.
Build fails, then click on the Build ID to open the Build details page and then click RETRY.
Test completed task
Click Check my progress to verify your performed task. If you have successfully built the Docker image, you will see an assessment score.
Task 5. Configuring your deployment pipelines
Now that your images are building automatically, you need to deploy them to the Kubernetes cluster.
You deploy to a scaled-down environment for integration testing. After the integration tests pass, you must manually approve the changes to deploy the code to production services.
Install the spin CLI for managing Spinnaker
spin is a command-line utility for managing Spinnaker's applications and pipelines.
- Download the 1.14.0 version of
spin:
- Make
spinexecutable:
Create the deployment pipeline
- Use spin to create an app called sample in Spinnaker. Set the owner email address for the app in Spinnaker:
Next, you create the continuous delivery pipeline. In this tutorial, the pipeline is configured to detect when a Docker image with a tag prefixed with "v" has arrived in your Container Registry.
- From your
sample-appsource code directory, run the following command to upload an example pipeline to your Spinnaker instance:
Manually trigger and view your pipeline execution
The configuration you just created uses notifications of newly tagged images being pushed to trigger a Spinnaker pipeline. In a previous step, you pushed a tag to the Cloud Source Repositories which triggered Cloud Build to build and push your image to Container Registry. To verify the pipeline, manually trigger it.
- Switch to your browser tab displaying your Spinnaker UI.
If you are unable to find it, you can get to this tab again by selecting Web Preview > Preview on Port 8080 in your Cloud Shell window.
- In the Spinnaker UI, click Applications at the top of the screen to see your list of managed applications.
sample is your application. If you don't see sample, try refreshing the Spinnaker Applications tab.
-
Click sample to view your application deployment.
-
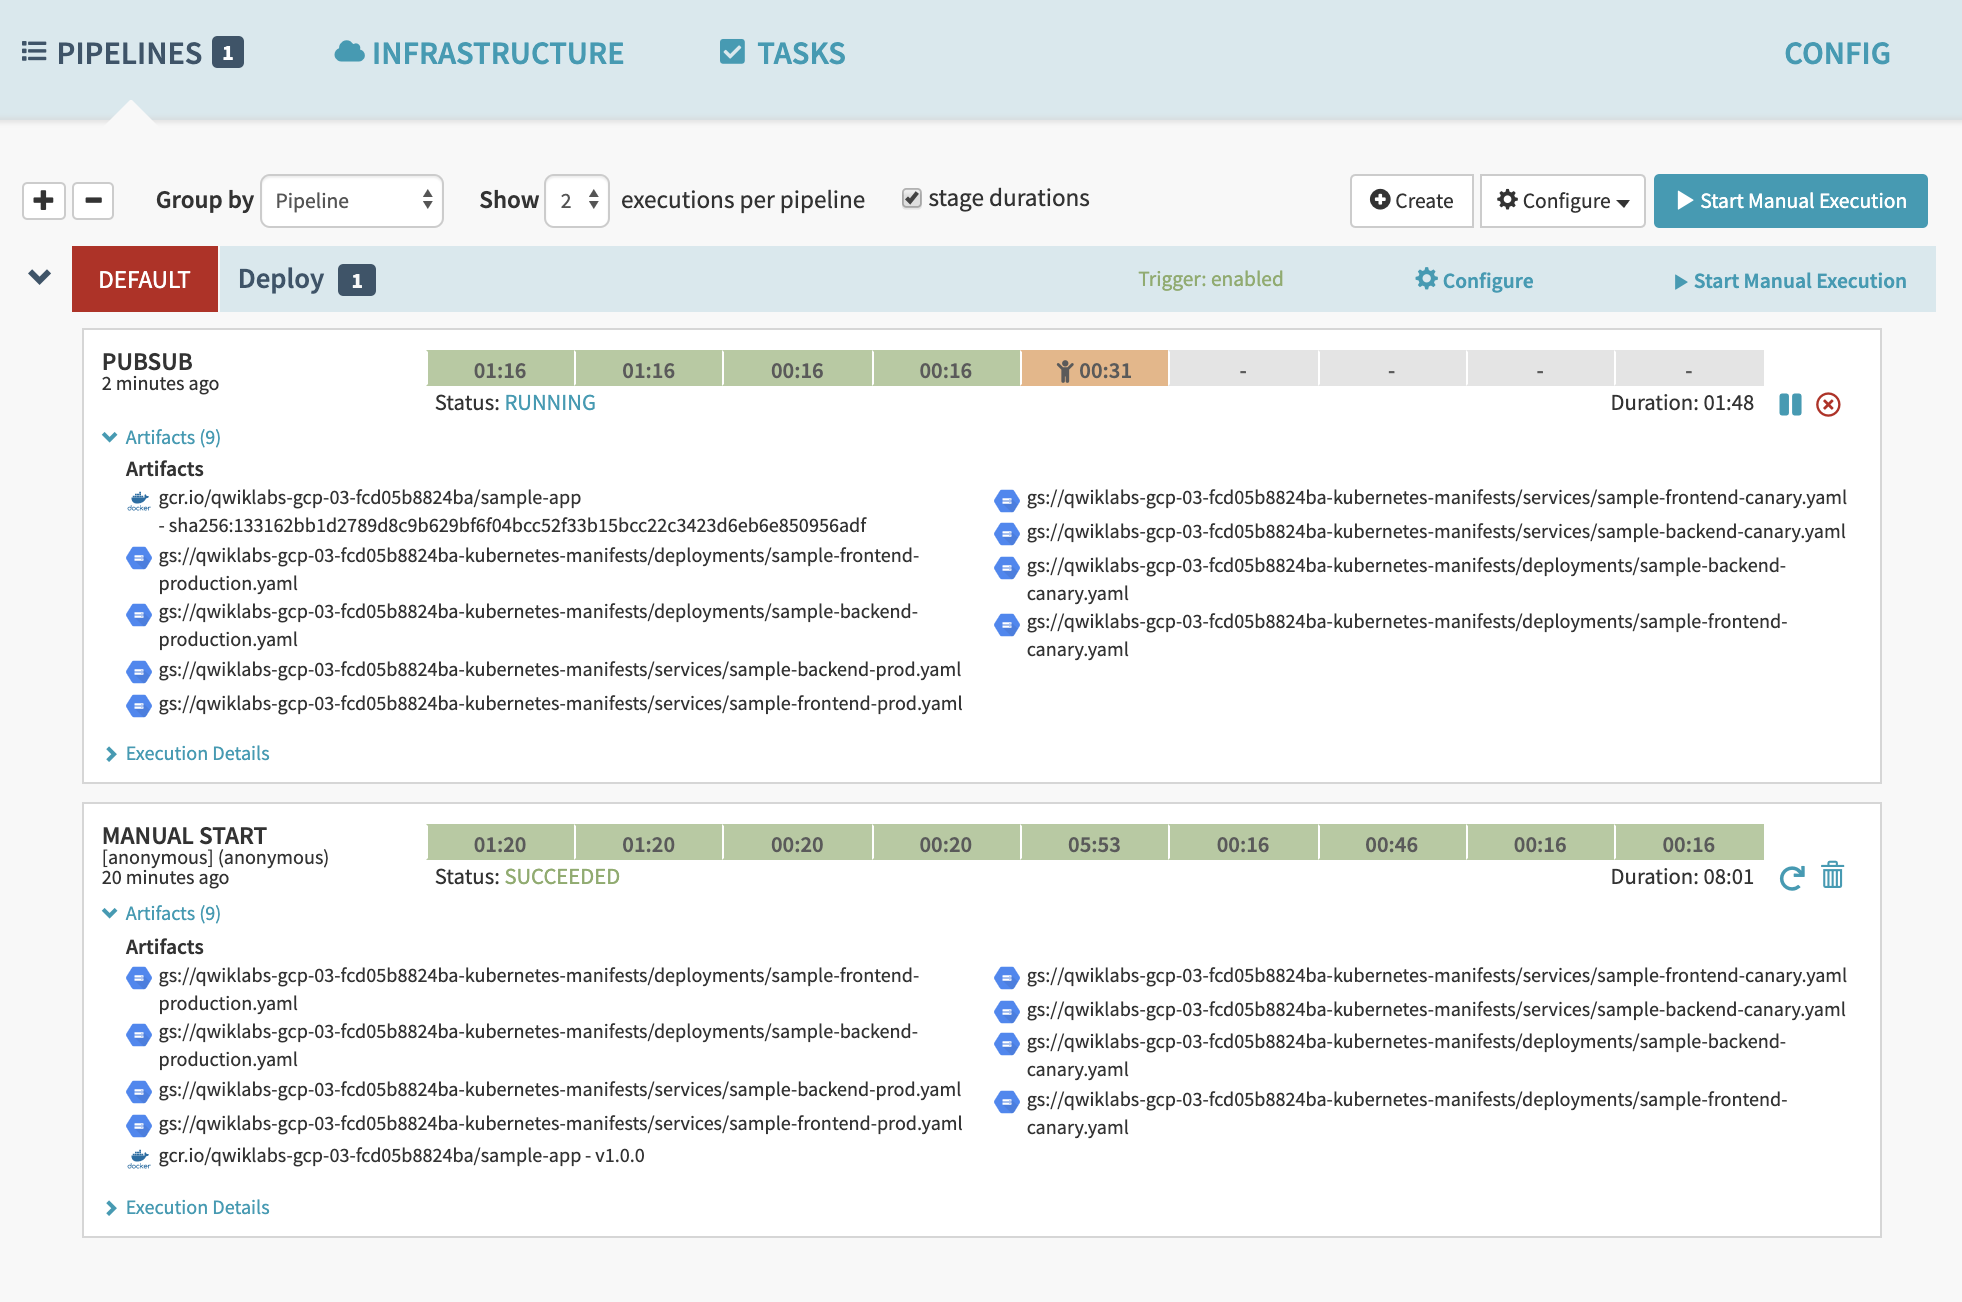
Click Pipelines at the top to view your applications pipeline status.
-
Click Start Manual Execution, select Deploy in Select Pipeline, and then click Run to trigger the pipeline this first time.
-
Click Execution Details to see more information about the pipeline's progress.
The progress bar shows the status of the deployment pipeline and its steps.

Steps in blue are currently running, green ones have completed successfully, and red ones have failed.
- Click a stage to see details about it.
After 3 to 5 minutes the integration test phase completes and the pipeline requires manual approval to continue the deployment.
- Hover over the yellow "person" icon and click Continue.
Your rollout continues to the production frontend and backend deployments. It completes after a few minutes.
-
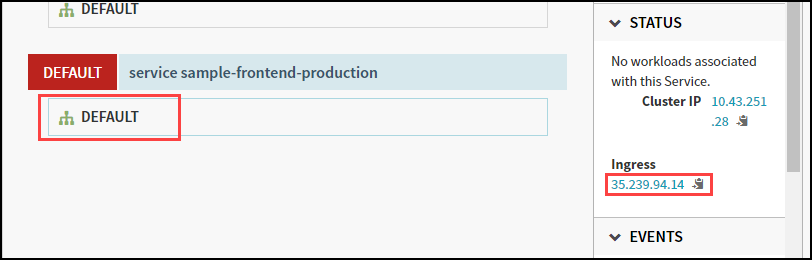
To view the app, at the top of the Spinnaker UI, select Infrastructure > Load Balancers.
-
Scroll down the list of load balancers and click Default, under
service sample-frontend-production. You will see details for your load balancer appear on the right side of the page. If you do not, you may need to refresh your browser. -
Scroll down the details pane on the right and copy your app's IP address by clicking the clipboard button on the Ingress IP. The ingress IP link from the Spinnaker UI may use HTTPS by default, while the application is configured to use HTTP.
- Paste the address into a new browser tab to view the application. You might see the canary version displayed, but if you refresh you will also see the production version.

You have now manually triggered the pipeline to build, test, and deploy your application.
Test Completed Task
Click Check my progress to verify your performed task. If you have successfully created service load balancers, you will see an assessment score.
Test completed task
Click Check my progress to verify your performed task. If you have successfully deployed an image to production, you will see an assessment score.
Task 6. Triggering your pipeline from code changes
Now test the pipeline end to end by making a code change, pushing a Git tag, and watching the pipeline run in response. By pushing a Git tag that starts with "v", you trigger Container Builder to build a new Docker image and push it to Container Registry. Spinnaker detects that the new image tag begins with "v" and triggers a pipeline to deploy the image to canaries, run tests, and roll out the same image to all pods in the deployment.
- From your sample-app directory, change the color of the app from orange to blue:
- Tag your change and push it to the source code repository:
- In the Console, in Cloud Build > History, wait a couple of minutes for the new build to appear. You may need to refresh your page. Wait for the new build to complete, before going to the next step.
Build fails, please click on Build ID and then click RETRY.- Return to the Spinnaker UI and click Pipelines to watch the pipeline start to deploy the image. The automatically triggered pipeline will take a few minutes to appear. You may need to refresh your page.
Test completed task
Click Check my progress to verify your performed task. If you have successfully triggered a pipeline from code changes, you will see an assessment score.
Task 7. Observe the canary deployments
-
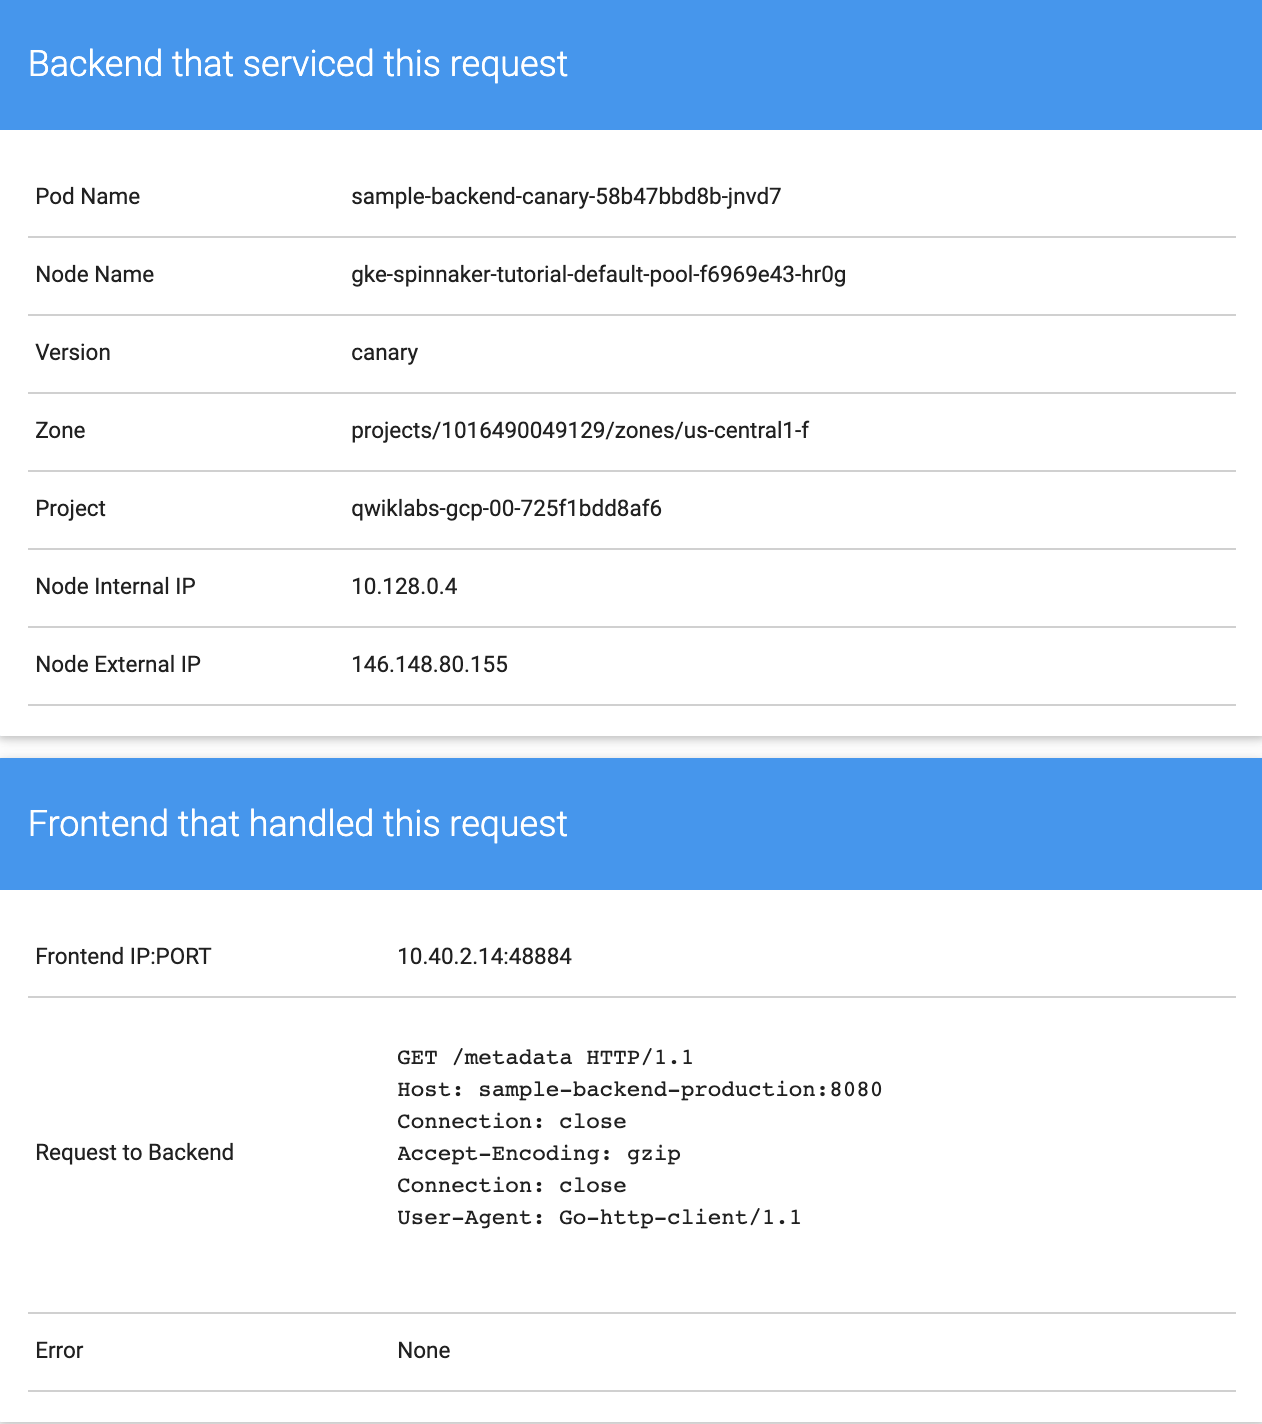
When the deployment is paused, waiting to roll out to production, return to the web page displaying your running application and start refreshing the tab that contains your app. Four of your backends are running the previous version of your app, while only one backend is running the canary. You should see the new, blue version of your app appear about every fifth time you refresh.
-
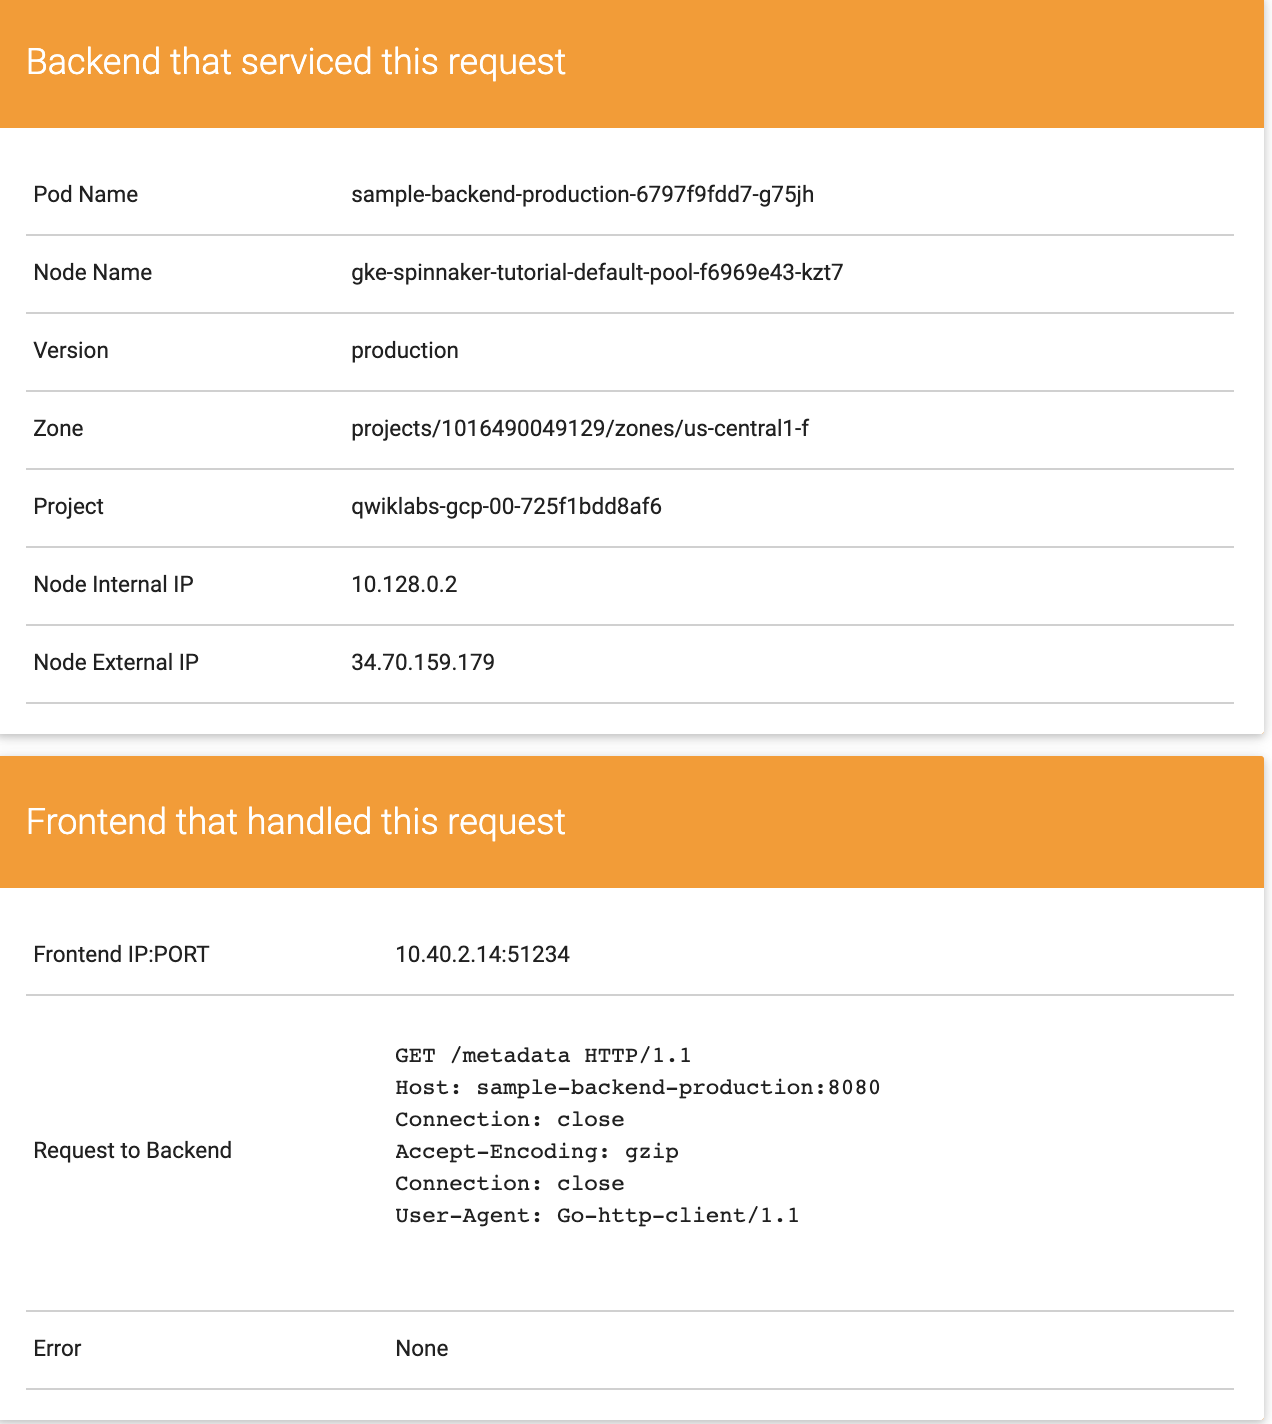
When the pipeline completes, your app looks like the following screenshot. Note that the color has changed to blue because of your code change, and that the Version field now reads
canary.
You have now successfully rolled out your app to your entire production environment!
- Optionally, you can roll back this change by reverting your previous commit. Rolling back adds a new tag (v1.0.2), and pushes the tag back through the same pipeline you used to deploy v1.0.1:
Press CTRL+O, ENTER, CTRL+X.
- When the build and then the pipeline completes, verify the roll back by clicking Infrastructure > Load Balancers, then click the service sample-frontend-production Default and copy the Ingress IP address into a new tab.
Now your app is back to orange and you can see the production version number.
Congratulations!
You have now successfully completed the Continuous Delivery Pipelines with Spinnaker and Kubernetes Engine lab.
Finish your quest
This self-paced lab is part of the Google Cloud Solutions I: Scaling Your Infrastructure and DevOps Essentials quests. A quest is a series of related labs that form a learning path. Completing this quest earns you a badge to recognize your achievement. You can make your badge or badges public and link to them in your online resume or social media account. Enroll in any quest that contains this lab and get immediate completion credit. See the Google Cloud Skills Boost catalog to see all available quests.
Take your next lab
Continue your quest with Running Dedicated Game Servers in Google Kubernetes Engine
Next steps / Learn more
- Learn about Continuous Deployment with Jenkins
- Learn about Deploying Spinnaker to Compute Engine
- Deploy Jenkins to Kubernetes Engine
- Use Spinnaker with Ansible to Do Continuous Delivery
Google Cloud training and certification
...helps you make the most of Google Cloud technologies. Our classes include technical skills and best practices to help you get up to speed quickly and continue your learning journey. We offer fundamental to advanced level training, with on-demand, live, and virtual options to suit your busy schedule. Certifications help you validate and prove your skill and expertise in Google Cloud technologies.
Manual Last Updated: November 21, 2023
Lab Last Tested: November 21, 2023
Copyright 2024 Google LLC All rights reserved. Google and the Google logo are trademarks of Google LLC. All other company and product names may be trademarks of the respective companies with which they are associated.