Checkpoints
Create the VM instances
/ 10
Optimizing Network Spend with Network Tiers
Overview
In this lab, you create one VM in the Premium network service tier (default) and one VM in the Standard network service tier. Then you compare the latency and network paths for each VM instance.
With network service tiers, Google Cloud enables you to optimize your cloud network for performance by choosing the Premium tier, or for cost with the new Standard tier.
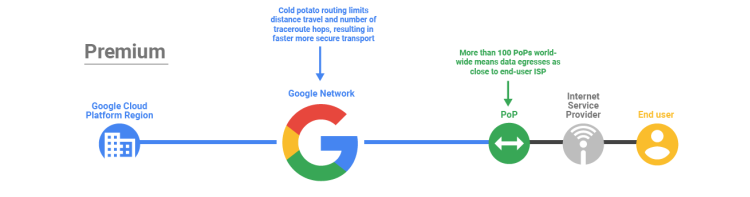
Premium tier
Premium tier delivers traffic over Google’s well-provisioned, low-latency, highly reliable global network. This network consists of an extensive global private fiber network with over 100 points of presence (POPs) across the globe.
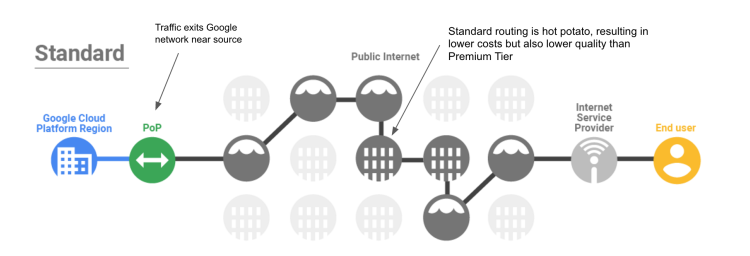
Standard tier
Standard tier is a new, lower-cost offering. The network quality of this tier is comparable to the quality of other public cloud providers and regional network services, such as regional load balancing with one VIP per region, but lower than the quality of Premium tier.
Objectives
In this lab, you will learn how to perform the following tasks:
- Create a VM using the Premium network service tier.
- Create a VM using the Standard network service tier.
- Explore the latency and network paths for VMs on different network service tiers.
Setup and requirements
For each lab, you get a new Google Cloud project and set of resources for a fixed time at no cost.
-
Sign in to Qwiklabs using an incognito window.
-
Note the lab's access time (for example,
1:15:00), and make sure you can finish within that time.
There is no pause feature. You can restart if needed, but you have to start at the beginning. -
When ready, click Start lab.
-
Note your lab credentials (Username and Password). You will use them to sign in to the Google Cloud Console.
-
Click Open Google Console.
-
Click Use another account and copy/paste credentials for this lab into the prompts.
If you use other credentials, you'll receive errors or incur charges. -
Accept the terms and skip the recovery resource page.
Task 1. Create the VM instances
In this task, you create two VM instances and define their network service tier during the instance creation. You can configure the network tier for your VM instances at the project level or at the resource level.
Create the Premium tier VM
Create a VM instance using the Premium service tier, which is the default.
-
In the Cloud Console, on the Navigation menu (
), click Compute Engine > VM instances.
-
Click Create Instance.
-
Specify the following, and leave the remaining settings as their defaults.
Property Value (type value or select option as specified) Name vm-premium Zone Series E2 Machine type e2-medium (2vCPU, 1 core, 4 GB memory) -
Click Advanced options.
-
Click Networking.
-
In Network interfaces, click default default to expand the Network interfaces settings.
-
Verify that Network Service Tier is set to Premium.
- Click Done.
- Click Create.
Create the Standard tier VM
Create a VM instance of the same machine type and in the same zone but use the Standard service tier.
-
Click Create Instance.
-
Specify the following, and leave the remaining settings as their defaults.
Property Value (type value or select option as specified) Name vm-standard Zone Series E2 Machine type e2-medium (2vCPU, 1 core, 4 GB memory) -
Click Advanced options.
-
Click Networking.
-
In Network interfaces, click default default to expand the Network interfaces settings.
-
In Network Service Tier, click Standard.
-
Click Done.
-
Click Create. Wait for both instances to be created. This is indicated by green checkmarks next to the instance names.
- Note the External IP addresses of vm-premium and vm-standard. They will be referred to as [premium-IP] and [standard-IP], respectively.
Click Check my progress to verify the objective.
Task 2. Explore the latency and network paths
In this task, you explore some of the network performance differences between the Premium tier and Standard tier.
Explore the latency for each VM instance
In this step, you explore the latency from a third-party service in Europe to your VM instances in
In this step, you use the website ping.eu to demonstrate the latency a user in Europe might experience when accessing your server in
- Open a new browser tab and navigate to ping.eu/ping.
- Type the [premium-IP] in the IP address or host name field.
- For Enter code, type the captcha code shown onscreen.
- Click Go.
- Wait for the four consecutive pings to complete.
The output should look like this.
Output example (yours will differ):
- Type the [standard-IP] in the IP address or host name field.
- For Enter code, type the captcha code shown onscreen.
- Click Go.
- Wait for the four consecutive pings to complete.
The output should look like this.
Output example (yours will differ):
Explore the network path for each VM instance
Next, explore the network path between a third-party service in Europe and your VM instances in
In this step, you use ping.eu/traceroute to visualize a network path that traffic from a user in Europe might take when accessing your server in
- Open a new tab and navigate to https://ping.eu/traceroute.
- Type the [premium-IP] in the IP address or host name field.
- For Enter code, type the captcha code shown onscreen.
- Click Go.
- Wait for traceroute to complete.
The output should look like this.
Output example (yours will differ):
- Type the [standard-IP] in the IP address or host name field.
- For Enter code, type the captcha code shown onscreen.
- Click Go.
- Wait for traceroute to complete.
The output should look like this.
Output example (yours will differ):
Congratulations!
In this lab, you have created one VM in the Premium network service tier (default) and one VM in the Standard network service tier. Then, you used a third-party service to visualize the differences in latency and network paths for each VM instance. The Premium tier VM had a lower latency and its traffic entered Google Cloud's network sooner than the Standard tier VM's traffic.
With network service tiers, Google Cloud offers the flexibility to configure your resources for performance or cost by introducing the Standard tier of networking. To learn more about the pricing differences between the two network tiers, refer to the pricing documentation.
End your lab
When you have completed your lab, click End Lab. Google Cloud Skills Boost removes the resources you’ve used and cleans the account for you.
You will be given an opportunity to rate the lab experience. Select the applicable number of stars, type a comment, and then click Submit.
The number of stars indicates the following:
- 1 star = Very dissatisfied
- 2 stars = Dissatisfied
- 3 stars = Neutral
- 4 stars = Satisfied
- 5 stars = Very satisfied
You can close the dialog box if you don't want to provide feedback.
For feedback, suggestions, or corrections, please use the Support tab.
Copyright 2022 Google LLC All rights reserved. Google and the Google logo are trademarks of Google LLC. All other company and product names may be trademarks of the respective companies with which they are associated.