检查点
Create a Pub/Sub topic
/ 10
Deploy the Lab Report Service: Build
/ 15
Create a Revision for Cloud Run
/ 15
Deploy the Email Service: Build
/ 15
Create a new Revision
/ 15
Create a service account
/ 10
Create a Pub/Sub subscription
/ 10
Deploy the SMS Service
/ 10
Build a Resilient, Asynchronous System with Cloud Run and Pub/Sub
GSP650

Overview
For the labs in the Serverless Cloud Run Development course, you will read through a fictitious business scenario and assist the characters with their serverless migration plan.
Twelve years ago, Lily started the Pet Theory chain of veterinary clinics. Over the years, the number of clinics has grown, and so has the need for automation. The way Pet Theory handles the results of medical tests when they come back from the lab is too slow and error-prone, and Lily wants to improve this.
Currently, Patrick, Pet Theory's IT administrator, handles test results manually. Whenever a test result comes back, he composes and sends an email to the client whose pet was tested, then he taps out a text message on his phone and sends the results as a text to the client.
Patrick is working with Ruby, a software consultant, to design a more scalable system. They want to build a solution that doesn't require a lot of ongoing maintenance. Patrick and Ruby have decided to go with serverless technology.
Objectives
In this lab, you will learn how to:
- Create a Pub/Sub topic and subscription
- Create a Cloud Run service that receives HTTP requests and publishes messages to Cloud Pub/Sub
- Create a Cloud Run service that receives messages from Cloud Pub/Sub
- Create a Pub/Sub subscription that triggers a Cloud Run service
- Test the resiliency of a system
Prerequisites
This lab assumes familiarity with the Cloud Console and shell environments. This lab is part of a series. Taking the previous labs could be helpful, but is not necessary:
- Importing Data to a Firestore Database
- Build a Serverless Web App with Firebase
- Build a Serverless App with Cloud Run that Creates PDF Files
Setup and requirements
Before you click the Start Lab button
Read these instructions. Labs are timed and you cannot pause them. The timer, which starts when you click Start Lab, shows how long Google Cloud resources will be made available to you.
This hands-on lab lets you do the lab activities yourself in a real cloud environment, not in a simulation or demo environment. It does so by giving you new, temporary credentials that you use to sign in and access Google Cloud for the duration of the lab.
To complete this lab, you need:
- Access to a standard internet browser (Chrome browser recommended).
- Time to complete the lab---remember, once you start, you cannot pause a lab.
How to start your lab and sign in to the Google Cloud console
-
Click the Start Lab button. If you need to pay for the lab, a pop-up opens for you to select your payment method. On the left is the Lab Details panel with the following:
- The Open Google Cloud console button
- Time remaining
- The temporary credentials that you must use for this lab
- Other information, if needed, to step through this lab
-
Click Open Google Cloud console (or right-click and select Open Link in Incognito Window if you are running the Chrome browser).
The lab spins up resources, and then opens another tab that shows the Sign in page.
Tip: Arrange the tabs in separate windows, side-by-side.
Note: If you see the Choose an account dialog, click Use Another Account. -
If necessary, copy the Username below and paste it into the Sign in dialog.
{{{user_0.username | "Username"}}} You can also find the Username in the Lab Details panel.
-
Click Next.
-
Copy the Password below and paste it into the Welcome dialog.
{{{user_0.password | "Password"}}} You can also find the Password in the Lab Details panel.
-
Click Next.
Important: You must use the credentials the lab provides you. Do not use your Google Cloud account credentials. Note: Using your own Google Cloud account for this lab may incur extra charges. -
Click through the subsequent pages:
- Accept the terms and conditions.
- Do not add recovery options or two-factor authentication (because this is a temporary account).
- Do not sign up for free trials.
After a few moments, the Google Cloud console opens in this tab.

Activate Cloud Shell
Cloud Shell is a virtual machine that is loaded with development tools. It offers a persistent 5GB home directory and runs on the Google Cloud. Cloud Shell provides command-line access to your Google Cloud resources.
- Click Activate Cloud Shell
at the top of the Google Cloud console.
When you are connected, you are already authenticated, and the project is set to your Project_ID,
gcloud is the command-line tool for Google Cloud. It comes pre-installed on Cloud Shell and supports tab-completion.
- (Optional) You can list the active account name with this command:
- Click Authorize.
Output:
- (Optional) You can list the project ID with this command:
Output:
gcloud, in Google Cloud, refer to the gcloud CLI overview guide.
Set your region and zone
Certain Compute Engine resources live in regions and zones. A region is a specific geographical location where you can run your resources. Each region has one or more zones.
Run the following gcloud commands in Cloud Console to set the default region and zone for your lab:
Scenario
Pet Theory would like to automate the process of sharing client test results. They have experienced a tough time keeping up with an increased volume of appointments, so Lily decides to ask Ruby for some assistance...
|
Lily, Founder of Pet Theory |
Hi Ruby, Thanks for sorting out the insurance portal. I was wondering if something could be done about the medical test results? We need a more efficient way of sending results to our clients. Lily |
|
Ruby, Software Consultant |
Hey Lily, Sure - let me see what I can do. I have a few ideas that may improve the situation. Ruby |


Task 1. Architecture
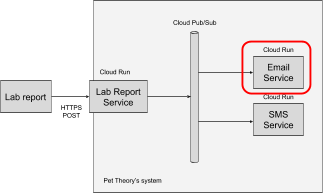
Pet Theory uses an external company for medical tests. Once the lab company completes a medical test, they send the results back to Pet Theory.
The lab company uses a HTTP(s) POST to Pet Theory's web endpoint for medical lab results. The illustration below outlines the general architecture.
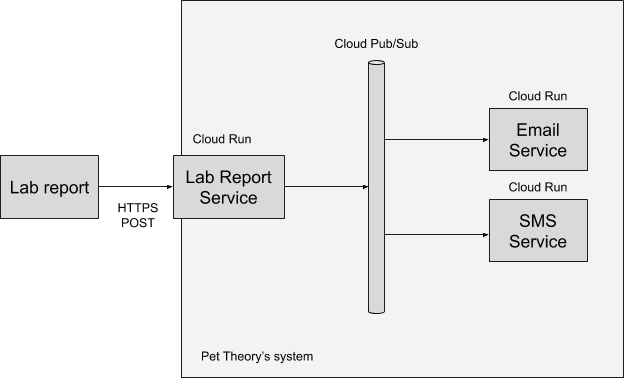
After looking at the general process followed, Ruby believes that a system can be designed in which Pet Theory is able to:
- Receive the HTTP POST request and confirm receipt to the medical lab.
- Email the test result to the client.
- Send a text message (SMS) and an email to the client with the test result.
Ruby's design isolates each of the above activities and requires:
- A service to perform the request and response for the medical result(s)
- A service to email test results to the client
- A service to send a text message (SMS) to the client
- Pub/Sub to be used for inter-service communication
- Serverless infrastructure to be used for the application architecture
Through the use of single use functions, Ruby is looking to develop code that is easier to write and contains fewer bugs.
|
Ruby, Software Consultant |
Hi Patrick, Lily would like me to build a prototype to help with the processing of medical records. To get started, could you set up a Pub/Sub Topic called Ruby |
|
Patrick, IT Administrator |
Hey Ruby, That sounds like a cool project. I can get that finished for you this morning, both activities are really quick to set up on Google Cloud. Patrick |

Create a Pub/Sub topic
Help Patrick to create a Pub/Sub topic called new-lab-report.
When a service publishes a Pub/Sub message, that message must be tagged with a topic. The Lab Report is consumed via the service to be created and publish a message for each report found.
First you need to create a topic that can be used for this task.
- Run the following command to create a Pub/Sub topic:
Any service subscribed to the topic "new-lab-report" will be able to consume the message published by the Lab Report Service. In the above diagram you can see two such consumers, Email Service and SMS Service.
- Then enable Cloud Run, which will run your code in the cloud:
Click Check my progress to verify the objective.
Don't forget to update Ruby to let her know that the Pub/Sub topic is ready for her!
|
Patrick, IT Administrator |
Hey Ruby, All done. If you have time, I would like to see how this prototype is put together. Could we work on this together? Patrick |
|
Ruby, Software Consultant |
Hi Patrick, That's great, thanks for getting to this so quickly. I'll set up a time and we'll start building. Ruby |
Task 2. Build the Lab Report Service
Help Ruby to set up the new Lab Report Service.
This service will serve the purpose of prototyping, so it will only do two things:
- Receive the lab report HTTPS POST containing the report data.
- Publish a message on Pub/Sub.
Add code for the Lab Report Service
- Back in Cloud Shell, clone the repository needed for this lab:
- Move to the
lab-servicedirectory:
- Install the following packages that will be needed to receive incoming HTTPS requests and publish to Pub/Sub:
These commands update the package.json file to indicate the dependencies required for this service.
You will now edit the package.json file so that Cloud Run knows how to start your code.
-
Open the
package.jsonfile. -
In the "scripts" section of the
package.jsonfile, add the code line"start": "node index.js",at line 7 (as shown below), and then save the file:
"start": "node index.js",
Otherwise, you will encounter errors during deployment.
- Create a new file named
index.jsand add this code to it:
const labReport = req.body;
await publishPubSubMessage(labReport);
Specifically, these lines:
- Extract the lab report from the POST request.
- Publish a PubSub message containing the newly posted lab report.
- Now create a file named
Dockerfileand add the code below into it:
This file defines how to package up the Cloud Run service into a container.
Deploy the lab-report-service
- Create a file named
deploy.shand paste these commands into it:
- In Cloud Shell, run the following to make this file executable:
- It's time to deploy the Lab Report Service! Run the deployment script:
Due to timing issues, you may get an error the first time you run this command. If you do, simply rerun deploy.sh.
When the deployment has successfully completed, you will see a message similar to this:
Nice work, the Lab Report Service has been deployed and will consume medical lab results over HTTP. You can now test if the new service is up and running.
Click Check my progress to verify the objective.
Click Check my progress to verify the objective.
Test the Lab Report Service
To validate the Lab Report Service, simulate three HTTPS POSTs made by the lab company, each containing one lab report. For the purpose of testing, the lab reports created will only contain an ID.
- First, put the URL to the report in an environment variable, to make it easier to work with.
- Confirm the LAB_REPORT_SERVICE_URL has been captured:
- Create a new file named
post-reports.shand add the code below into it:
The above script will use the curl command to post three distinct ID's to the Lab Service URL. Each command will be run individually in the background.
- Make the
post-reports.shscript executable:
- Now test the Lab Report Service endpoint by posting three lab reports to it using the script outlined above:
This script posted three lab reports to your Lab Report Service. Check the logs to see the results!
-
In the Cloud console, click Navigation menu (
) > Cloud Run.
-
You should now see your newly deployed lab-report-service in the Services list. Click it.
-
The next page shows details about your lab-report-service. Click the Logs tab.
On the Logs page are the results of the three test reports that you just posted with the script. Hopefully the returned HTTP codes are 204, meaning OK - not content, shown below. If you don’t see any entries, try scrolling up and down using the scrollbar to the right. This reloads the log.
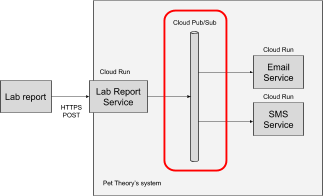
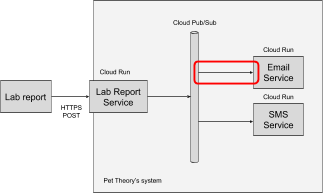
The next task is to write the SMS and Email services. These services will be triggered when the Lab Report Service publishes a Pub/Sub message on the "new-lab-report" topic.
Task 3. The Email Service
Help Ruby to set up the new Email Service.
Add code for the Email Service
- Move to the Email Service directory:
- Install these packages so that the code can handle incoming HTTPS requests:
The above command will update the package.json file, which describes the app and its dependencies. Cloud Run needs to know how to run the code, so add start instruction so that it knows what to do.
-
Open the
package.jsonfile. -
In the "scripts" section, add the
"start": "node index.js",line as shown below and save the file:
"start": "node index.js",
Otherwise, you will encounter errors during deployment.
- Create a new file called
index.jsand add the following to it:
This code will run when Pub/Sub posts a message to the service. This is what it does:
- It decodes the Pub/Sub message and then tries to call the
sendEmail()function. - If that succeeds and no exception is thrown, it will return status code 204 so Pub/Sub knows that the message was processed.
- If there is an exception, the service will return status code 500 so that Pub/Sub knows the message was not processed and it should re-post it to the service later.
Once the communication between services is working, Ruby will add code to the sendEmail() function to actually send the email.
- Now create a file named
Dockerfileand add the code below into it:
This file defines how to package up the Cloud Run service into a container.
Deploy the Email Service
- Create a new file called
deploy.shand add the following to it:
- Make
deploy.shexecutable:
- Deploy the Email Service:
When the deployment is complete, you will see a message similar to this:
The service has been successfully deployed. You now need to ensure the Email Service is triggered when a Pub/Sub message is available.
Click Check my progress to verify the objective.
Click Check my progress to verify the objective.
Configure Pub/Sub to trigger the Email Service
Whenever a new Pub/Sub message is published using the "new-lab-report" topic, it should trigger the Email Service. To achieve this task, configure a service account to automatically handle the associated requests for this service.
- Create a new service account that will be used to trigger the services responding to Pub/Sub messages:
Click Check my progress to verify the objective.
- Give the new service account permission to invoke the Email Service:
Next, tell Pub/Sub to invoke the SMS Service when a "new-lab-report" message is published.
- Put the project number in an environment variable for easy access:
Next, enable the project to create Pub/Sub authentication tokens.
- Run the code below:
- Put the URL of the Email Service in another environment variable:
- Confirm the EMAIL_SERVICE_URL has been captured:
- Create a Pub/Sub subscription for the Email Service.
Nice work! The service is now set up to respond to Cloud Pub/Sub messages. As a next step, validate the code to confirm it meets requirements.
Click Check my progress to verify the objective.
Test the Lab Report Service and the Email Service together
- Using the script created earlier, post to the lab reports again:
-
Then open the log (Navigation menu > Cloud Run). You will see the two Cloud Run services, email-service and lab-report-service, in your account.
-
Click email-service and then click Logs.
You will see the result of this service being triggered by Pub/Sub. If you don’t see the messages you expect, you may need to scroll up and down with the scrollbar to get the log to refresh.
Great job! The Email service is now able to write information to the log whenever a message is processed from the Cloud Pub/Sub topic queue! The last task is to write the SMS Service.
Task 4. The SMS Service
Help Ruby to set up the new SMS Service.
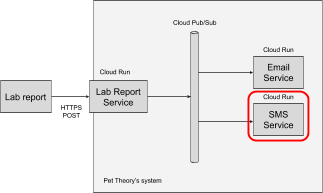
Add code for the SMS Service
- Create a directory for the SMS Service:
- Install the packages required to receive incoming HTTPS requests:
-
Open the
package.jsonfile. -
In the "scripts" section, add the
"start": "node index.js",line as shown below and save the file:
"start": "node index.js",
Otherwise, you will encounter errors during deployment.
- Create a new file called
index.jsand add the following to it:
- Now create a file named
Dockerfileand add the code below into it:
This file defines how to package up the Cloud Run service into a container. Now the code has been created, the next step is to deploy the service.
Deploy the SMS Service
- Create a file named
deploy.shand add this code into it:
- Make
deploy.shexecutable:
- Deploy the SMS Service:
When the deployment is complete, a message similar to this is displayed:
The SMS Service is successfully deployed, but it isn't linked to the Cloud Pub/Sub service. Correct that in the next section.
Click Check my progress to verify the objective.
Configure Cloud Pub/Sub to trigger the SMS Service
As with the Email Service, the link between Cloud Pub/Sub and the SMS service needs to be configured so that messages can be consumed.
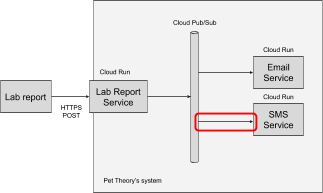
- Set the permissions to allow Pub/Sub to trigger the SMS Service:
Next, tell Pub/Sub to invoke the SMS Service when a “new-lab-report” message is published.
- The first step is to put the URL address of the SMS Service in an environment variable:
-
Confirm the SMS_SERVICE_URL has been captured:
echo $SMS_SERVICE_URL -
Then create the Pub/Sub subscription:
- Run the test script again to post three lab reports to the Lab Report Service:
-
Then open the log (Navigation menu > Cloud Run). You will see the three Cloud Run services, email-service, lab-report-service, and sms-service, in your account.
-
Click sms-service, then click Logs. You will see the result of this service being triggered by Pub/Sub.
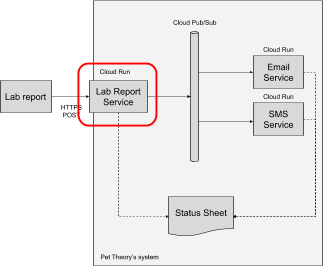
The prototype system has been created and successfully tested. However, Patrick is concerned that resilience, as part of the initial validation process, hasn't been tested.
Task 5. Test the resiliency of the system
What happens if one of the services goes down? Patrick has run into this before, as it is a common situation.
Help Ruby investigate how to ensure the system can handle this scenario. She wants to test what happens when a service fails by deploying a bad version of the Email Service.
- Go back to the
email-servicedirectory:
Add some invalid text to the Email Service application to cause an error.
- Edit
index.jsand add thethrowline to thesendEmail()function, as shown below. This will throw an exception, as if the email server was down:
The addition of this code will crash the service when it is invoked.
- Deploy this bad version of the Email Service:
- When the Email Service deployment has successfully completed, post data to the lab reports again, then go and watch the email-service log status closely:
-
Open the Email Service logs to view the logs for the bad Email Service: Navigation menu > Cloud Run.
-
When you see the three Cloud Run services in your account, click email-service.
The Email Service is being invoked, but it will keep crashing. If you scroll back a bit in the logs you will find the root cause: “Email server is down”. You can also see that the service returns status code 500, and that Pub/Sub keeps retrying calling the service.
If you look at the logs from the SMS service, you will see that it operates successfully.
Now fix the error in the Email Service to restore the application!
- Open the
index.jsfile and remove the throw line you previously entered, then save the file.
Your index.js sendEmail function show now look similar to this:
- Deploy the fixed version of the Email Service:
- When the deployment has finished, click the refresh icon in the top right corner.
You will see how the emails for report 12, 34 and 56 were finally sent, the Email Service returned the status code 204, and Pub/Sub stopped invoking the service. No data was lost; Pub/Sub kept retrying until it was finally successful. This is the foundation of a robust system!
Takeaways
- If services communicate asynchronously with each other via Pub/Sub instead of calling each other directly, the system can be more resilient.
- The Lab Report Service trigger is independent of other services, thanks to the use of Pub/Sub. For example, if customers should also want to receive lab results via another messaging service, it can be added without needing to update the Lab Report Service.
- Cloud Pub/Sub handled the retries, the services didn't have to. Services are only required to return a status code: success or failure.
- If a service goes down, the system is capable of automatically "healing" itself when the service comes back online, thanks to Pub/Sub retries.
Congratulations!
Ruby, with your help, has successfully built a resilient prototype system. The service is capable of automatically sending every client an email and SMS message. In the event of individual services being temporarily down, the system will implement a retry mechanism so that no data is lost. Ruby receives some well deserved accolades...
|
Lily, Founder of Pet Theory |
Hey Ruby, I can't express our gratitude for all your hard work and leadership. Over a very short period of time our essential systems have been totally revamped. We are having a small gathering on Friday to celebrate and it would be great if you would be our guest of honor! Lily |
|
|
Ruby, I have received high praise for your work from Pet Theory. You are a tremendous credit to the team. Now that you're finished with this assignment, I would like to talk to you about a more senior role on a new project. Melody Managing Director Computer Consulting Inc. |
 Melody, Managing Director
Next steps / Learn more
- Medium article: Cloud Run as an internal async worker
Google Cloud training and certification
...helps you make the most of Google Cloud technologies. Our classes include technical skills and best practices to help you get up to speed quickly and continue your learning journey. We offer fundamental to advanced level training, with on-demand, live, and virtual options to suit your busy schedule. Certifications help you validate and prove your skill and expertise in Google Cloud technologies.
Manual Last Updated Feb 1, 2024
Lab Last Tested September 20, 2023
Copyright 2024 Google LLC All rights reserved. Google and the Google logo are trademarks of Google LLC. All other company and product names may be trademarks of the respective companies with which they are associated.