체크포인트
Install Anthos Service Mesh
/ 50
Deploying a BookInfo application
/ 50
Installing Anthos Service Mesh on Google Kubernetes Engine
- GSP654
- Overview
- Setup and requirements
- Task 1. Set up your project
- Task 2. Set up your GKE cluster
- Task 3. Prepare to install Anthos Service Mesh
- Task 4. Validate Anthos Service Mesh
- Task 5. Install Anthos Service Mesh
- Task 6. Deploy Bookinfo, an Istio-enabled multi-service application
- Task 7. Use the Bookinfo application
- Task 8. Evaluate service performance using the Anthos Service Mesh dashboard
- Congratulations!
GSP654

Overview
Istio is an open source framework for connecting, securing, and managing microservices. It can be used with any services, including but not limited to services that are hosted in a Kubernetes cluster. Istio lets you create a network of deployed services with load balancing, service-to-service authentication, monitoring, and more, without requiring any changes in service code.
As one example - in reliable distributed systems, it's common for a system to want to retry a request after a failure, possibly with an exponential backoff delay. There are libraries for Java, Golang and NodeJS that do this. However, employing them within the app means each different app will need to solve that problem independently. The Istio sidecar could do this for the app, automatically.
Anthos Service Mesh
Anthos Service Mesh (ASM) is powered by Istio. With Anthos Service Mesh, you get an Anthos tested, fully supported, distribution of Istio, letting you create and deploy a service mesh with Anthos GKE, whether your cluster is operating in Google Cloud or on-premises.
You can use included configuration profiles with recommended settings customized for either Google Kubernetes Engine or Anthos GKE on-prem.
Finally, Anthos Service Mesh has a suite of additional features and tools that help you observe and manage secure, reliable services in a unified way:
- Service metrics and logs for HTTP(S) traffic within your mesh's GKE cluster are automatically ingested to Google Cloud.
- Preconfigured service dashboards give you the information you need to understand your services.
- In-depth telemetry lets you dig deep into your metrics and logs, filtering and slicing your data on a wide variety of attributes.
- Service-to-service relationships at a glance help you understand who connects to which service and the services that each service depends on.
- Service Level Objectives (SLOs) provide insights into the health of your services. You can easily define an SLO and alert on your own standards of service health.
Anthos Service Mesh is the easiest and richest way to implement an Istio-based service mesh on your Anthos clusters.
In this lab, you will install Anthos Service Mesh on a GKE cluster.
What you'll learn
In this lab, you will learn how to perform the following tasks:
- Provision a cluster on Google Kubernetes Engine (GKE)
- Install and configure Anthos Service Mesh
- Deploy Bookinfo, an Istio-enabled multi-service application
- Enable external access using an Istio Ingress Gateway
- Use the Bookinfo application
- Monitor service performance with the Anthos Service Mesh Dashboard
Setup and requirements
Before you click the Start Lab button
Read these instructions. Labs are timed and you cannot pause them. The timer, which starts when you click Start Lab, shows how long Google Cloud resources will be made available to you.
This hands-on lab lets you do the lab activities yourself in a real cloud environment, not in a simulation or demo environment. It does so by giving you new, temporary credentials that you use to sign in and access Google Cloud for the duration of the lab.
To complete this lab, you need:
- Access to a standard internet browser (Chrome browser recommended).
- Time to complete the lab---remember, once you start, you cannot pause a lab.
How to start your lab and sign in to the Google Cloud console
-
Click the Start Lab button. If you need to pay for the lab, a pop-up opens for you to select your payment method. On the left is the Lab Details panel with the following:
- The Open Google Cloud console button
- Time remaining
- The temporary credentials that you must use for this lab
- Other information, if needed, to step through this lab
-
Click Open Google Cloud console (or right-click and select Open Link in Incognito Window if you are running the Chrome browser).
The lab spins up resources, and then opens another tab that shows the Sign in page.
Tip: Arrange the tabs in separate windows, side-by-side.
Note: If you see the Choose an account dialog, click Use Another Account. -
If necessary, copy the Username below and paste it into the Sign in dialog.
{{{user_0.username | "Username"}}} You can also find the Username in the Lab Details panel.
-
Click Next.
-
Copy the Password below and paste it into the Welcome dialog.
{{{user_0.password | "Password"}}} You can also find the Password in the Lab Details panel.
-
Click Next.
Important: You must use the credentials the lab provides you. Do not use your Google Cloud account credentials. Note: Using your own Google Cloud account for this lab may incur extra charges. -
Click through the subsequent pages:
- Accept the terms and conditions.
- Do not add recovery options or two-factor authentication (because this is a temporary account).
- Do not sign up for free trials.
After a few moments, the Google Cloud console opens in this tab.

Activate Cloud Shell
Cloud Shell is a virtual machine that is loaded with development tools. It offers a persistent 5GB home directory and runs on the Google Cloud. Cloud Shell provides command-line access to your Google Cloud resources.
- Click Activate Cloud Shell
at the top of the Google Cloud console.
When you are connected, you are already authenticated, and the project is set to your Project_ID,
gcloud is the command-line tool for Google Cloud. It comes pre-installed on Cloud Shell and supports tab-completion.
- (Optional) You can list the active account name with this command:
- Click Authorize.
Output:
- (Optional) You can list the project ID with this command:
Output:
gcloud, in Google Cloud, refer to the gcloud CLI overview guide.
Task 1. Set up your project
Verify the SDK configuration
-
In Cloud Shell, verify your default account is configured.
Verify that the Cloud SDK is configured to use your Qwiklabs-generated user account.
gcloud config list Output:
[component_manager] disable_update_check = True [compute] gce_metadata_read_timeout_sec = 5 [core] account = student-xx-xxxx@qwiklabs.net disable_usage_reporting = False project = qwiklabs-gcp-yy-#### [metrics] environment = devshell Your active configuration is: [cloudshell-#####] -
Update project configuration if needed.
If the SDK does not have the default project set correctly, update the configuration. Replace
[project_id]with the name of the project provided in the credential section of the Qwiklabs instructions page:gcloud config set project [project_id]
Configure environment variables
- Configure environment variables that will be used in the setup and installation commands:
- WORKLOAD_POOL will be used to enable Workload Identity, which is the recommended way to safely access Google Cloud services from GKE applications.
- MESH_ID will be used to set the mesh_id label on the cluster, which is required for metrics to get displayed on the Anthos Service Mesh Dashboard in the Cloud Console.
Verify sufficient permissions
- In Cloud Shell, verify that your user account has the Owner role assigned:
Output:
- Project Editor
- Kubernetes Engine Admin
- Project IAM Admin
- GKE Hub Admin
- Service Account Admin
- Service Account key Admin
Task 2. Set up your GKE cluster
Create the cluster
- Now run the following command in Cloud Shell to create the Kubernetes cluster
central:
Output:
It will take several minutes for cluster creation to complete.
- After your cluster finishes creating, run this command to ensure you have the
cluster-adminrole on your cluster:
- Configure kubectl to point to the cluster.
Task 3. Prepare to install Anthos Service Mesh
Google provides a tool, asmcli, which allows you to install or upgrade Anthos Service Mesh. If you let it, asmcli will configure your project and cluster as follows:
- Grant you the required Identity and Access Management (IAM) permissions on your Google Cloud project.
- Enable the required Google APIs on your Cloud project.
- Set a label on the cluster that identifies the mesh.
- Create a service account that lets data plane components, such as the sidecar proxy, securely access your project's data and resources.
- Register the cluster to the fleet if it isn't already registered.
You will use asmcli to install Anthos Service Mesh on your cluster.
- Download the version that installs Anthos Service Mesh 1.20.3 to the current working directory:
- Make the script executable:
- Enable the Service Mesh API:
Task 4. Validate Anthos Service Mesh
You can run asmcli validate to make sure that your project and cluster are set up as required to install Anthos Service Mesh. With this option, asmcli doesn't make any changes to your project or cluster, and it doesn't install Anthos Service Mesh.
asmcli validates that:
- Your environment has the required tools.
- The cluster meets the minimum requirements.
- You have the required permissions on the specified project.
- The project has all the required Google APIs enabled.
- Run the following command to validate your configuration and download the installation file and
asmpackage to the OUTPUT_DIR directory:
On success, you should have output similar to the following:
Task 5. Install Anthos Service Mesh
The following command will install Anthos Service Mesh. The --enable_all flag allows the script to enable the required Google APIs, set Identity and Access Management permissions, and make the required updates to your cluster, which includes enabling GKE Workload Identity.
- Run the following command to install Anthos Service Mesh:
You should see output similar to the following:
Click Check my progress to verify the objective.
Install an ingress gateway
Anthos Service Mesh gives you the option to deploy and manage gateways as part of your service mesh. A gateway describes a load balancer operating at the edge of the mesh receiving incoming or outgoing HTTP/TCP connections. Gateways are Envoy proxies that provide you with fine-grained control over traffic entering and leaving the mesh.
- Create a namespace for the ingress gateway if you don't already have one. Gateways are user workloads, and as a best practice, they shouldn't be deployed in the control plane namespace.
-
Enable auto-injection on the gateway by applying a revision label on the gateway namespace. The revision label is used by the sidecar injector webhook to associate injected proxies with a particular control plane revision.
- Use the following command to locate the revision label on
istiod:
kubectl get deploy -n istio-system -l app=istiod -o \ jsonpath={.items[*].metadata.labels.'istio\.io\/rev'}'{"\n"}' - Store that value in an environment variable:
REVISION=$(kubectl get deploy -n istio-system -l app=istiod -o \ jsonpath={.items[*].metadata.labels.'istio\.io\/rev'}'{"\n"}') - Apply the revision label to the namespace. In the following command, REVISION is the value of the istiod revision label that you noted in the previous step:
kubectl label namespace $GATEWAY_NS \ istio.io/rev=$REVISION --overwrite - Enable Istio's proxy injection
kubectl label namespace default istio-injection=enabled kubectl label namespace $GATEWAY_NS istio-injection=enabled - Use the following command to locate the revision label on
-
Change to the directory that you specified in
--output_dir:
- You can deploy the example ingress gateway configuration located in the
samples/gateways/istio-ingressgateway/directory as is, or modify it as needed:
Enable sidecar injection
Anthos Service Mesh uses sidecar proxies to enhance network security, reliability, and observability. With Anthos Service Mesh, these functions are abstracted away from an application's primary container and implemented in a common out-of-process proxy delivered as a separate container in the same Pod.
-
Before you deploy workloads, make sure to configure sidecar proxy injection so that Anthos Service Mesh can monitor and secure traffic.
-
To enable auto-injection, apply the revision label and remove the istio-injection label if it exists.
-
In the following command, you specify the namespace, default, where you want to enable auto-injection, and REVISION is the revision label you noted in the previous step:
"istio-injection" not found in the output. That means that the namespace didn't previously have the istio-injection label, which you should expect in new installations of Anthos Service Mesh or new deployments. If this cluster had already been running workloads, you would need to restart the pods to re-trigger auto injection.
Task 6. Deploy Bookinfo, an Istio-enabled multi-service application
In this task, you will set up the Bookinfo sample microservices application and explore the app.
Bookinfo overview
Now that ASM is configured and verified, you can deploy one of the sample applications provided with the installation — BookInfo. This is a simple mock bookstore application made up of four microservices - all managed using Istio. Each microservice is written in a different language, to demonstrate how you can use Istio in a multi-language environment, without any changes to code.
The microservices are:
- productpage: calls the details and reviews microservices to populate the page.
- details: contains book information.
- reviews: contains book reviews. It also calls the ratings microservice.
- ratings: contains book ranking information that accompanies a book review.
There are 3 versions of the reviews microservice:
- Reviews v1 doesn't call the ratings service.
- Reviews v2 calls the ratings service and displays each rating as 1 - 5 black stars.
- Reviews v3 calls the ratings service and displays each rating as 1 - 5 red stars.
The end-to-end architecture of the application looks like this:
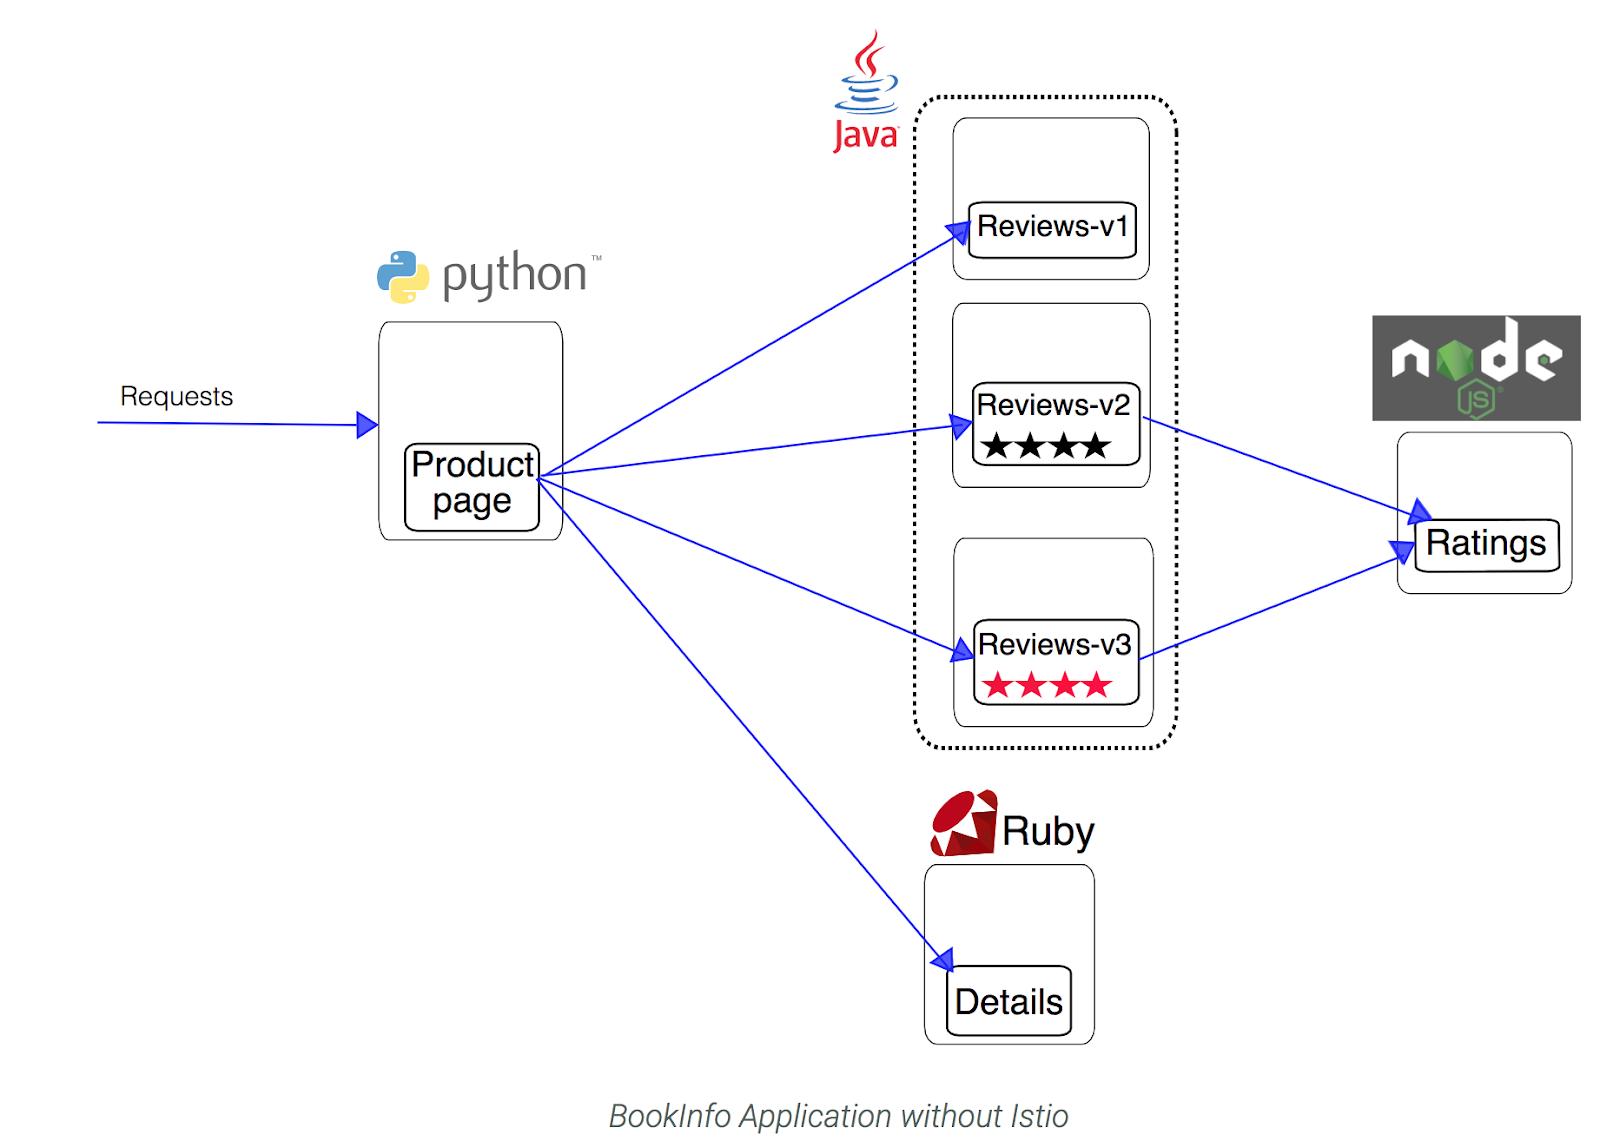
You can find the source code and all the other files used in this example in the Istio samples/bookinfo directory.
Deploy Bookinfo
-
Look at the
.yamlwhich describes the bookInfo application:istio_dir=$(ls -d istio-* | tail -n 1) cd $istio_dir cat samples/bookinfo/platform/kube/bookinfo.yaml Look for
containersto see that each deployment has one container, for each version of each service in the Bookinfo application. -
In Cloud Shell, use the following command to
injectthe proxy sidecar along with each application Pod that is deployed:kubectl apply -f samples/bookinfo/platform/kube/bookinfo.yaml Note: Istio uses an extended version of the open-source Envoy proxy, a high-performance proxy developed in C++, to mediate all inbound and outbound traffic for all services in the service mesh.
Istio leverages Envoy's many built-in features including dynamic service discovery, load balancing, TLS termination, HTTP/2 & gRPC proxying, circuit breakers, health checks, staged rollouts with %-based traffic split, fault injection, and rich metrics.Output:
service/details created serviceaccount/bookinfo-details created deployment.apps/details-v1 created service/ratings created serviceaccount/bookinfo-ratings created deployment.apps/ratings-v1 created service/reviews created serviceaccount/bookinfo-reviews created deployment.apps/reviews-v1 created deployment.apps/reviews-v2 created deployment.apps/reviews-v3 created service/productpage created serviceaccount/bookinfo-productpage created deployment.apps/productpage-v1 created
Click Check my progress to verify the objective.
Enable external access using an Istio Ingress Gateway
Now that the Bookinfo services are up and running, you need to make the application accessible from outside of your Kubernetes cluster, e.g. from a browser. An Istio Gateway is used for this purpose.
-
Look at the
.yamlwhich describes the configuration for the application ingress gateway:cat samples/bookinfo/networking/bookinfo-gateway.yaml Look for the
GatewayandVirtualServicemesh resources which get deployed. TheGatewayexposes services to users outside the service mesh, and allows Istio features such as monitoring and route rules to be applied to traffic entering the cluster. -
Configure the ingress gateway for the application, which exposes an external IP you will use later:
kubectl apply -f samples/bookinfo/networking/bookinfo-gateway.yaml Output:
gateway.networking.istio.io/bookinfo-gateway created virtualservice.networking.istio.io/bookinfo created
Verify the Bookinfo deployments
-
Confirm that the application has been deployed correctly, review services, pods, and the ingress gateway:
kubectl get services Output:
NAME TYPE ... details ClusterIP ... kubernetes ClusterIP ... productpage ClusterIP ... ratings ClusterIP ... reviews ClusterIP ... -
Review running application pods:
kubectl get pods Output:
NAME READY STATUS RESTARTS AGE details-v1-79f774bdb9-6l54w 2/2 Running 0 101s productpage-v1-6b746f74dc-4xccm 2/2 Running 0 100s ratings-v1-b6994bb9-7g4z2 2/2 Running 0 100s reviews-v1-545db77b95-hkh9p 2/2 Running 0 100s reviews-v2-7bf8c9648f-cmsxj 2/2 Running 0 100s reviews-v3-84779c7bbc-8b8qp 2/2 Running 0 100s You may need to re-run this command until you see that all six pods are in Running status.
-
Confirm that the Bookinfo application is running by sending a
curlrequest to it from some Pod, within the cluster, for example fromratings:kubectl exec -it $(kubectl get pod -l app=ratings \ -o jsonpath='{.items[0].metadata.name}') \ -c ratings -- curl productpage:9080/productpage | grep -o "<title>.*</title>" Output:
Simple Bookstore App -
Confirm the ingress gateway has been created:
kubectl get gateway Output:
NAME AGE bookinfo-gateway 20m -
Get the external IP address of the ingress gateway:
kubectl get svc istio-ingressgateway -n istio-system Output:
NAME TYPE ... EXTERNAL-IP ... istio-ingressgateway LoadBalancer ... 34.72.220.30 ... In this example, the external IP of the ingress gateway is
34.72.220.30. -
Now run the following command, replacing
[EXTERNAL-IP]with the external IP that was outputted from the previous command:export GATEWAY_URL=[EXTERNAL-IP] -
Check that the Bookinfo app is running by sending a
curlrequest to it from outside the cluster:curl -I http://${GATEWAY_URL}/productpage Output:
HTTP/1.1 200 OK content-type: text/html; charset=utf-8 content-length: 4183 server: istio-envoy ...
Task 7. Use the Bookinfo application
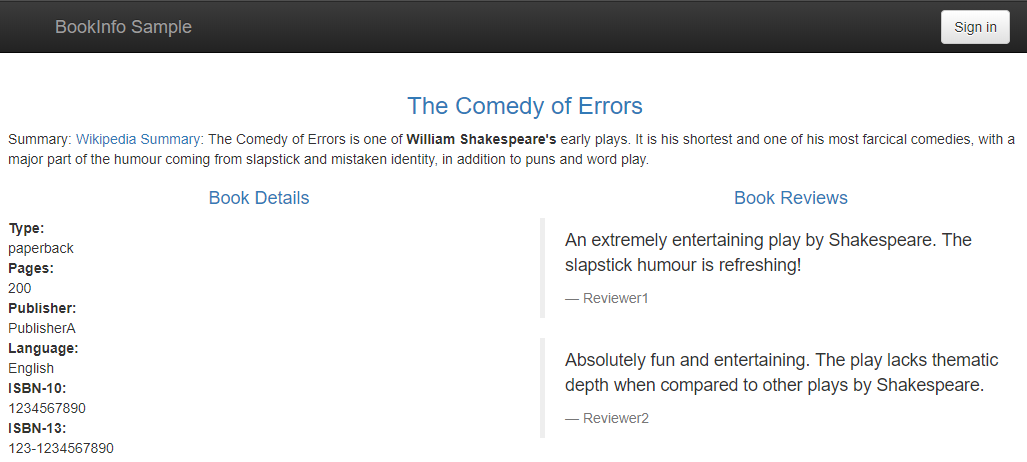
Try the application in your Web browser
-
Point your browser to
http://[$GATEWAY_URL]/productpageto see the BookInfo web page. Don't forget to replace[$GATEWAY_URL]with your working external IP address. -
Refresh the page several times.
Notice how you see three different versions of reviews, since we have not yet used Istio to control the version routing.
There are three different book review services being called in a round-robin style:
- no stars
- black stars
- red stars
Switching among the three is normal Kubernetes routing/balancing behavior.
Generate a steady background load
Run the siege utility to simulate traffic to Bookinfo.
-
In Cloud Shell, install siege:
Siege is a utility for generating load against Web sites.
sudo apt install siege -
Use siege to create traffic against your services:
siege http://${GATEWAY_URL}/productpage
Task 8. Evaluate service performance using the Anthos Service Mesh dashboard
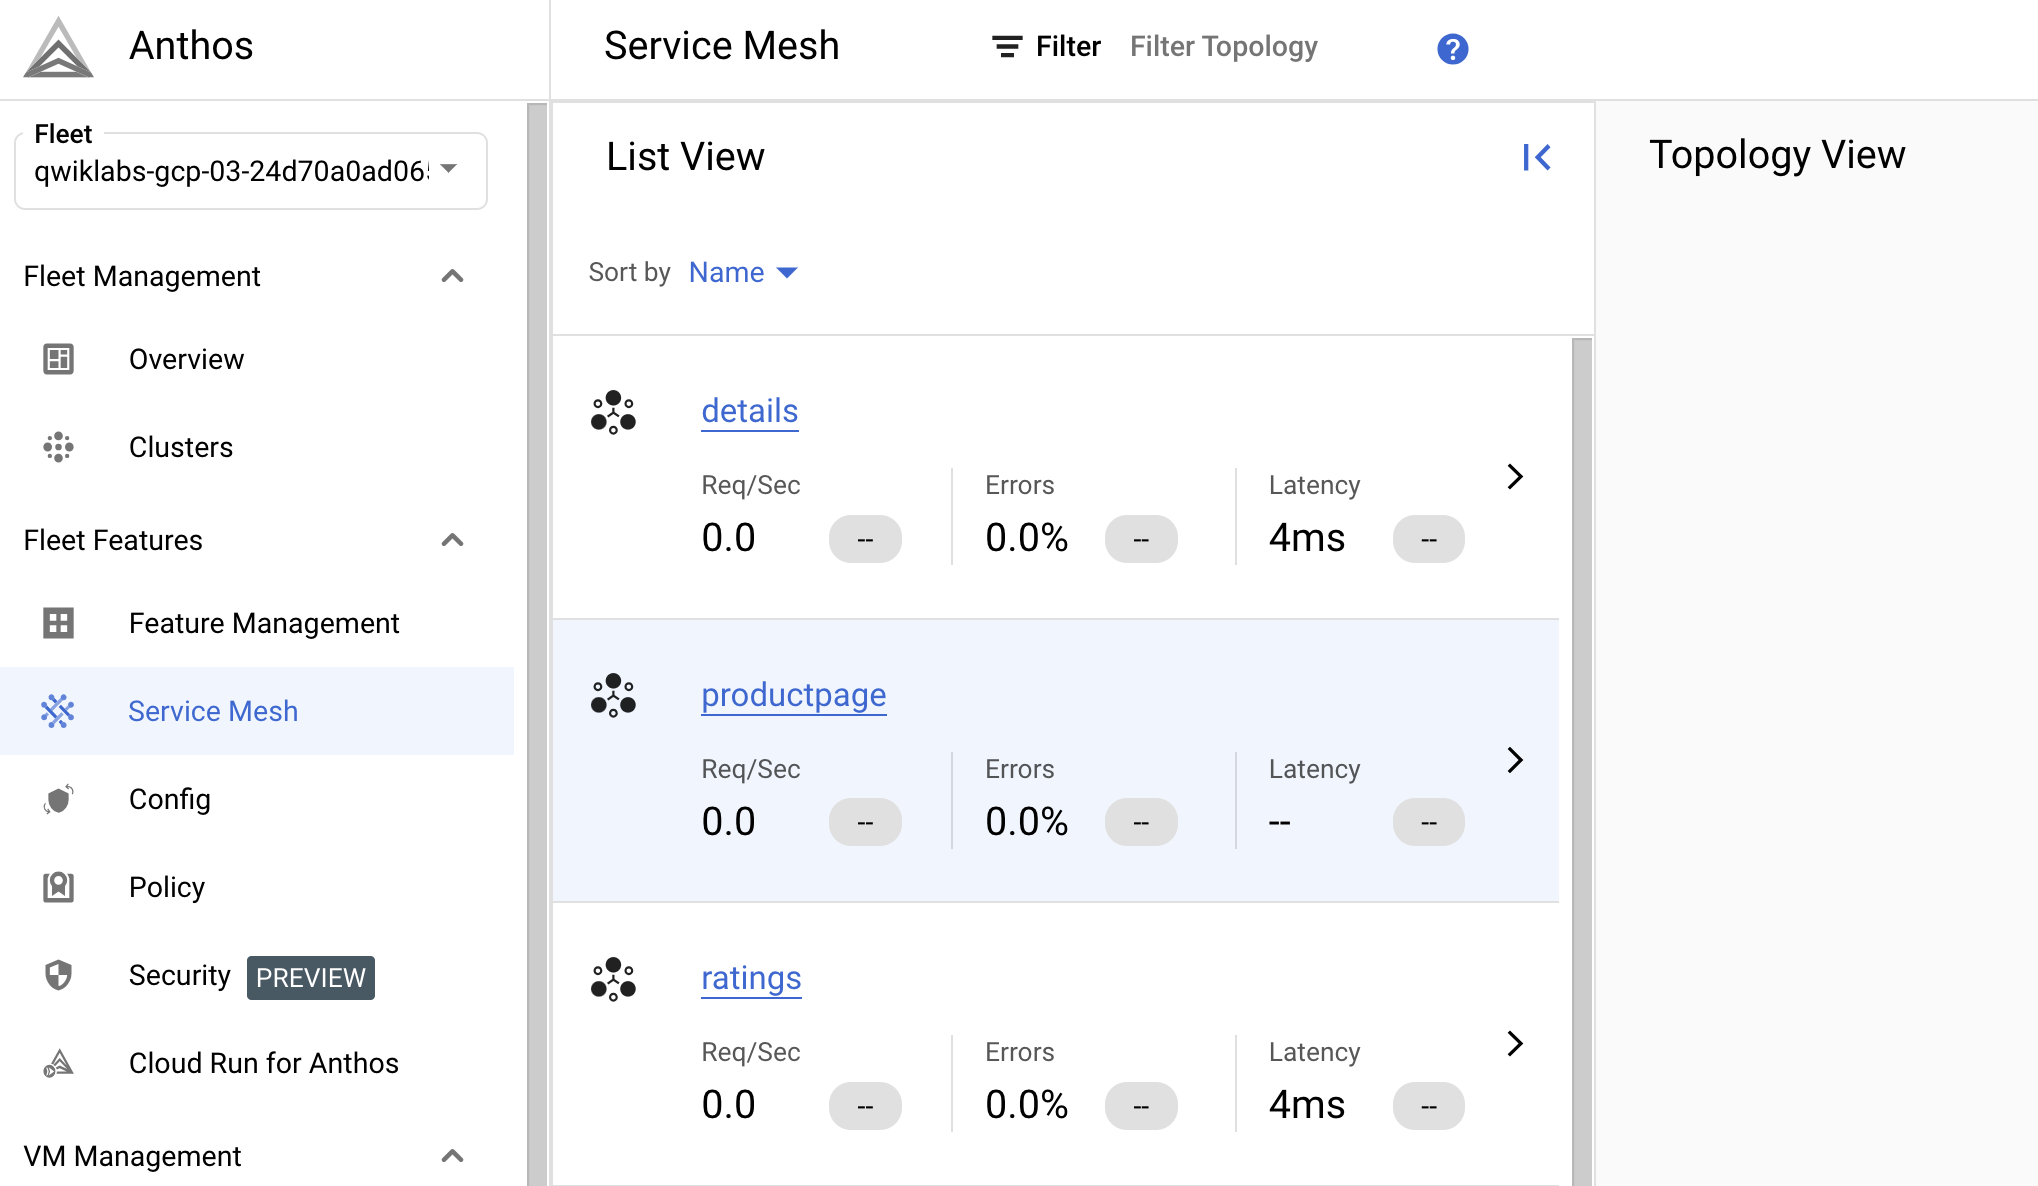
Gather data from the Services table view.
- In the Console, go to Navigation menu > Anthos > Service Mesh.
If prompted, click Enable to enable the Anthos API.
-
On the bottom half of the window, you will see a Service section.
How many services are listed?
-
Click on the productpage service to drill down and see more details.
Note the summary at the top detailing current requests/second, error rates, latencies, and resource usage.
If you don't see Requests > 0, try exiting and re-entering the productpage service after a few minutes.
-
On the left side of the window, click on the Metrics option. Explore the different graphs and their breakdown options.
- What is the current request rate, and how has it changed over time?
- What is the current error rate, and how has it changed over time?
- What latencies do you see charted?
- What is the median request size?
- What is median response size?
- What is the aggregate cpu usage?
-
Click on the Connected Services option from the left side.
This lists other services that make inbound requests of the productpage, and services the productpage makes outbound requests to.
- What services make calls to the productpage service?
- What services does the productpage service call?
- Is mTLS enforced on inter-service calls?
Note: The ratings service does not normally send requests to the productpage service. The ratings service is shown here because you used the ratings service to issue a test request as part of this lab. -
Return to the Anthos Service Mesh dashboard by clicking on the Anthos Service Mesh logo in the upper left corner.
At this time, you can explore or drill down on other services.
The top section of the dashboard shows information about Service Level Objectives (SLOs) and Alerts.
SLOs are targets for Service Level Indicators (SLIs); they embody your definition of how well a service should perform. An example SLO would be 99.9% of hourly requests return a 200 response. You might define an alerting policy that pages on-call staff when your service is failing to meet its SLOs.
Look for other labs where you can define and test SLOs!Use the Topology view to better visualize your mesh
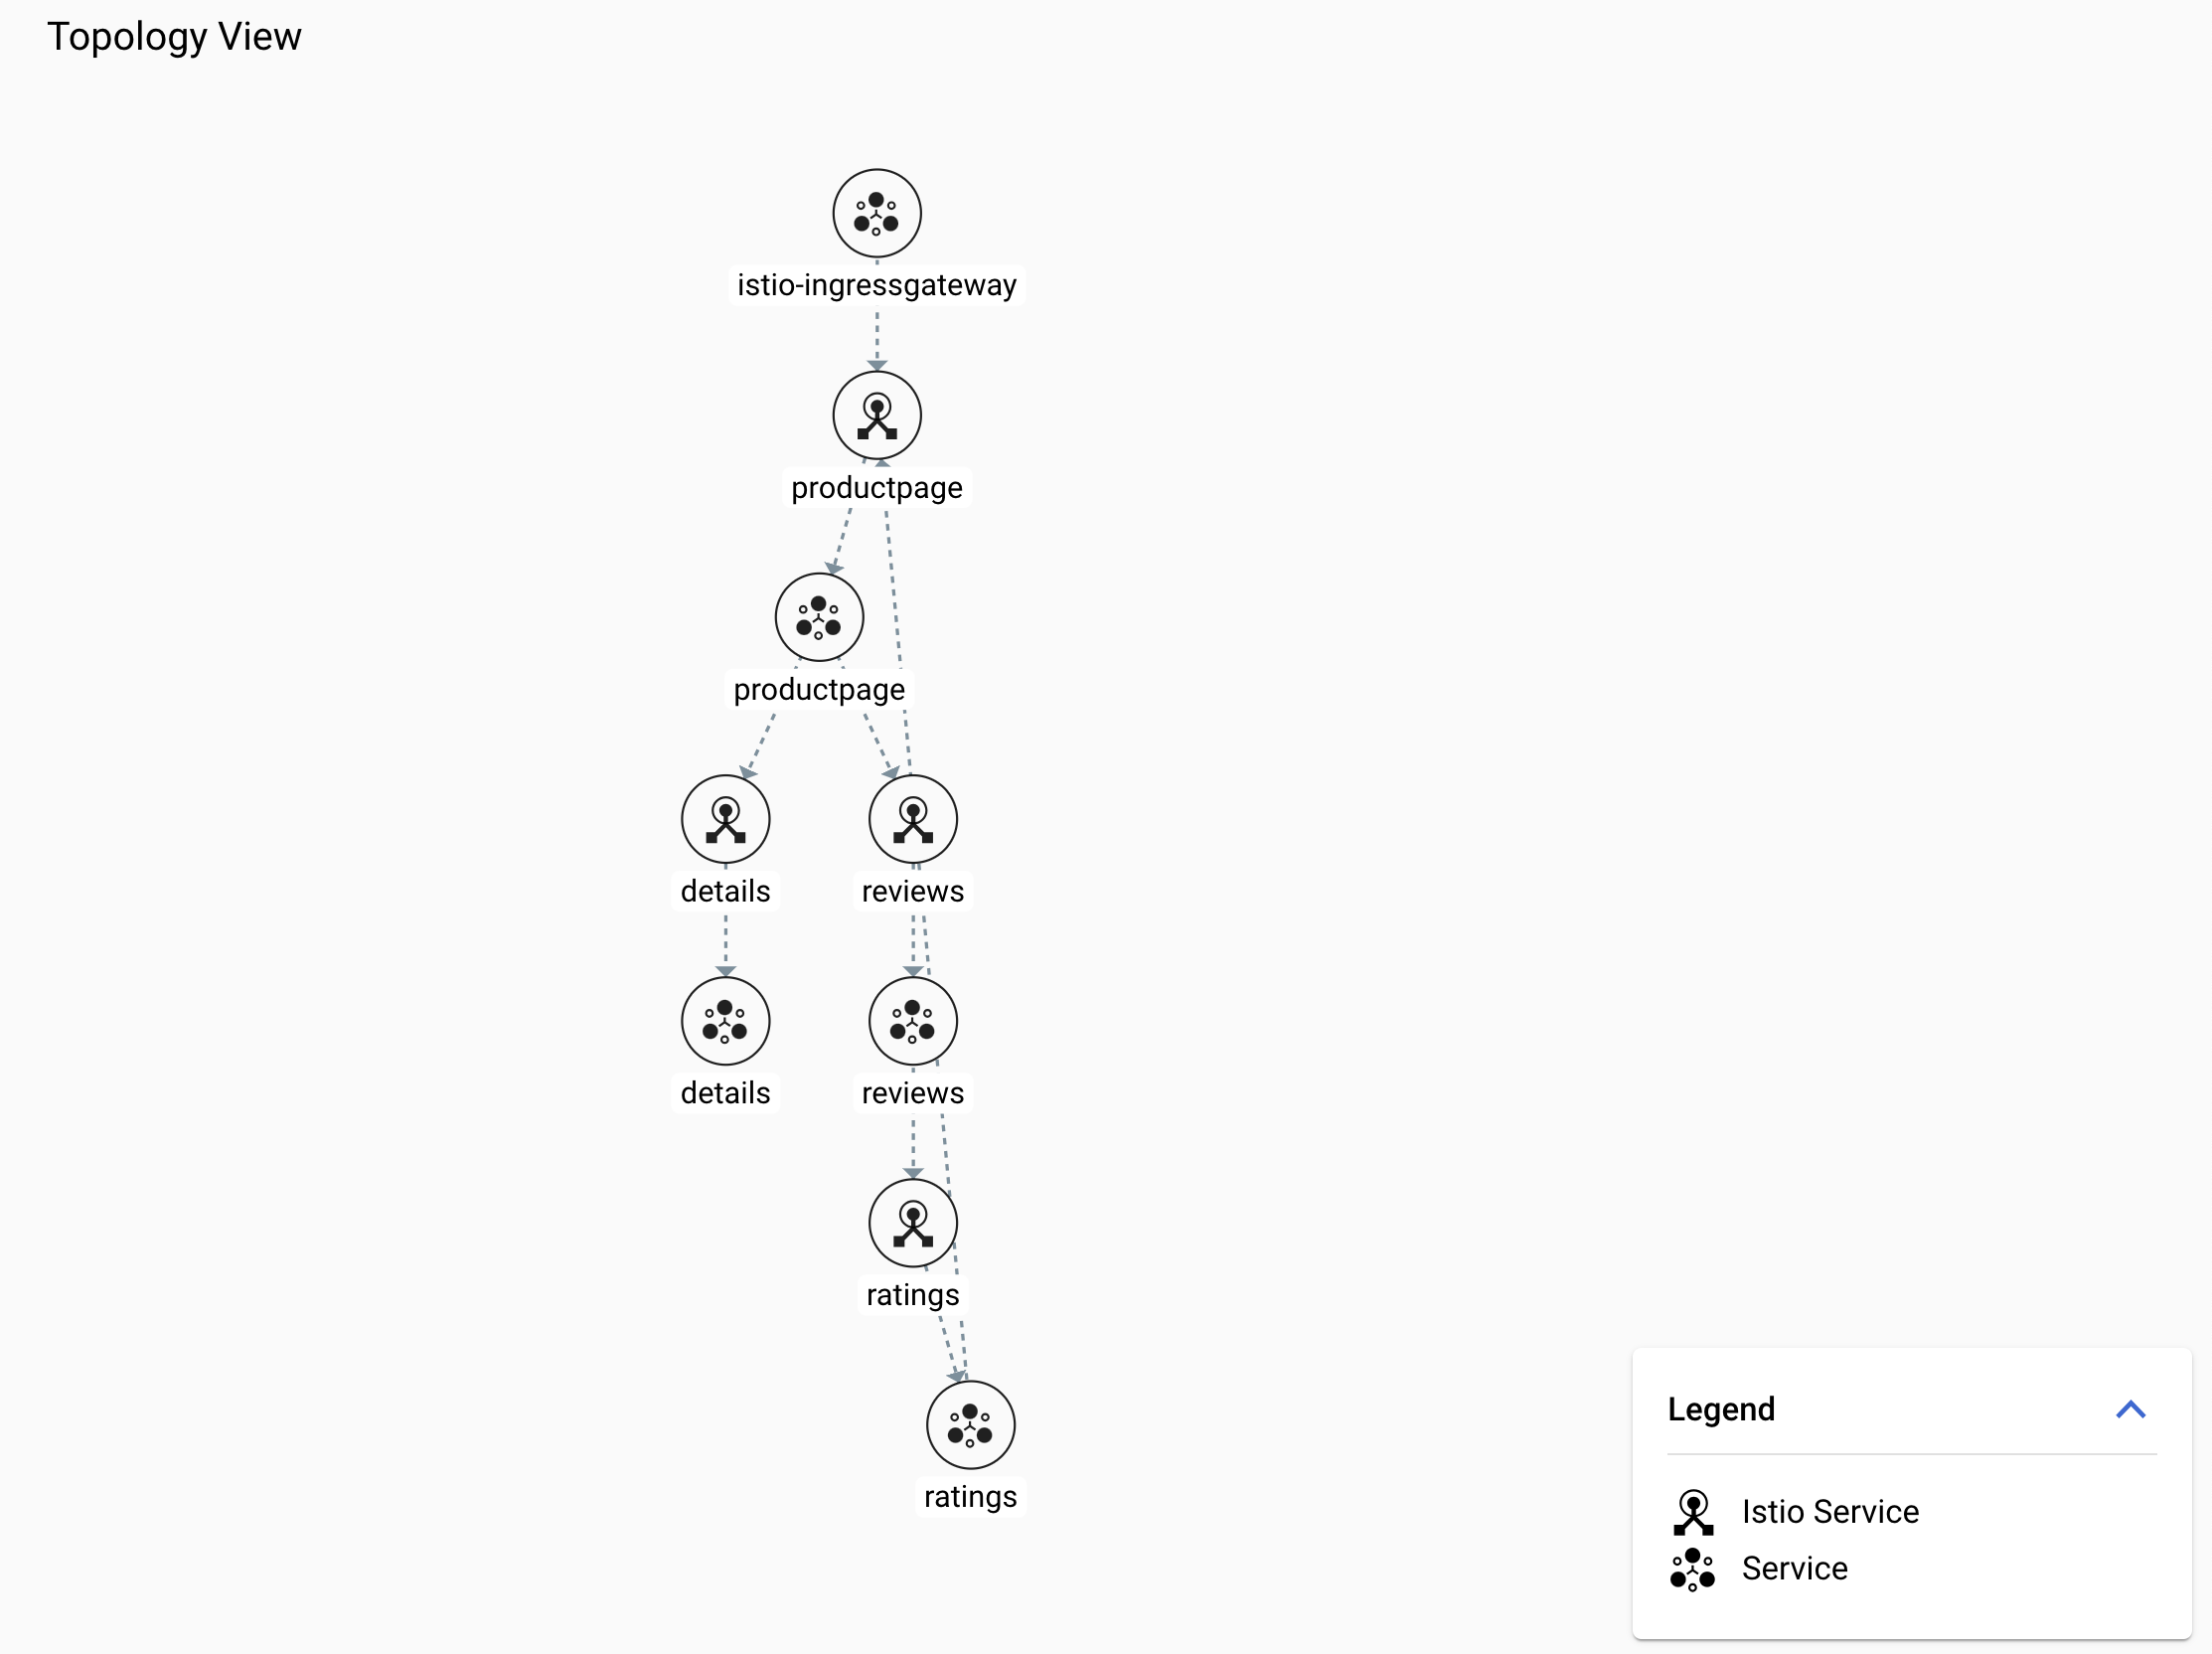
-
On the Anthos Service Mesh dashboard, view the topology on the right side of the window.
Here you may need to wait a few minutes for the topology graph to appear.
-
Rearrange the nodes in the graph until you can easily visualize the relationships between services and workloads.
Remember, external requests start at productpage. You can scroll back and study the Bookinfo architecture diagram at the Bookinfo Overview.
Your drawing might look something like this:
Note: You may need to click on Expand to see all the nodes. -
Click on the productpage service node.
You should see a service details card:
- How many requests per second is this service receiving?
- What are the median and 99% latencies?
-
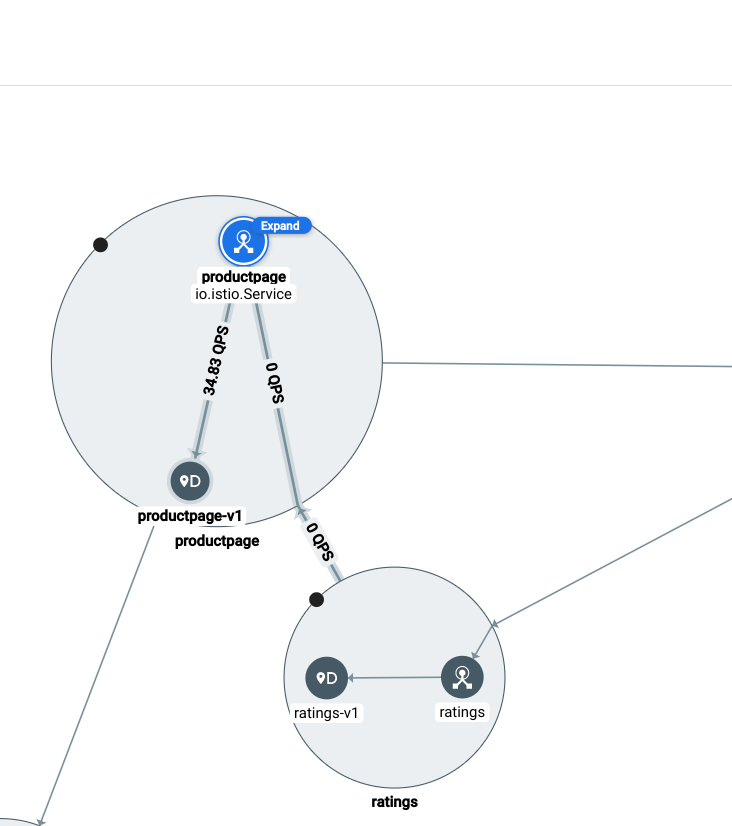
Now, hover over each of the service nodes and notice edge stats.
- How many requests/second is the productpage service receiving, and from where?
- How many requests per second is the service forwarding to the productpage-v1 workload?
You should see traffic details like this:
-
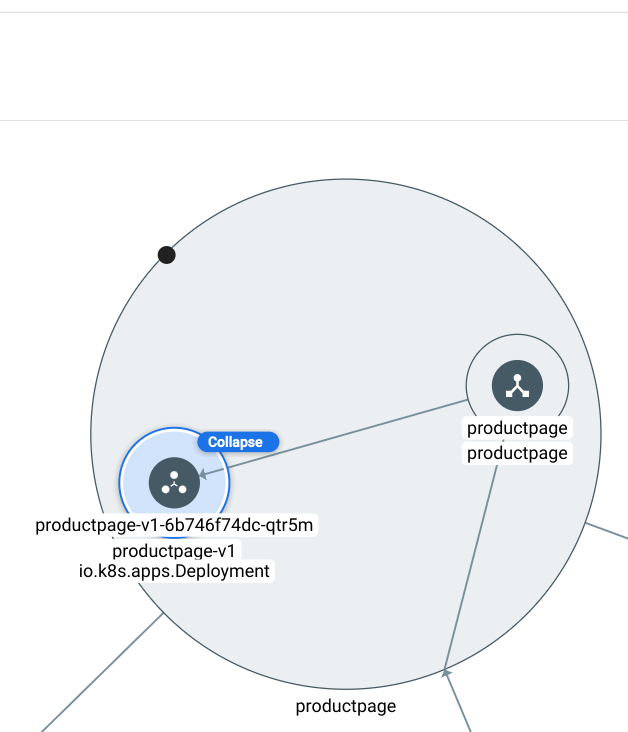
Drill down on one of the workloads until you can see the deployment, the replica set, and the Pods.
It should look something like this:

Congratulations!
In this lab, you deployed a GKE cluster, Anthos Service Mesh, and an Istio-enabled application. You also used the Anthos Service Mesh dashboard to better understand the service performance and topology of your application.
Next steps / Learn more
Google Cloud training and certification
...helps you make the most of Google Cloud technologies. Our classes include technical skills and best practices to help you get up to speed quickly and continue your learning journey. We offer fundamental to advanced level training, with on-demand, live, and virtual options to suit your busy schedule. Certifications help you validate and prove your skill and expertise in Google Cloud technologies.
Manual Last Updated January 22, 2024
Lab Last Tested January 22, 2024
Copyright 2024 Google LLC All rights reserved. Google and the Google logo are trademarks of Google LLC. All other company and product names may be trademarks of the respective companies with which they are associated.