チェックポイント
Create a Cloud Pub/Sub topic
/ 10
Generate some Compute Engine log messages
/ 10
Configure Stackdriver log export
/ 20
Create a simple Cloud Function
/ 20
Update Cloud Function logic to add VM metadata
/ 20
Trigger the Cloud Function by creating a VM
/ 20
Responding to Cloud Logging Messages with Cloud Functions
- GSP447
- Overview
- Setup and requirements
- Task 1. Create a Cloud Pub/Sub topic
- Task 2. Generate some Compute Engine log messages
- Task 3. Configure filters
- Task 4. Configure log export
- Task 5. Create a simple Cloud Function
- Task 6. Update Cloud Function logic to add VM metadata
- Task 7. Trigger the Cloud Function by creating a VM
- Congratulations
- End your lab
GSP447

Overview
In this lab, you will learn how to use Cloud Functions to perform lightweight processing of Cloud Logging messages.
Use case: You want to track creation of Compute Engine virtual machine (VM) instances and ensure that each instance is tagged with the user that created it. Here are the high-level steps involved:
- VM instance creation generates log messages
- Cloud Logging sends the log messages to Cloud Pub/Sub as a sink destination
- Cloud Pub/Sub topic triggers a Cloud Function
- Cloud Function updates the VM metadata to include the user who created the VM
What you'll learn
- How to filter and export Cloud Logging messages to Cloud Pub/Sub
- How to trigger Cloud Functions from Pub/Sub
- How to write a Cloud Function to do simple processing
- How to update a VM's metadata
Setup and requirements
Before you click the Start Lab button
Read these instructions. Labs are timed and you cannot pause them. The timer, which starts when you click Start Lab, shows how long Google Cloud resources will be made available to you.
This hands-on lab lets you do the lab activities yourself in a real cloud environment, not in a simulation or demo environment. It does so by giving you new, temporary credentials that you use to sign in and access Google Cloud for the duration of the lab.
To complete this lab, you need:
- Access to a standard internet browser (Chrome browser recommended).
- Time to complete the lab---remember, once you start, you cannot pause a lab.
How to start your lab and sign in to the Google Cloud console
-
Click the Start Lab button. If you need to pay for the lab, a pop-up opens for you to select your payment method. On the left is the Lab Details panel with the following:
- The Open Google Cloud console button
- Time remaining
- The temporary credentials that you must use for this lab
- Other information, if needed, to step through this lab
-
Click Open Google Cloud console (or right-click and select Open Link in Incognito Window if you are running the Chrome browser).
The lab spins up resources, and then opens another tab that shows the Sign in page.
Tip: Arrange the tabs in separate windows, side-by-side.
Note: If you see the Choose an account dialog, click Use Another Account. -
If necessary, copy the Username below and paste it into the Sign in dialog.
{{{user_0.username | "Username"}}} You can also find the Username in the Lab Details panel.
-
Click Next.
-
Copy the Password below and paste it into the Welcome dialog.
{{{user_0.password | "Password"}}} You can also find the Password in the Lab Details panel.
-
Click Next.
Important: You must use the credentials the lab provides you. Do not use your Google Cloud account credentials. Note: Using your own Google Cloud account for this lab may incur extra charges. -
Click through the subsequent pages:
- Accept the terms and conditions.
- Do not add recovery options or two-factor authentication (because this is a temporary account).
- Do not sign up for free trials.
After a few moments, the Google Cloud console opens in this tab.

Activate Cloud Shell
Cloud Shell is a virtual machine that is loaded with development tools. It offers a persistent 5GB home directory and runs on the Google Cloud. Cloud Shell provides command-line access to your Google Cloud resources.
- Click Activate Cloud Shell
at the top of the Google Cloud console.
When you are connected, you are already authenticated, and the project is set to your Project_ID,
gcloud is the command-line tool for Google Cloud. It comes pre-installed on Cloud Shell and supports tab-completion.
- (Optional) You can list the active account name with this command:
- Click Authorize.
Output:
- (Optional) You can list the project ID with this command:
Output:
gcloud, in Google Cloud, refer to the gcloud CLI overview guide.
Task 1. Create a Cloud Pub/Sub topic
Start by creating a Pub/Sub topic that will hold the log messages exported from Cloud Logging.
- In Cloud Shell, run the following to create a Cloud Pub/Sub topic named
vm-audit-logs:
Click Check my progress to verify the objective.
Task 2. Generate some Compute Engine log messages
The use case is to respond to log messages generated by Compute Engine VM creation operations. Before you can respond to the log messages, you need to know what those messages look like. Now you will perform some simple Compute Engine operations to generate some sample log messages.
- Set an environment variable for the Compute Engine zone:
- Now create a virtual machine instance in your selected zone. This machine is created only to generate log messages, you can use the defaults.
After a minute or so you will receive confirmation on the command line that the VM creation operation has completed.
- In order to have log messages for different VM operations, which will make the log filtering more interesting, you can now stop the instance:
Click Check my progress to verify the objective.
Task 3. Configure filters
Cloud Logging can export logs to Cloud Storage, BigQuery, and Cloud Pub/Sub. You can include or exclude log messages from the export using filters.
Next, you will define a filter that captures audit log messages that indicate a VM has been created.
-
In the Console, navigate to Navigation menu > Logging > Logs Explorer:
-
First, do some coarse-grained filtering of the log messages so you only see important messages related to Compute Engine VM instances. You will define a Basic Filter in the Console:
- In the Resource drop-down, select VM Instance > All instance_id and click Apply.
- In the Log name drop-down, search for
cloudaudit.googleapis.comand select activity. Click Apply.
You should now see a much smaller number of messages.
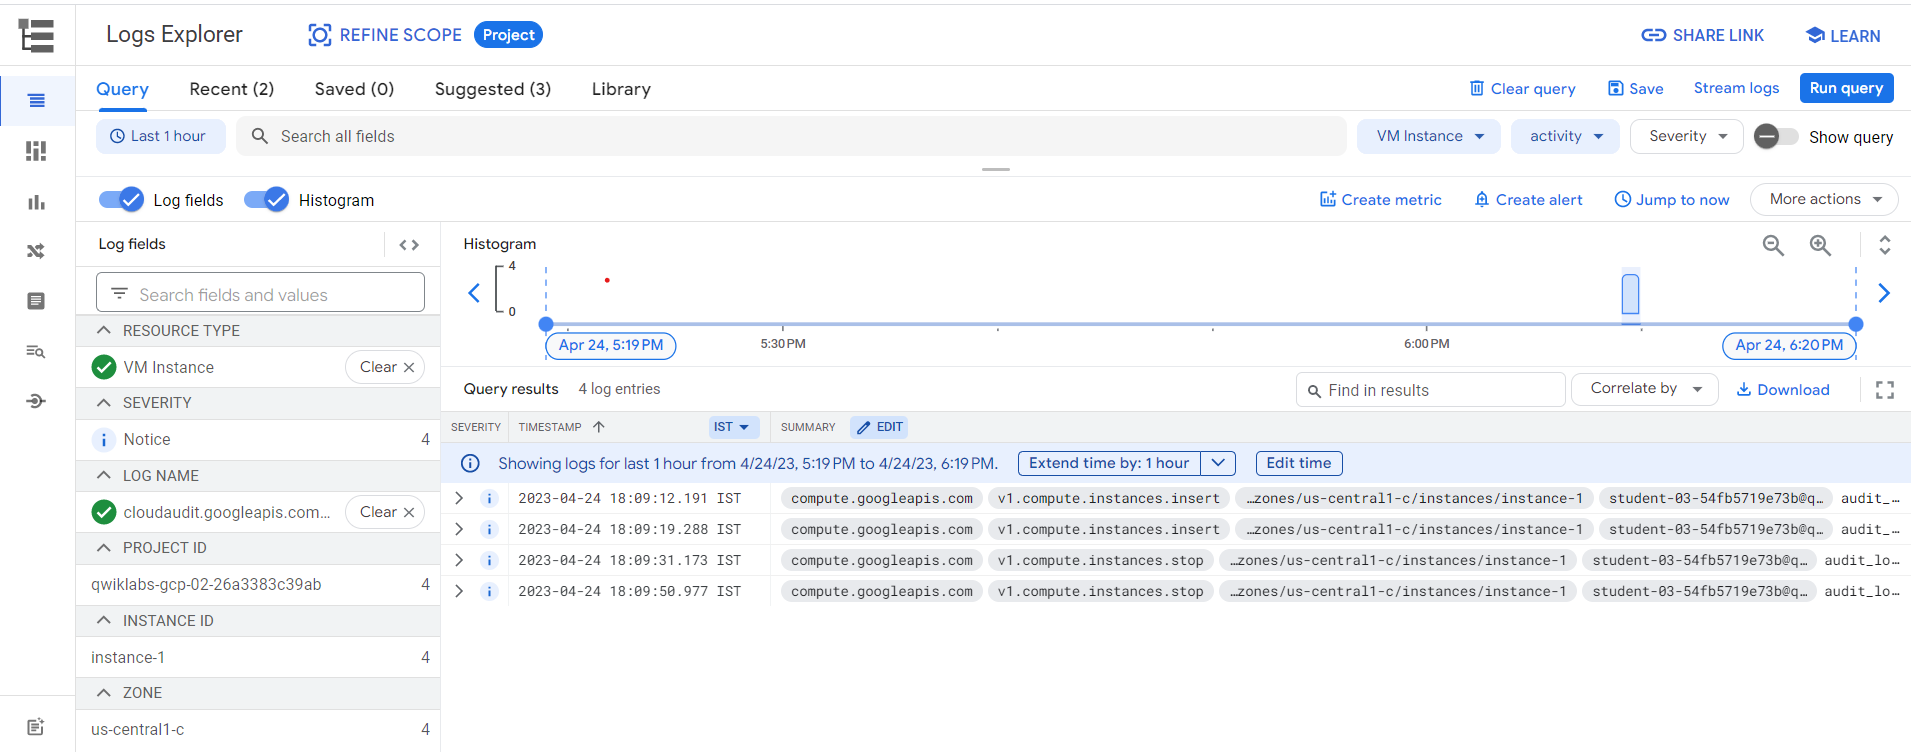
The view pane is now displaying all audit activity logs for Compute Engine. You should see log messages relating to both the "insert" (create) and "stop" operations you performed in the previous step.
- The use case also requires that only log messages for a successful "insert" operation be captured. For that you need to define an Advanced Filter.
- Expand an "insert" log message to view its full JSON. (You expand the message by clicking on the triangle-shaped icon on the left hand side of each log entry in the list)
- Expand the
protoPayloadelement and examine the contents - Click on the
methodName: "v1.compute.instances.insert"line and then click Show matching entries. - On the top of your screen the Basic Filter drop-downs have been replaced with the Advanced Filter textbox. The advanced filter conditions include the basic filter elements you set via the drop-down boxes
- Now only "insert" log messages are displayed in the view pane
- For the use case, you only want to take action when the VM insert operation has finished. You need to add additional conditions to further filter the messages:
- Expand the last log message in the pane
- Expand the
operationelement - Click on the
last: trueline and select "Show matching entries" - The advanced filter conditions have been updated to include the operation.
You should now see only a single insert log message in the view pane. Your Advanced Filter should look something like this (Enable the Show query toggle if required):

Task 4. Configure log export
In the previous step, you defined a filter that captures audit log messages that indicate a VM has been created. Next, you will create a Cloud Logging export that sends the captured messages to the Cloud Pub/Sub topic you created earlier.
With your Advanced Filter still defined:
- Click on More Actions > Create Sink.
-
Sink Name:
instance-insert-sink, click Next. -
Select Sink Service:
Cloud Pub/Sub topic. -
Select a Cloud Pub/Sub topic:
vm-audit-logs(the Cloud Pub/Sub topic you created earlier as the sink destination). - Click Create sink.
Click Check my progress to verify the objective.
Task 5. Create a simple Cloud Function
Now that you have configured certain log messages to be sent to a Cloud Pub/Sub topic, the next step is to consume those messages and take appropriate action.
Cloud Functions provide a serverless, lightweight way to respond to events including Cloud Pub/Sub messages.
Create a very simple Cloud Function initially.
-
In the Console, navigate to the Navigation menu > Cloud Functions page.
-
Click Create Function.
-
Function Name:
addVmCreatorMetadata -
Region:
-
Trigger Type:
Cloud Pub/Sub -
Cloud Pub/Sub Topic: select the topic you created earlier:
vm-audit-logs, click Save and then click Next. -
Runtime:
Python 3.7
- Click Deploy. This can take a little while to complete.
Click Check my progress to verify the objective.
Task 6. Update Cloud Function logic to add VM metadata
In the previous step, you created a simple Cloud Function that executes in response to messages on a particular Cloud Pub/Sub topic. Now you will update the Cloud Function code so that it parses some information from the Pub/Sub message and then updates the VM metadata.
This time you will use gcloud rather than the UI to update the Cloud Function.
- In Cloud Shell make a new directory to hold your Cloud Function code:
- Execute the below command to create a new Python file called
main.pywith the below code in the new directory; then read through the code to understand its operation:
- Execute the following to create a new
requirements.txtfile with the required Python dependency:
- Execute the below command to update the Cloud Function you created earlier. Note that the
--sourceparameter references the directory that contains themain.pysource file andrequirements.txtdependency file:
--entry-point such that the tag_with_creator function will be called when the Cloud Function executes.-
Refresh the Cloud Functions page in the Console and verify that the Executed function field has been updated to the new
tag_with_creatorvalue.

Click Check my progress to verify the objective.
Task 7. Trigger the Cloud Function by creating a VM
Earlier in the lab you created a Cloud Logging export that runs anytime a Compute Engine VM is created, and the corresponding audit log messages are published to a Cloud Pub/Sub topic. In the previous step, you added a Cloud Function to consume these messages and then update the metadata of the newly created VM.
Time to test it end-to-end!
- In Cloud Shell, restart the virtual machine you created earlier:
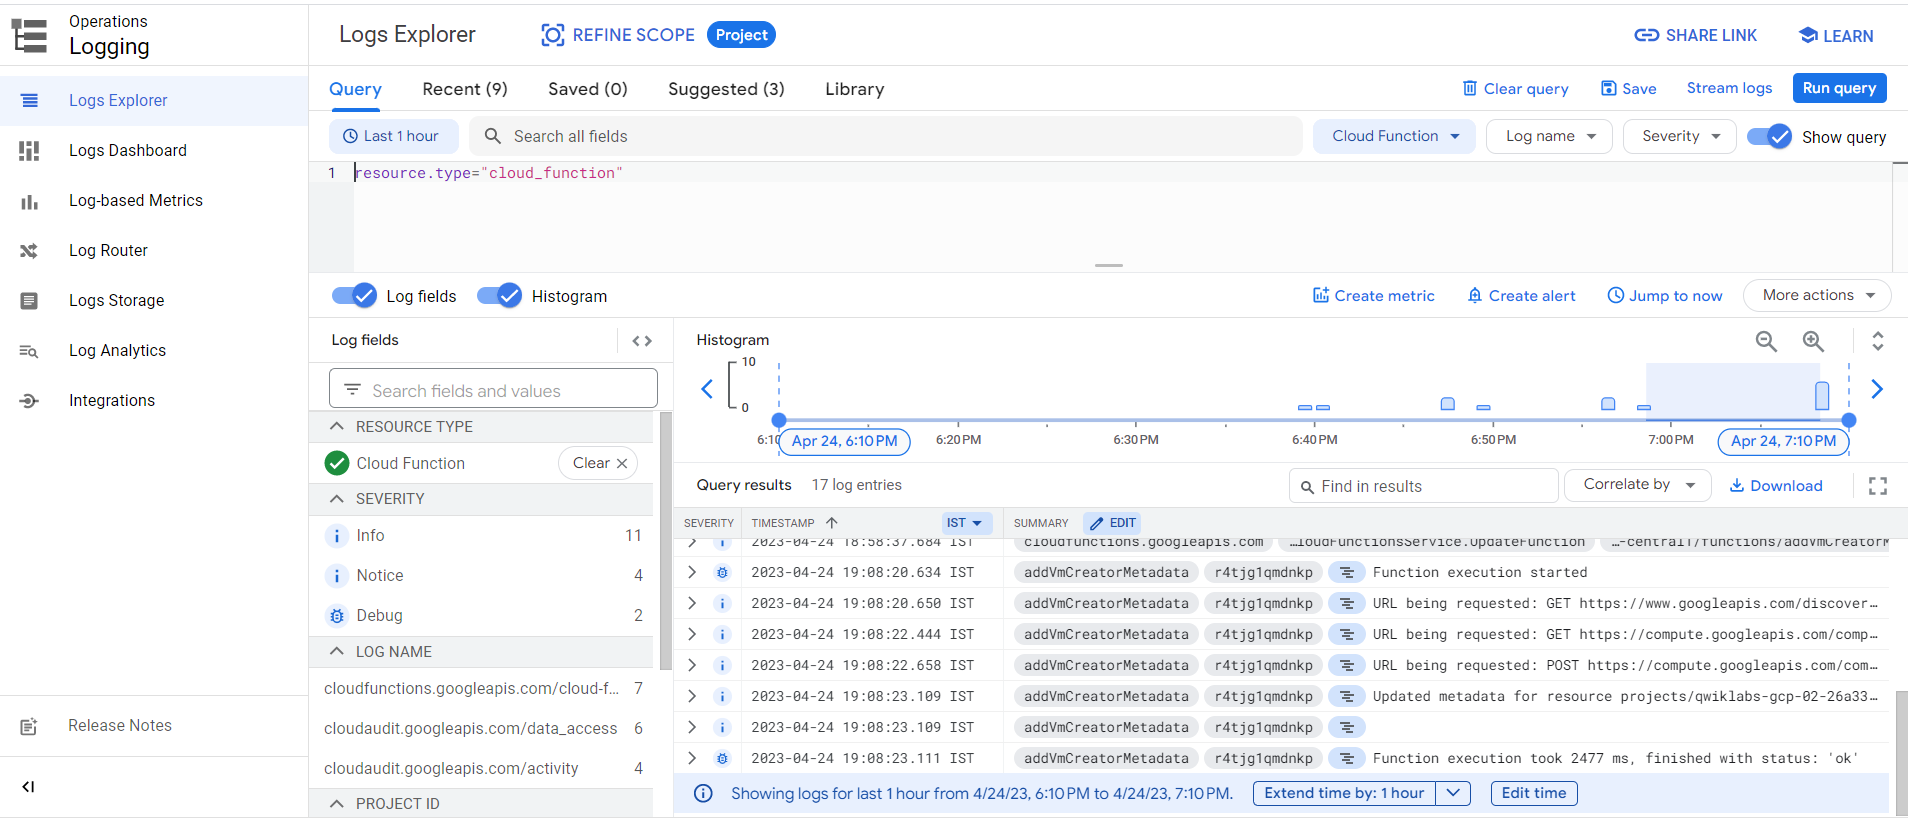
- Once the VM has completed starting, navigate to Navigation menu > Logging > Logs Explorer.
- In the Resource drop-down, select Cloud Function > addVmCreatorMetadata and click Apply. You should see some log messages relating to the creation and update of the function performed in the previous step.
Look at the log messages more closely. You should not see any log messages indicating that the addVmCreatorMetadata Cloud Function has executed.
Remember your export only sends insert (VM creation) messages to the Pub/Sub topic. So restarting an existing VM will not generate a message into the topic and hence the Cloud Function does not trigger.
- Create a new VM in Cloud Shell, which should trigger the Cloud Function:
- Once the VM creation has completed, go back to refresh the Logging view pane with the existing filter intact. You should now see some log messages, indicating that the Cloud Function executed.
- Examine the log messages and cross-reference with the function code to gain an understanding of the different steps.
- Navigate to Compute Engine > VM Instances and click on the
instance-2machine. Verify that the metadata for the newly created VM has been updated to include the email of the account that created it. - Scroll down through the details and verify that the Custom Metadata section has the creator key and expected email address added by the Cloud Function:

Click Check my progress to verify the objective.
Congratulations
You have now completed the Responding to Cloud Logging messages with Cloud Functions lab!
What you learned
- How to define Cloud Logging filters and export certain log messages to Cloud Pub/Sub
- How to create a Cloud Function that triggers from Pub/Sub messages
- How to update a Cloud Function with Python code that parses Cloud Logging log messages and calls the Compute Engine API to update a VM instance's metadata
Next steps / Learn more
- Learn more about Cloud Functions
- Learn more about Google Cloud's operations suite
- Learn more about Serverless on Google Cloud
End your lab
When you have completed your lab, click End Lab. Your account and the resources you've used are removed from the lab platform.
You will be given an opportunity to rate the lab experience. Select the applicable number of stars, type a comment, and then click Submit.
The number of stars indicates the following:
- 1 star = Very dissatisfied
- 2 stars = Dissatisfied
- 3 stars = Neutral
- 4 stars = Satisfied
- 5 stars = Very satisfied
You can close the dialog box if you don't want to provide feedback.
For feedback, suggestions, or corrections, please use the Support tab.
Manual Last Updated October 30, 2023
Lab Last Tested October 31, 2023
Copyright 2024 Google LLC All rights reserved. Google and the Google logo are trademarks of Google LLC. All other company and product names may be trademarks of the respective companies with which they are associated.